1964-1972 Pontiac GTO Air Ride Suspension Kit | Elite Plus Package
“The kit price includes free shipping to the lower 48.”
$2,995.00
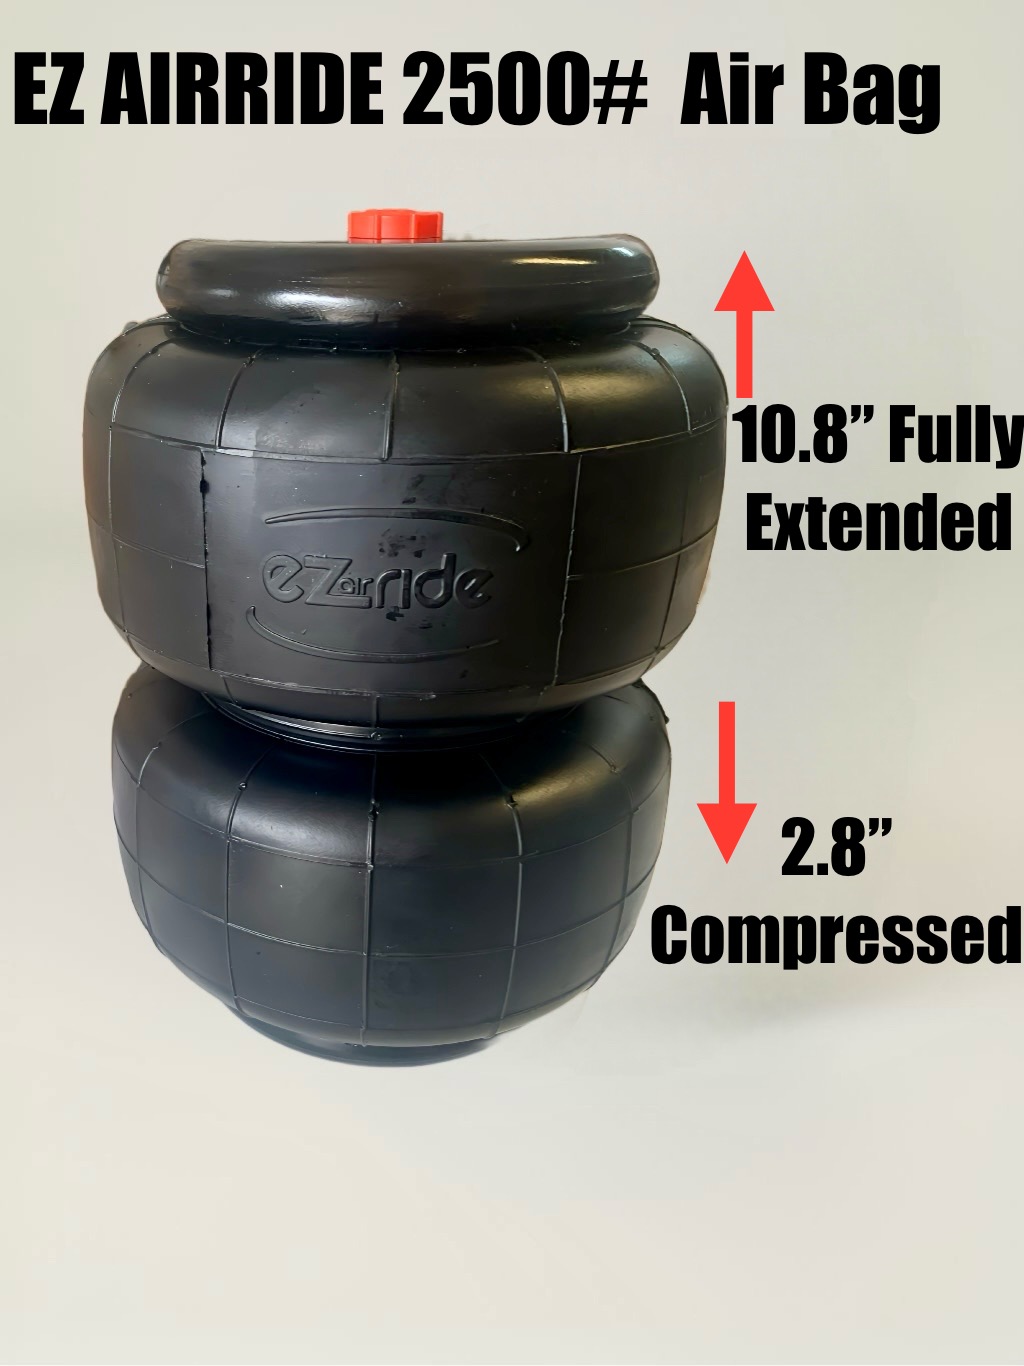
We don’t believe in “one-size-fits-all” bracket setups or inferior, low-stroke towing helper bags designed for full-size pickups. Every vehicle platform we produce features proprietary brackets paired with our exclusive 2500-series airbags that deliver up to 8″ of true, usable stroke. Engineered to handle everything from stock small blocks to heavy, cast-iron big blocks, this setup gives you the ultimate balance of a slammed stance and uncompromised ride quality.
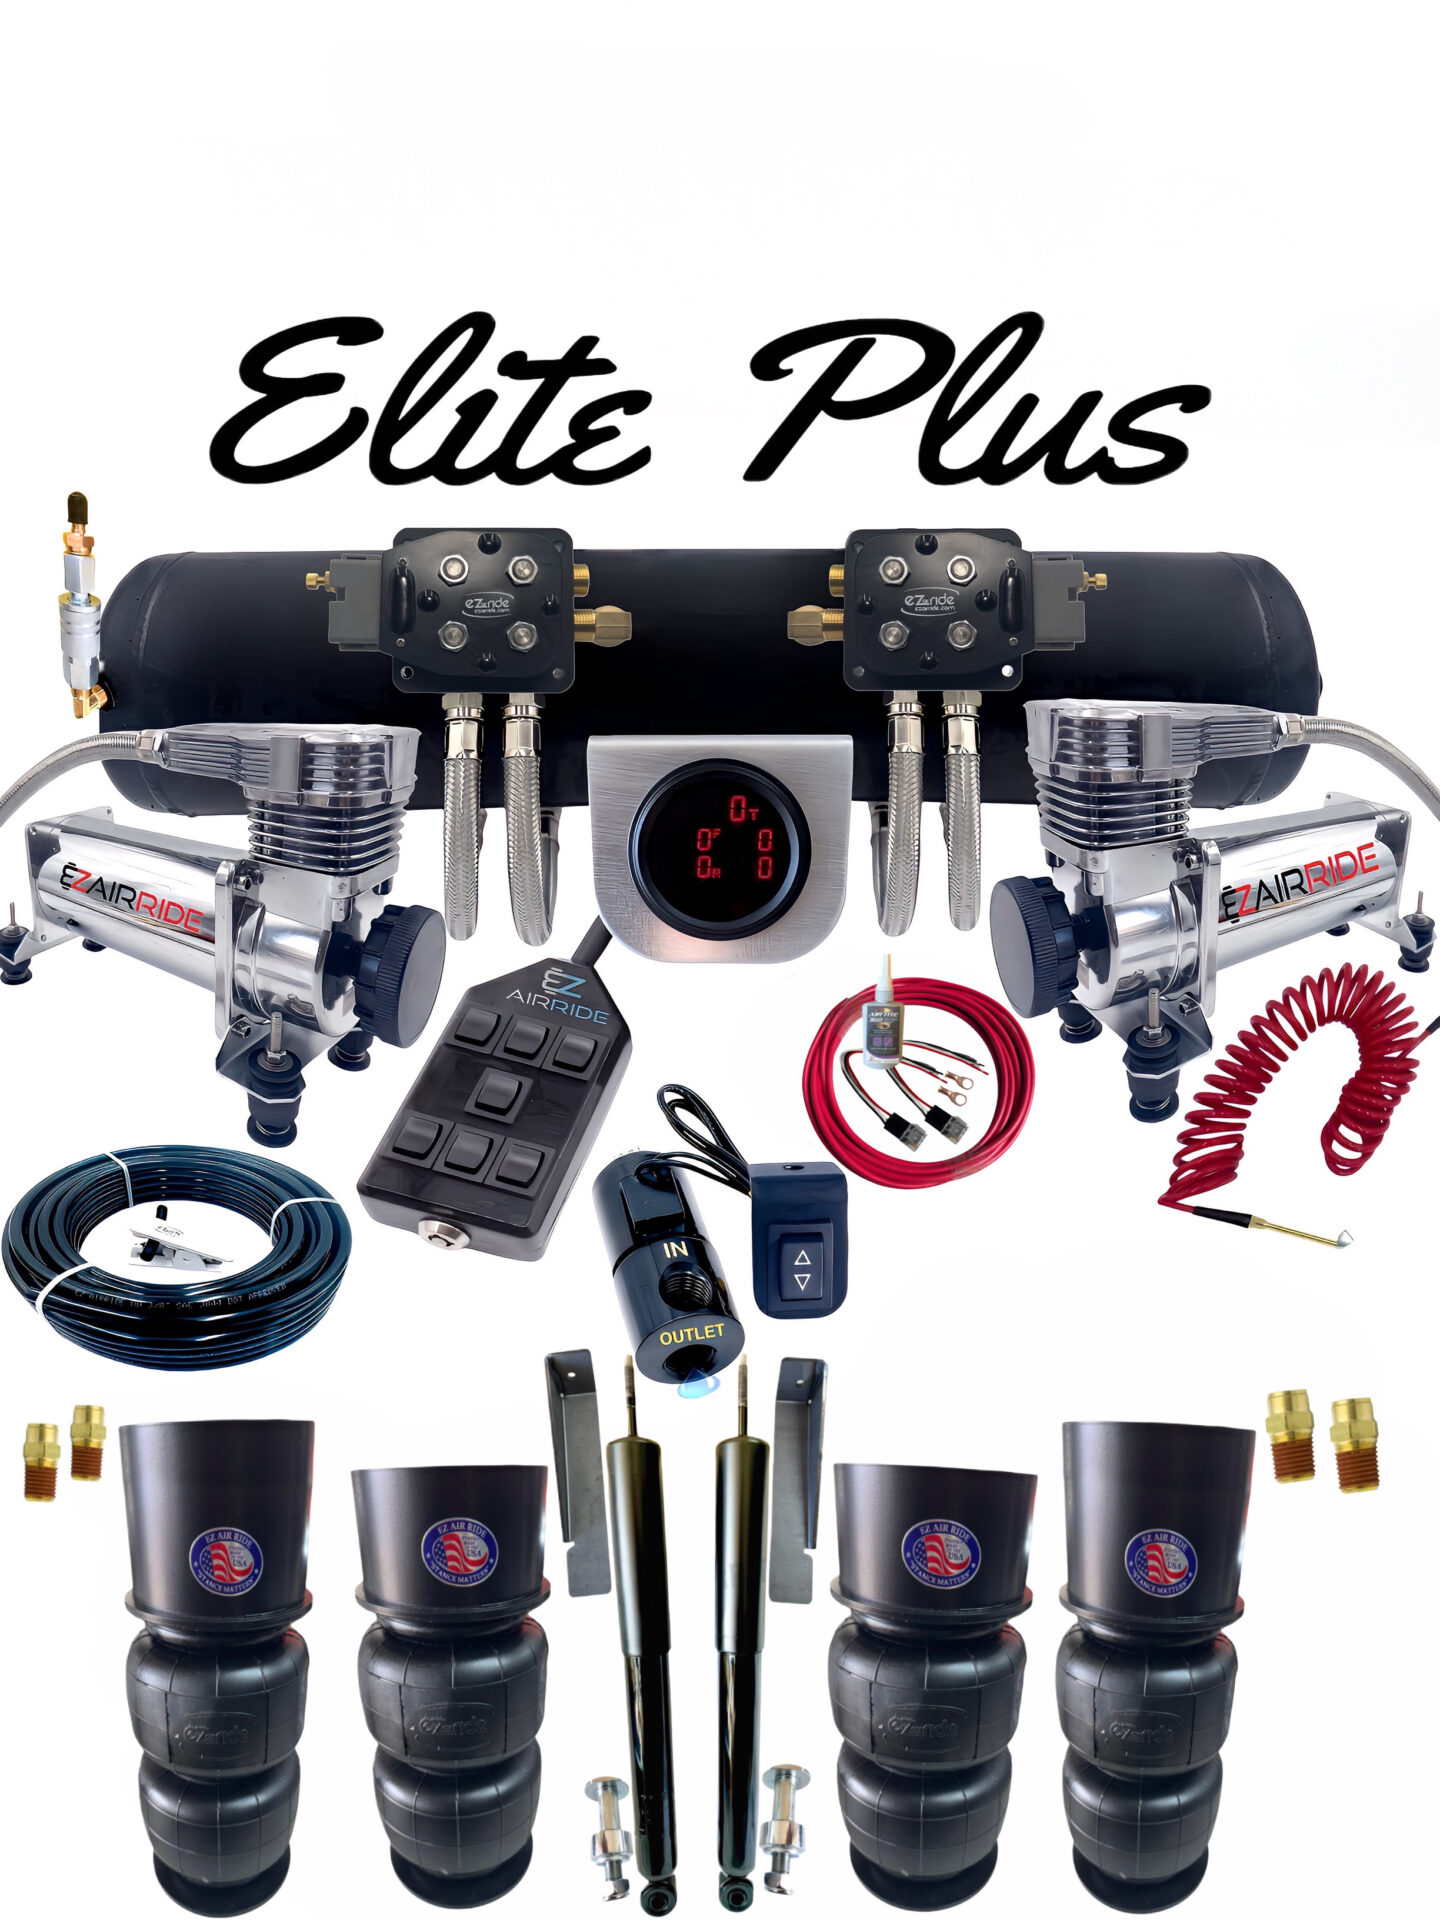
Elite Plus Kit
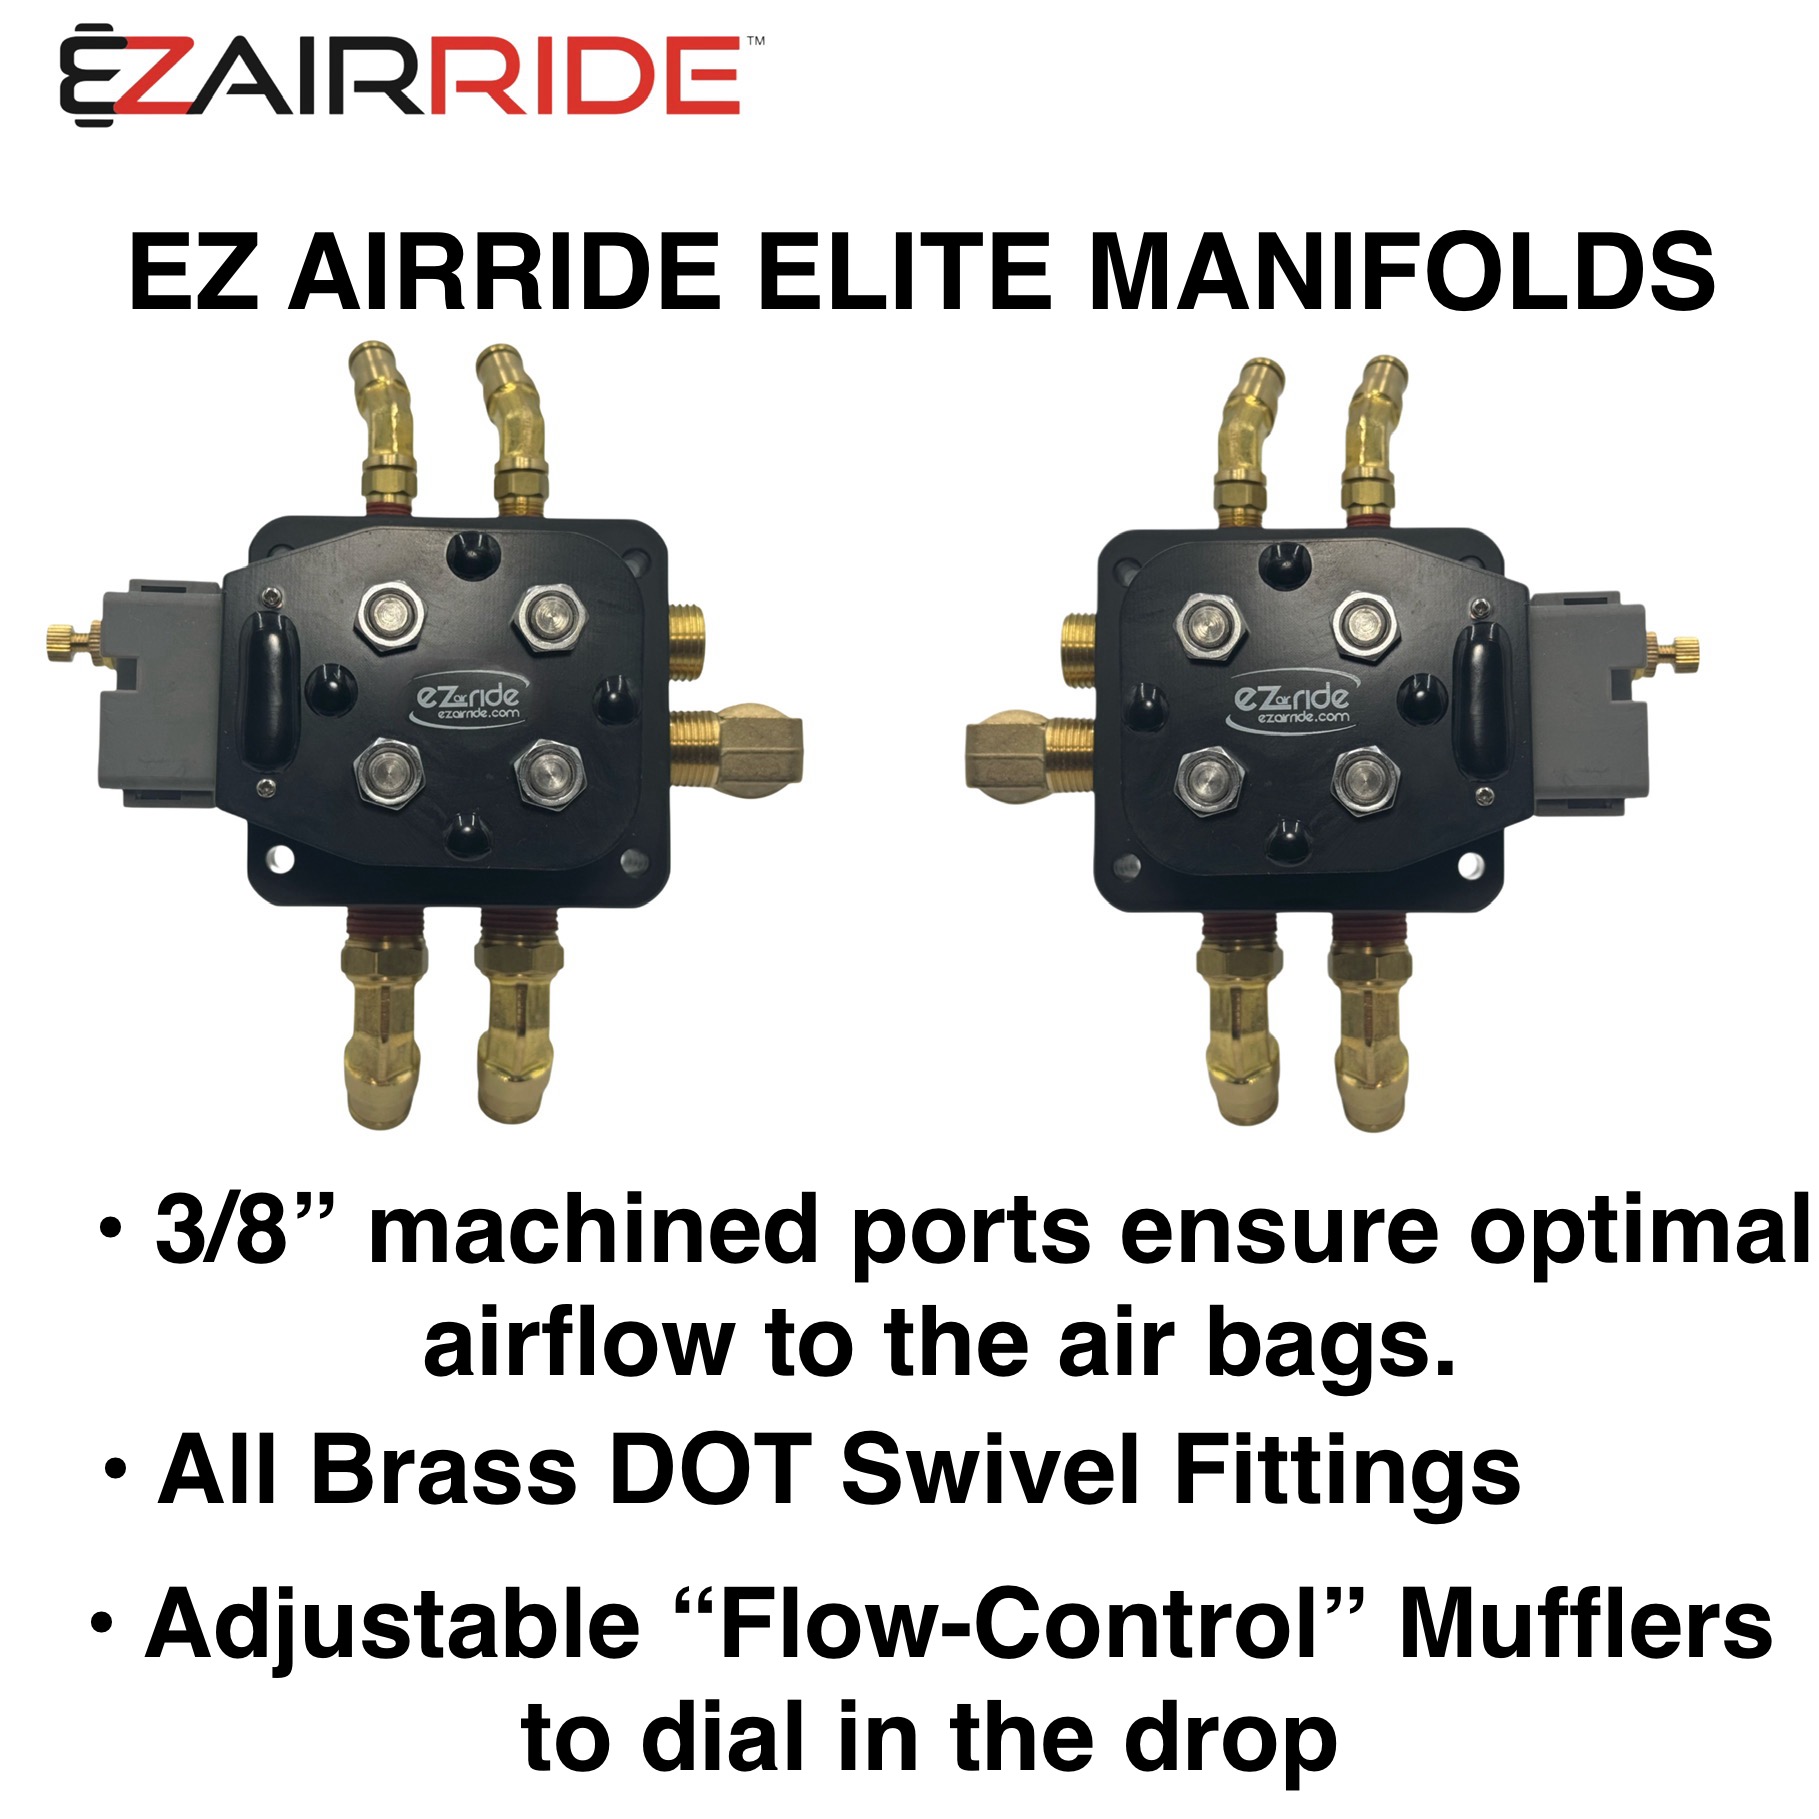
Our best-selling system hands down, designed for builders who want touch-button control without the headaches of wiring complex height sensors and computers. This system isolates the air to all four airbags using our 3/8″ electric manifolds, virtually eliminating that sloppy, factory body roll. With the touch of a button on the 7-button switch box, you get the unmatched slammed stance you’re looking for. When it’s time to roll, our fast-acting manifolds deliver a swift, buttery-smooth lift back to ride height—providing an incredibly stable rise without the sudden, violent jarring common in overly pressurized systems. Best of all, you have total control to level out any classic car lean on the spot, regardless of heavy passenger weight or uneven cruiser payloads.
Kit Highlights:
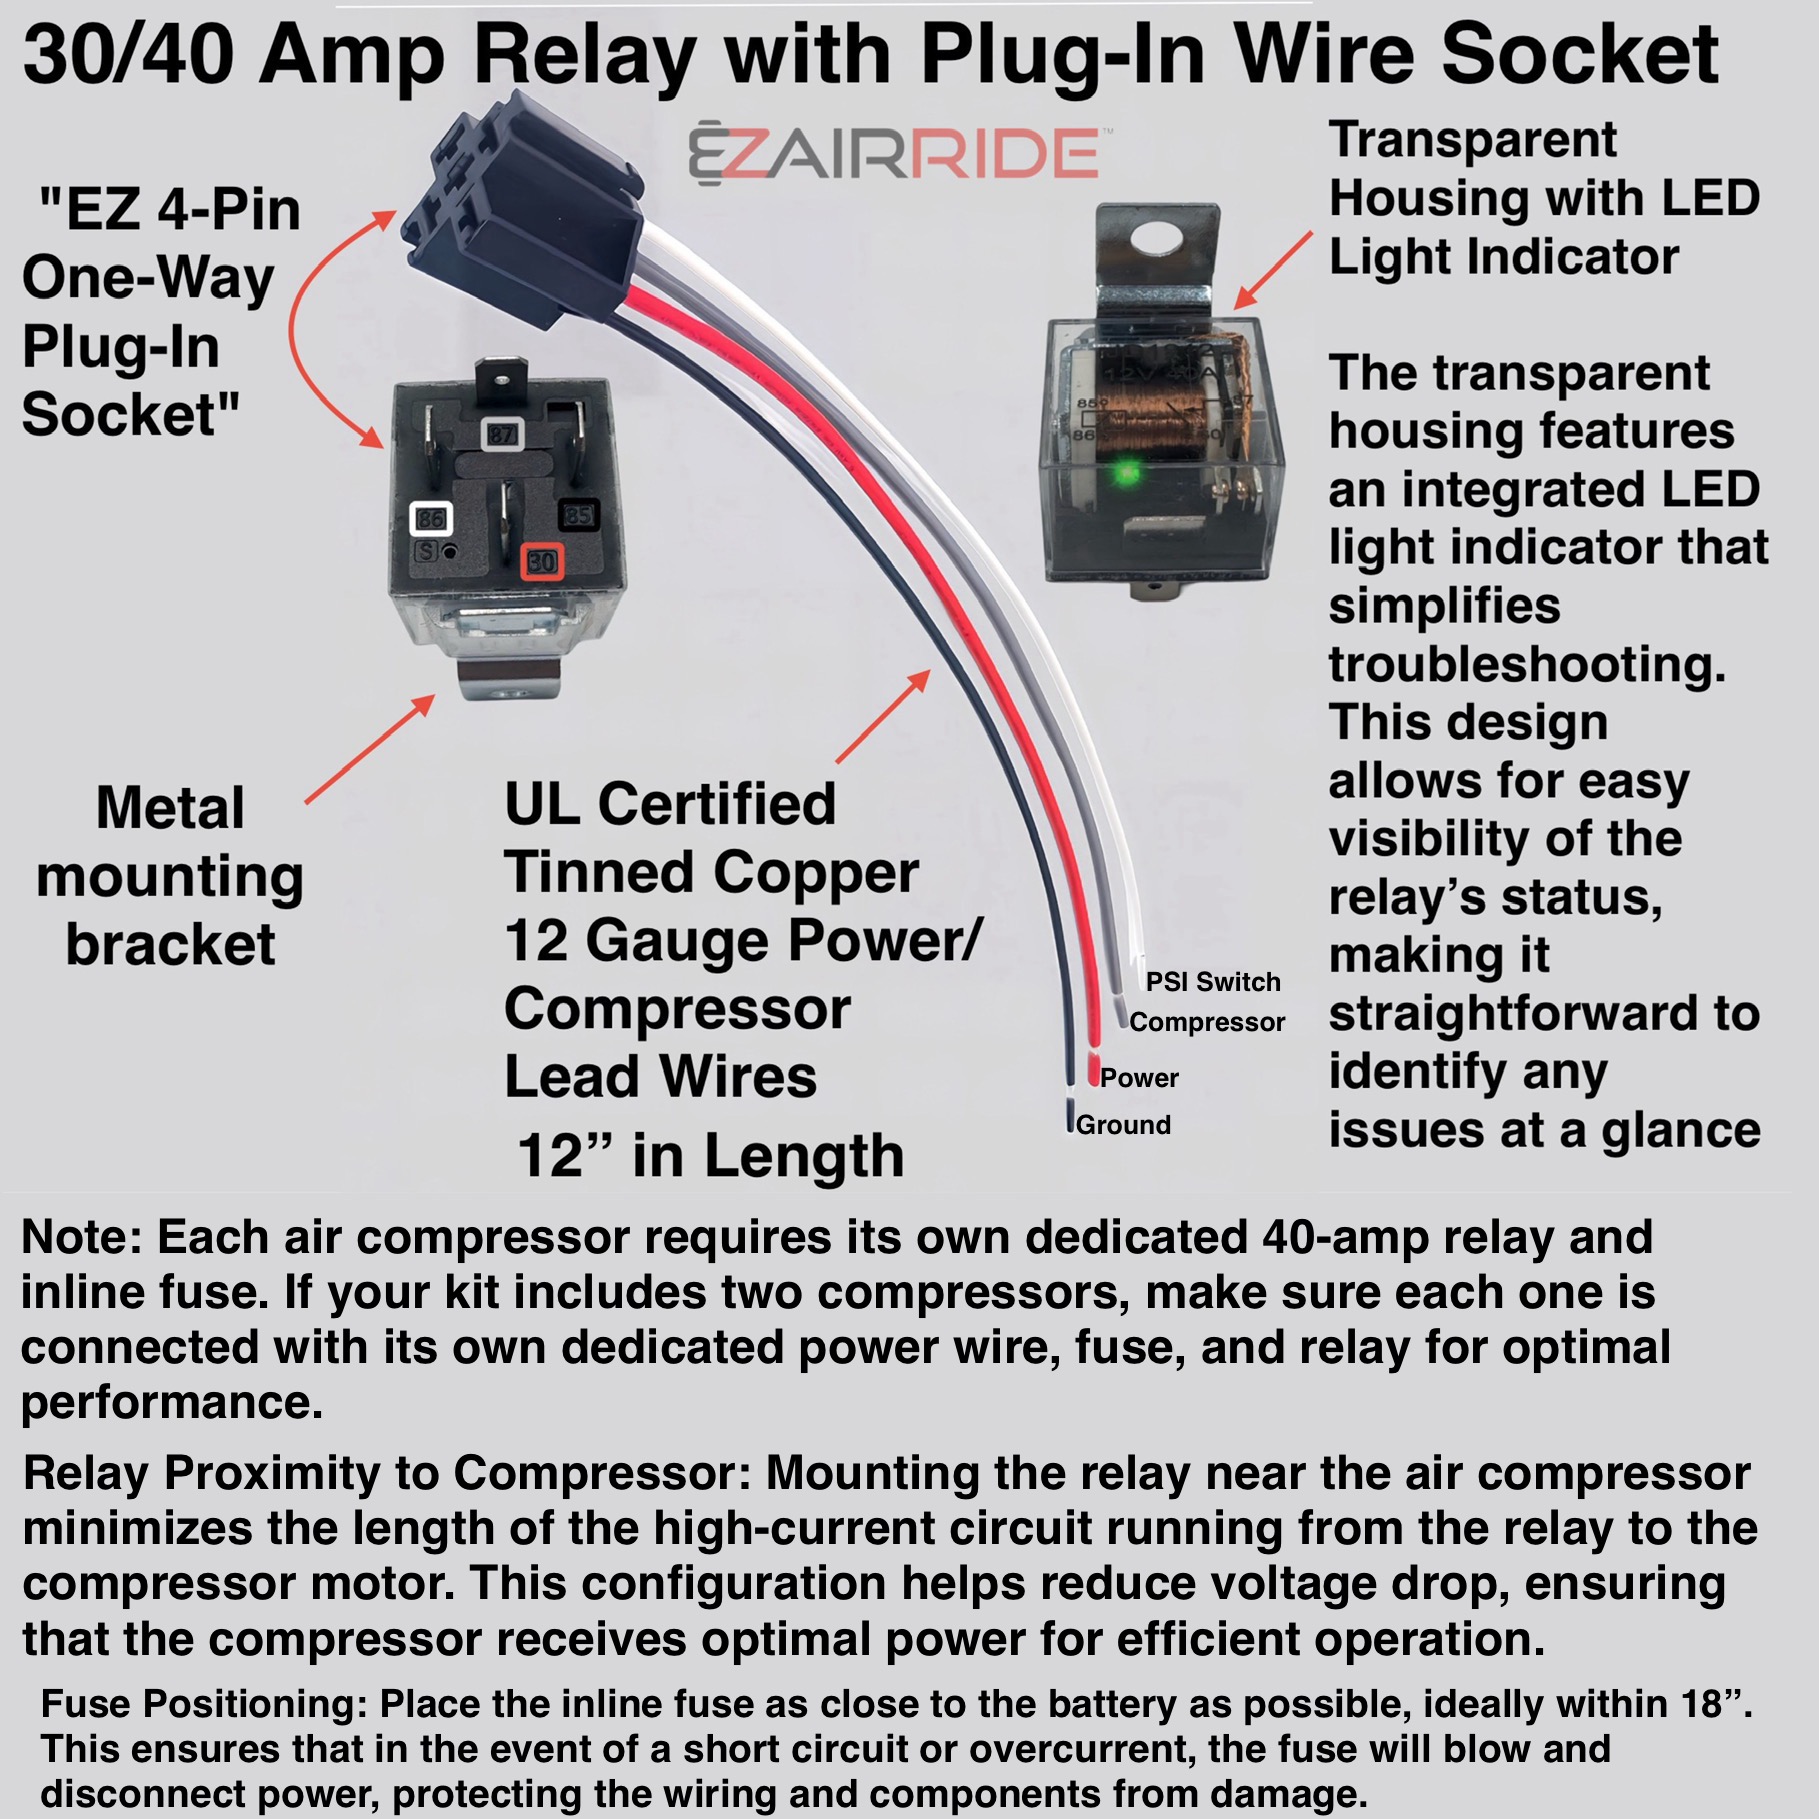
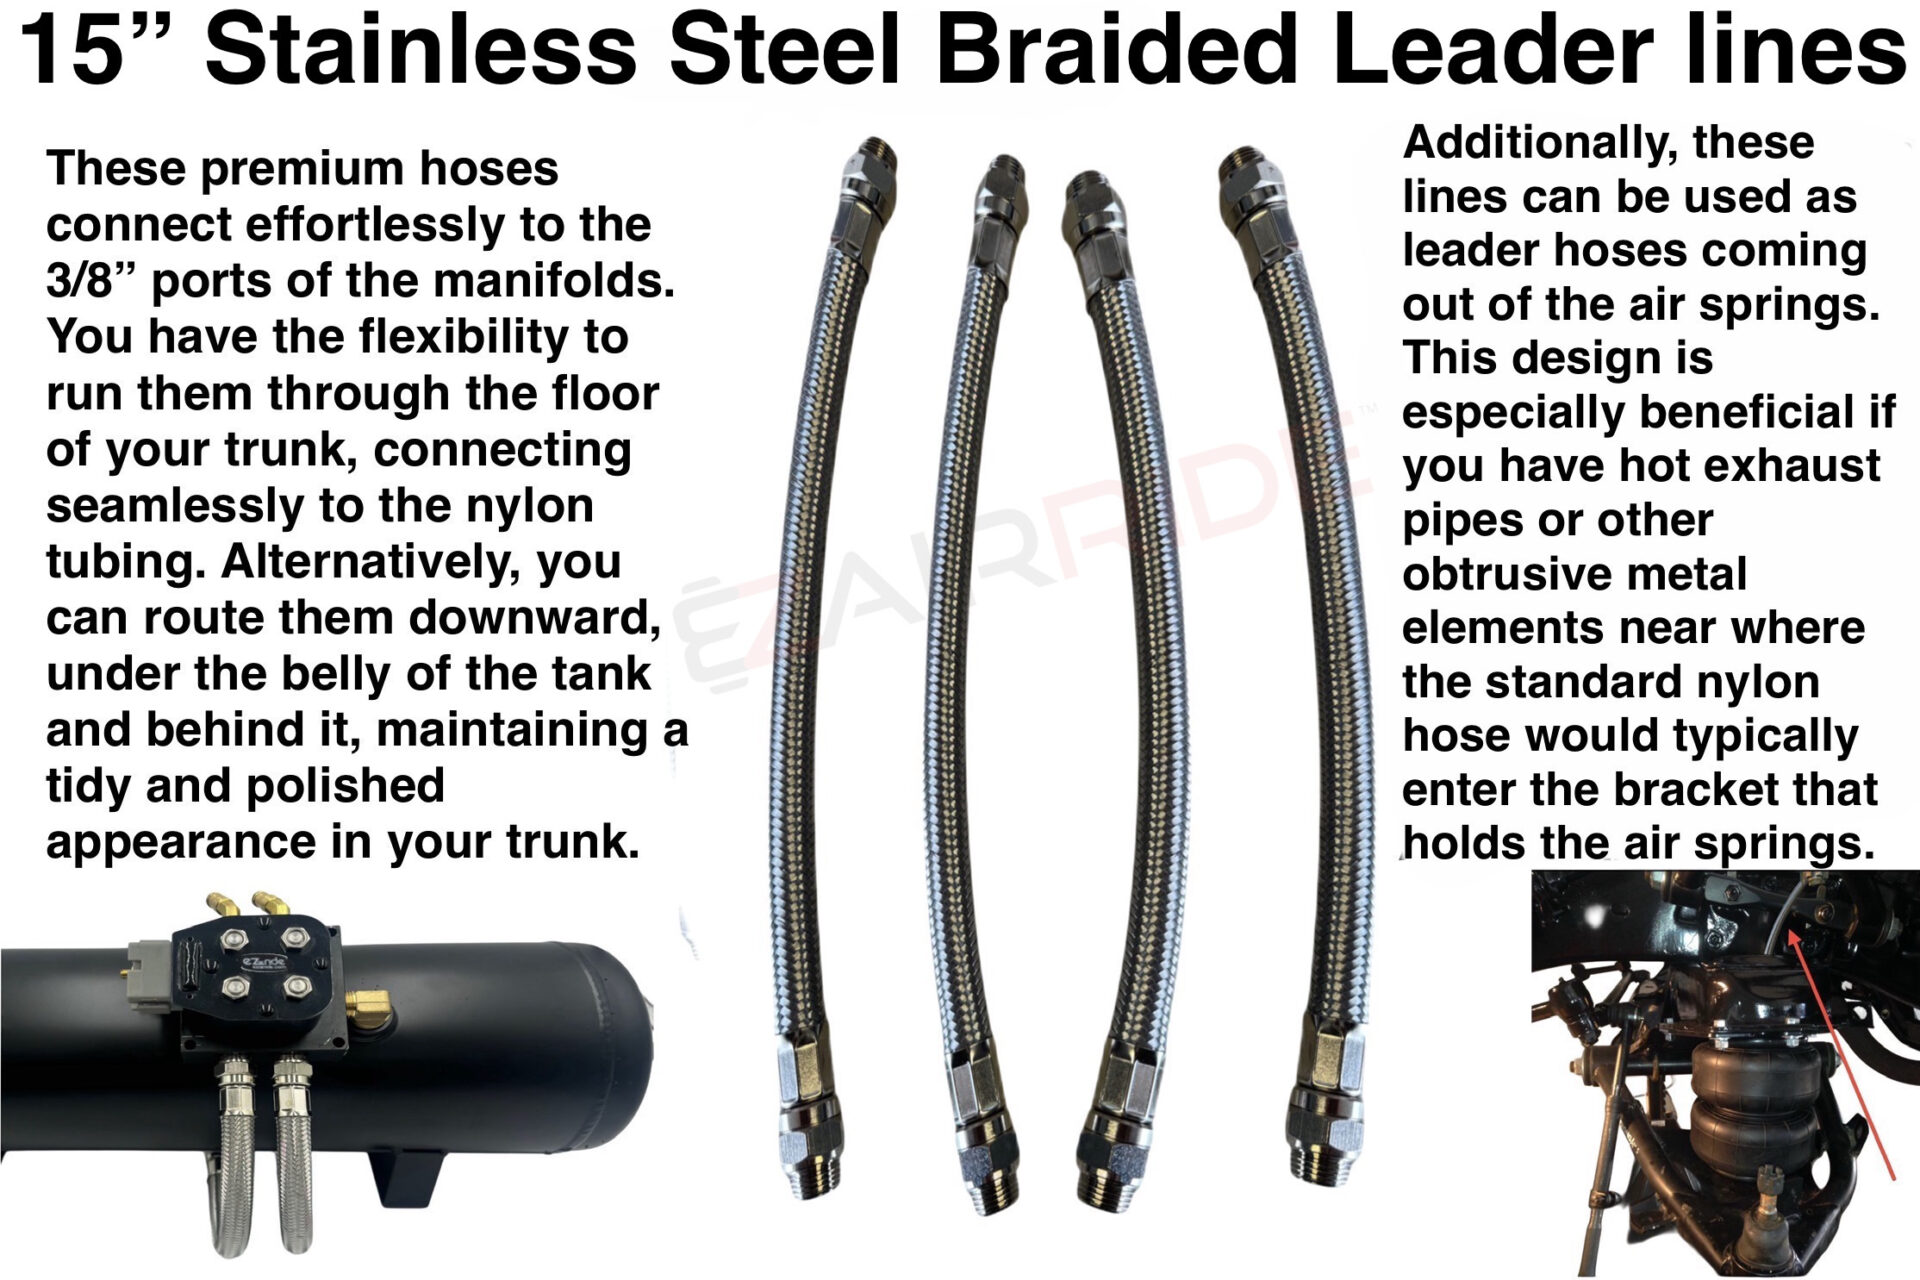
The Easiest to Plumb (Air Lines): Powered by our exclusive tank-mounted manifold design, your air lines run straight from the manifolds to the airbags. Because our digital gauges use simple plug-in wiring instead of cabin air hoses, you are strictly running lines from the bags to the manifolds. This creates a direct point-A to point-B install with the absolute fewest air connections possible, making it virtually leak-free right out of the gate.
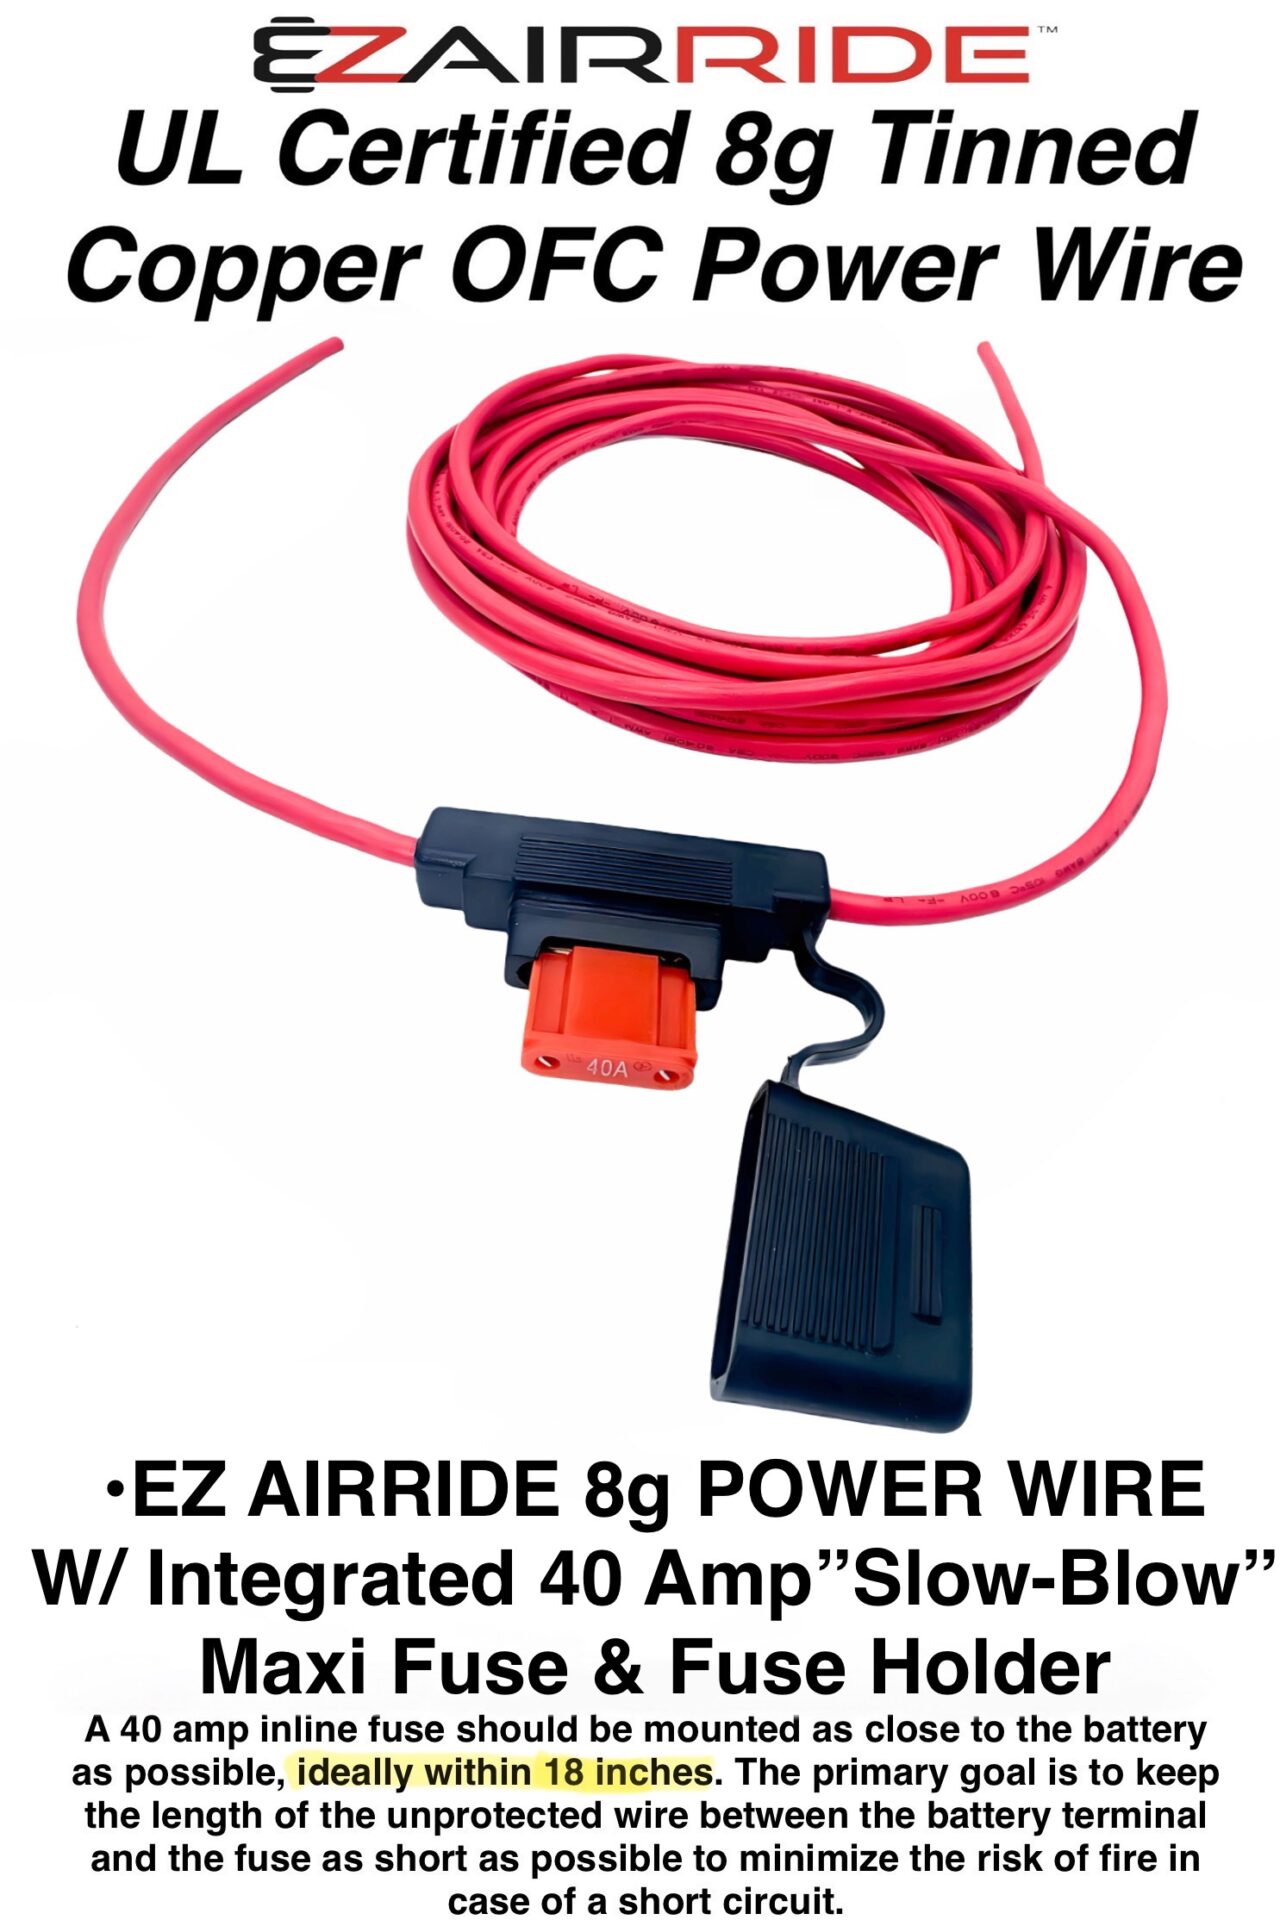
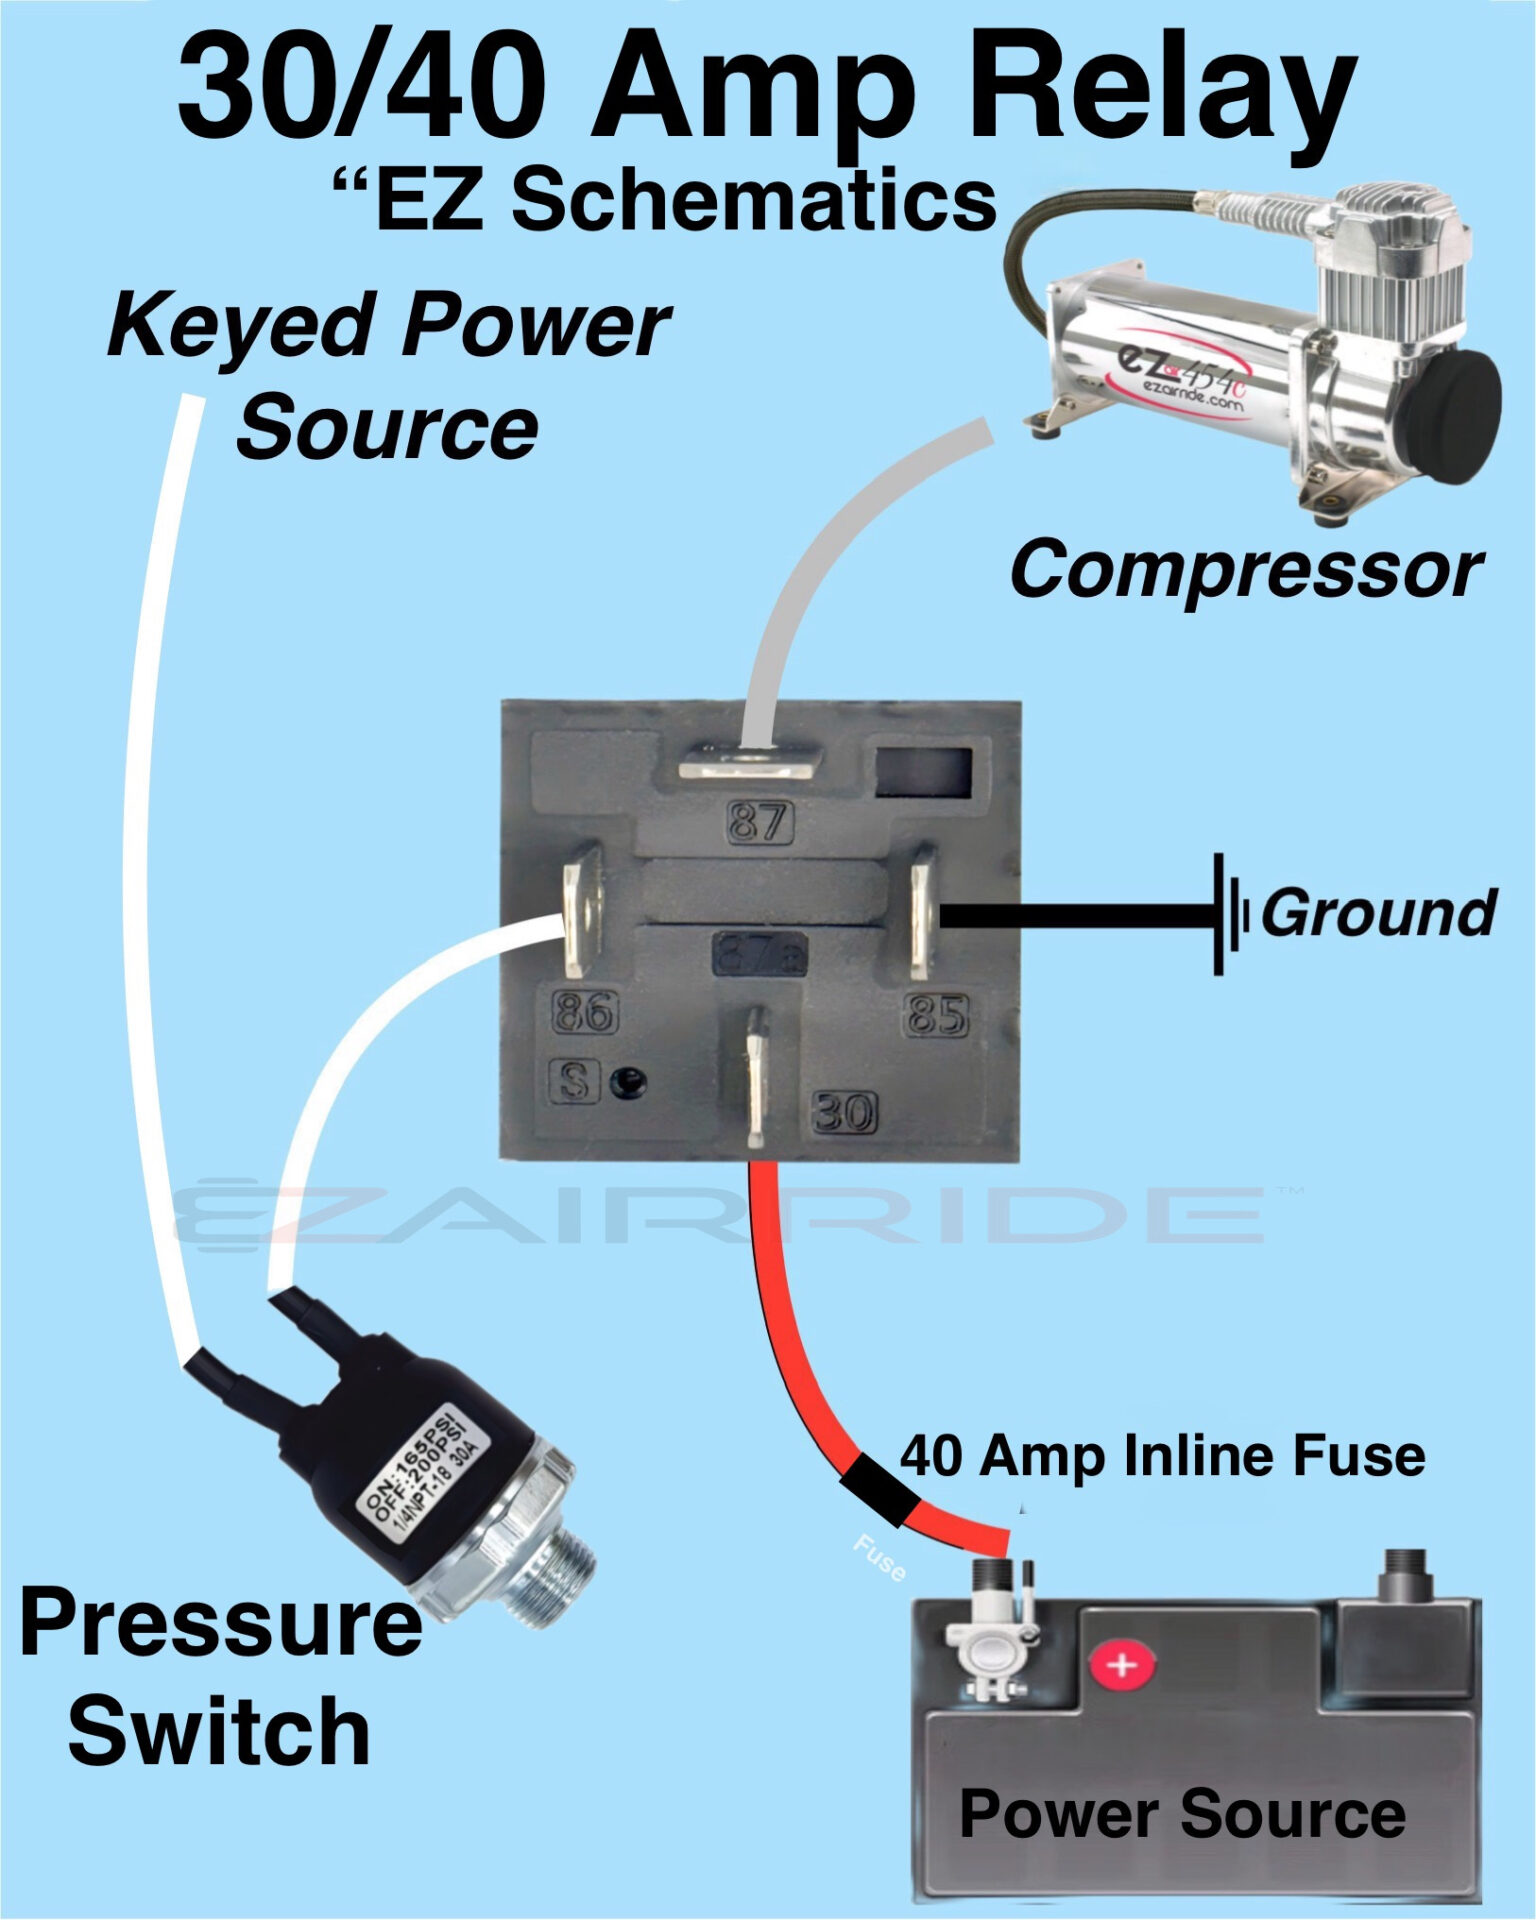
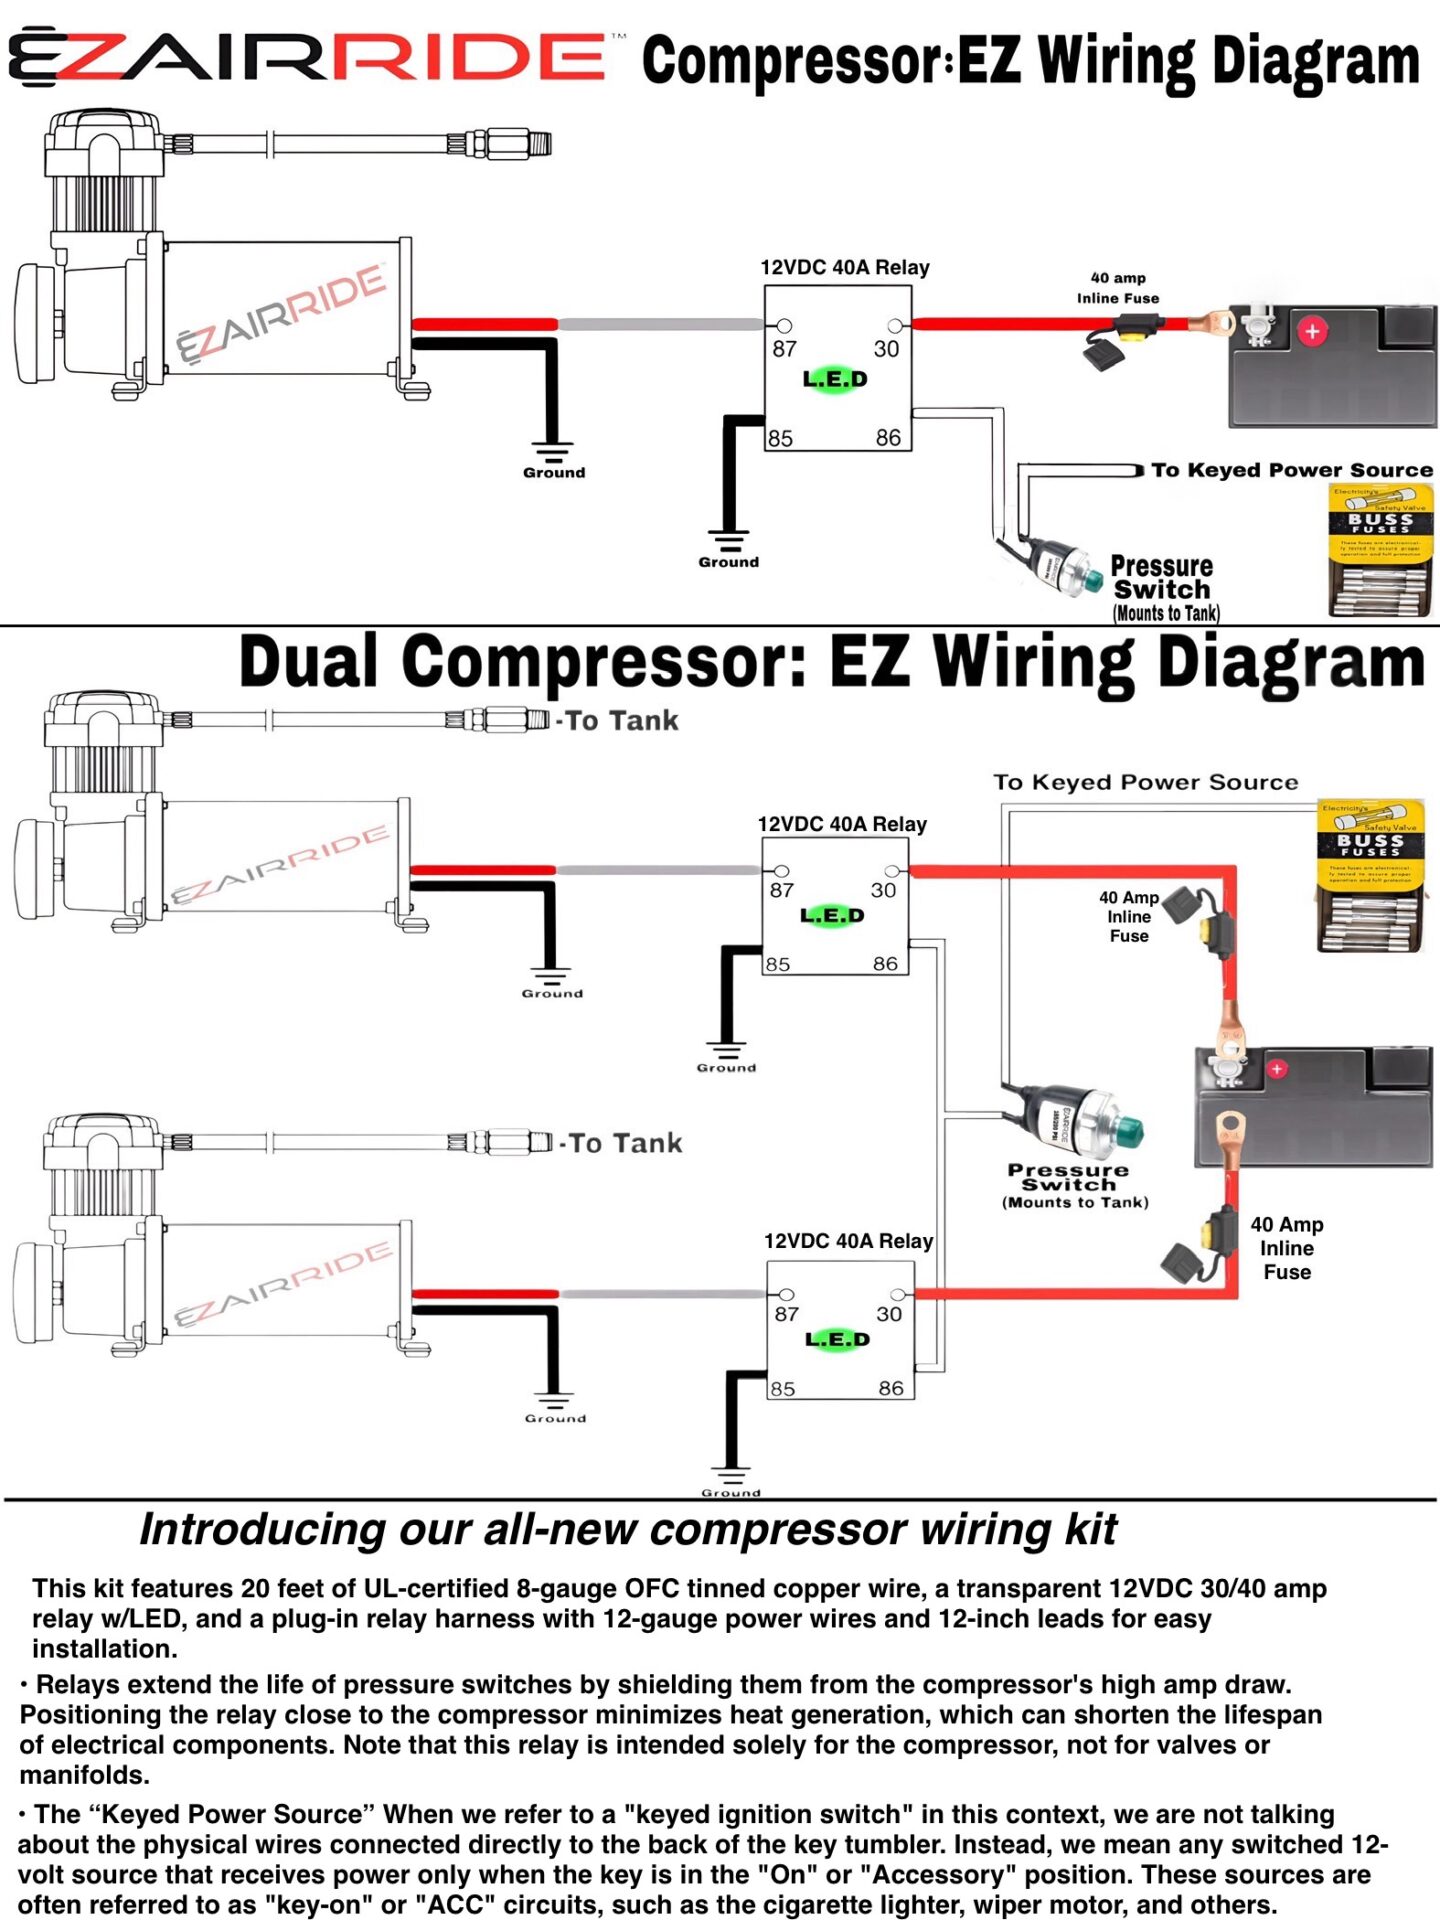
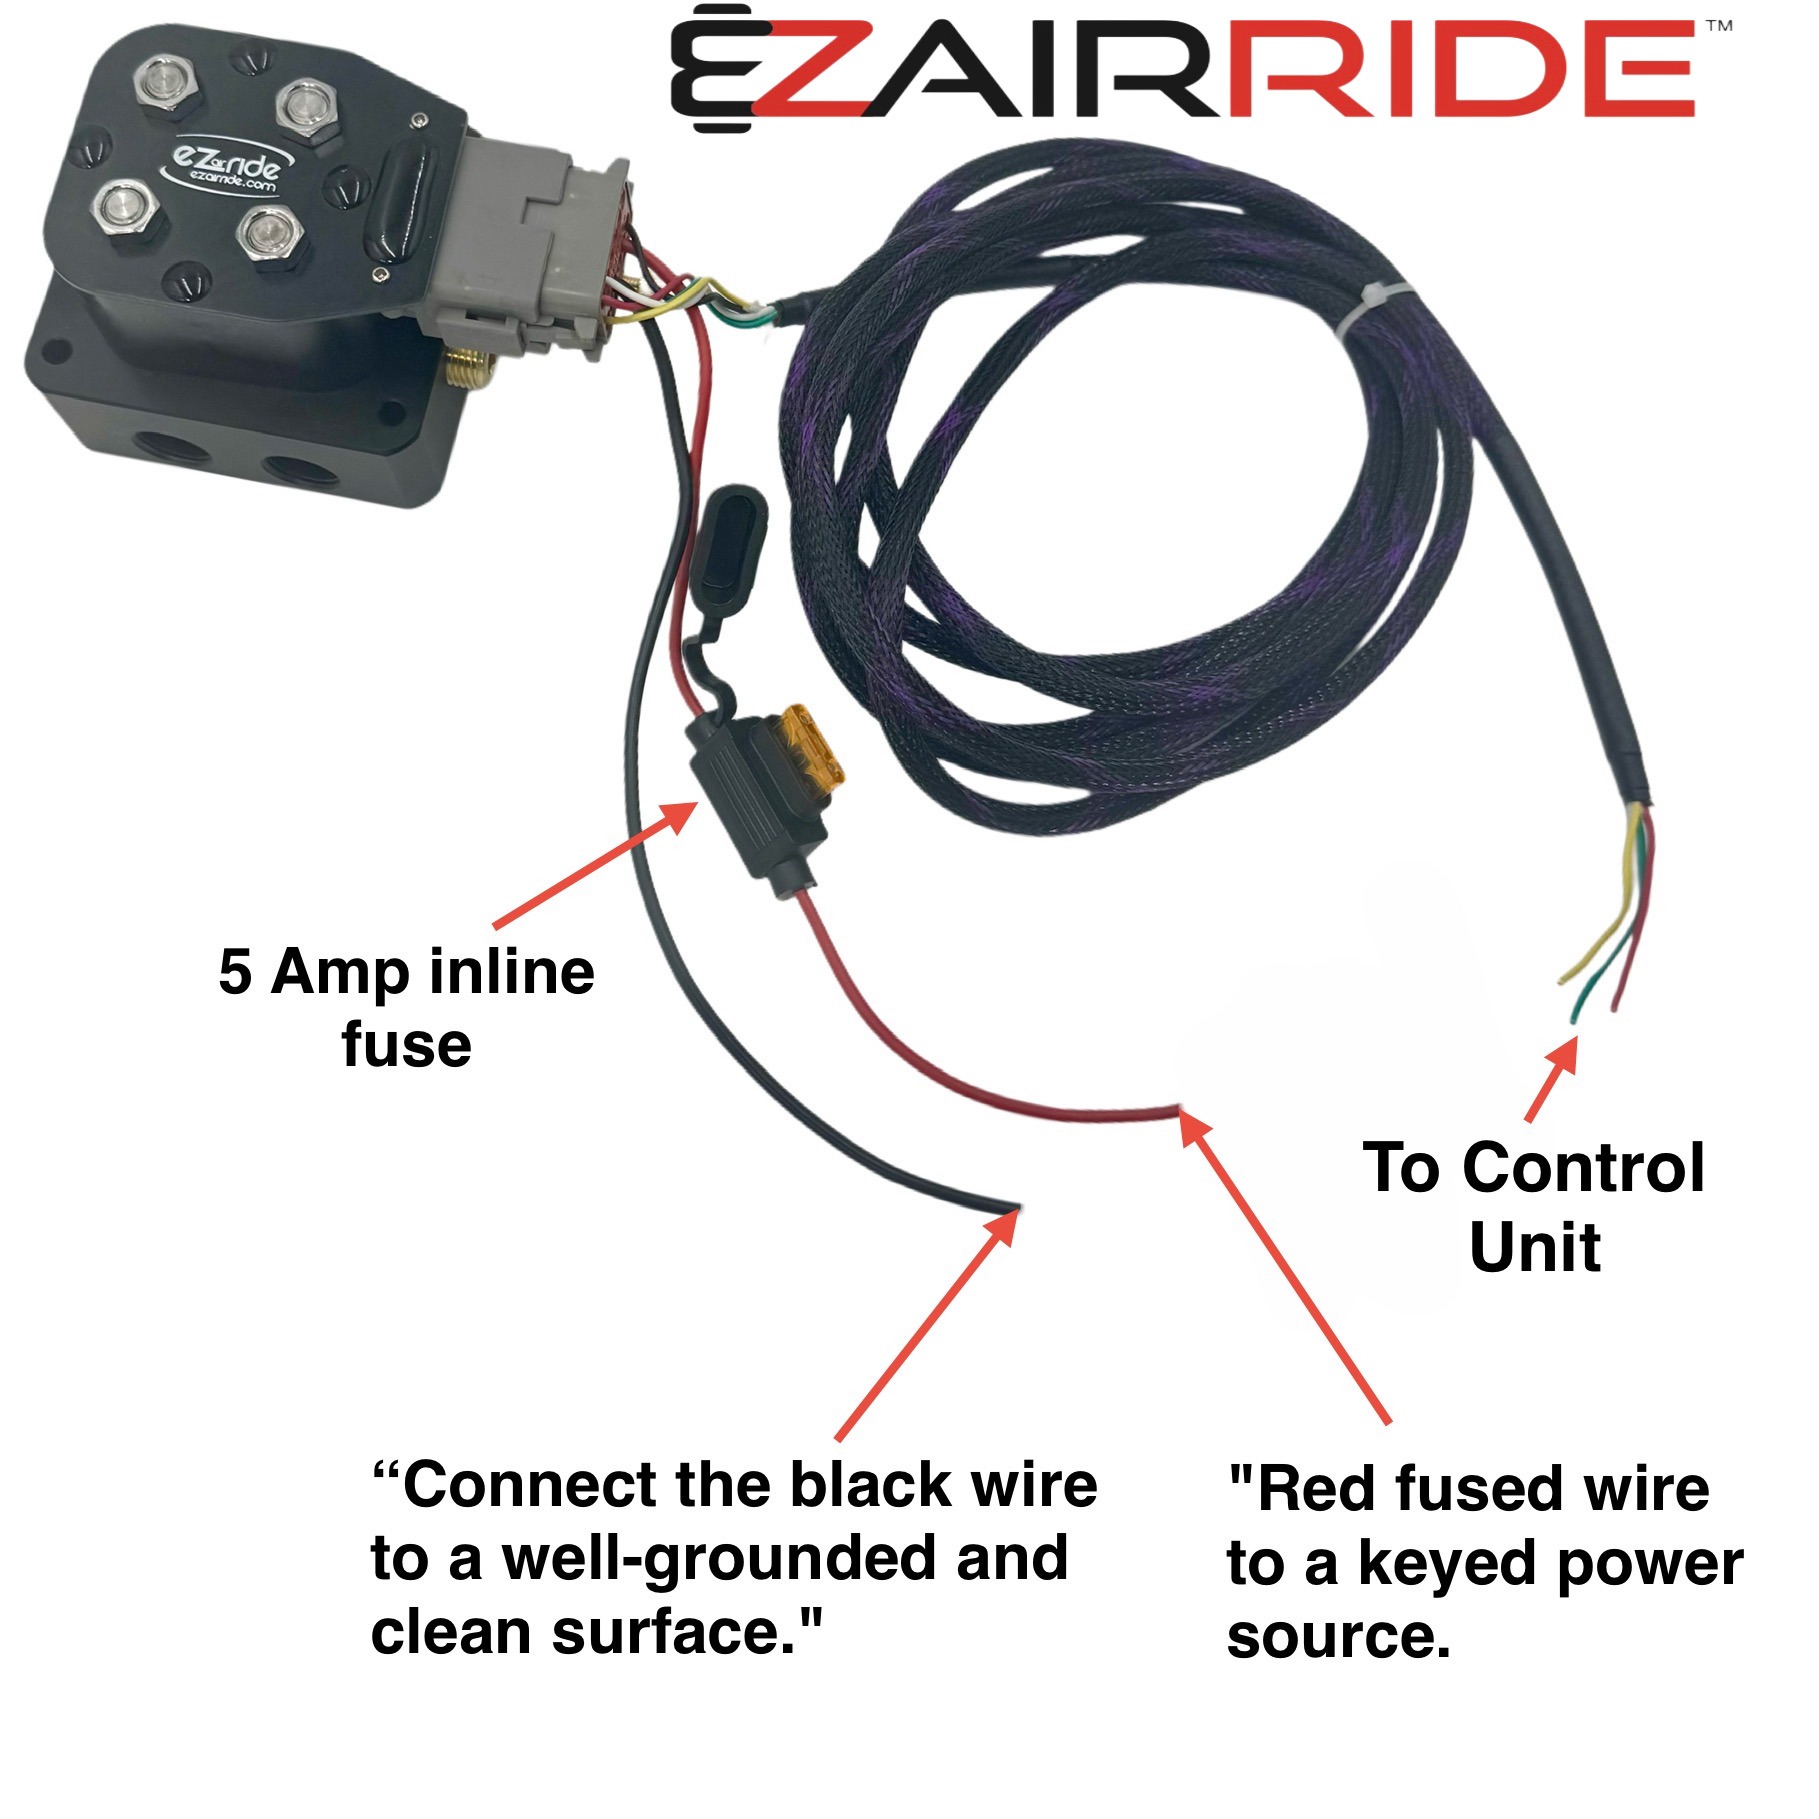
Straightforward Wiring (Electrical): Once your tank, pumps, and manifold are mounted in the trunk, the forward wiring is quite simple. You are essentially running just two 8-gauge power wires from both pumps up to your battery source, and one lead wire from the pressure switch to your fuse panel for a keyed ignition power source. Everything else—including the relays and the main manifold wire harness—simply plugs together right there in the trunk.
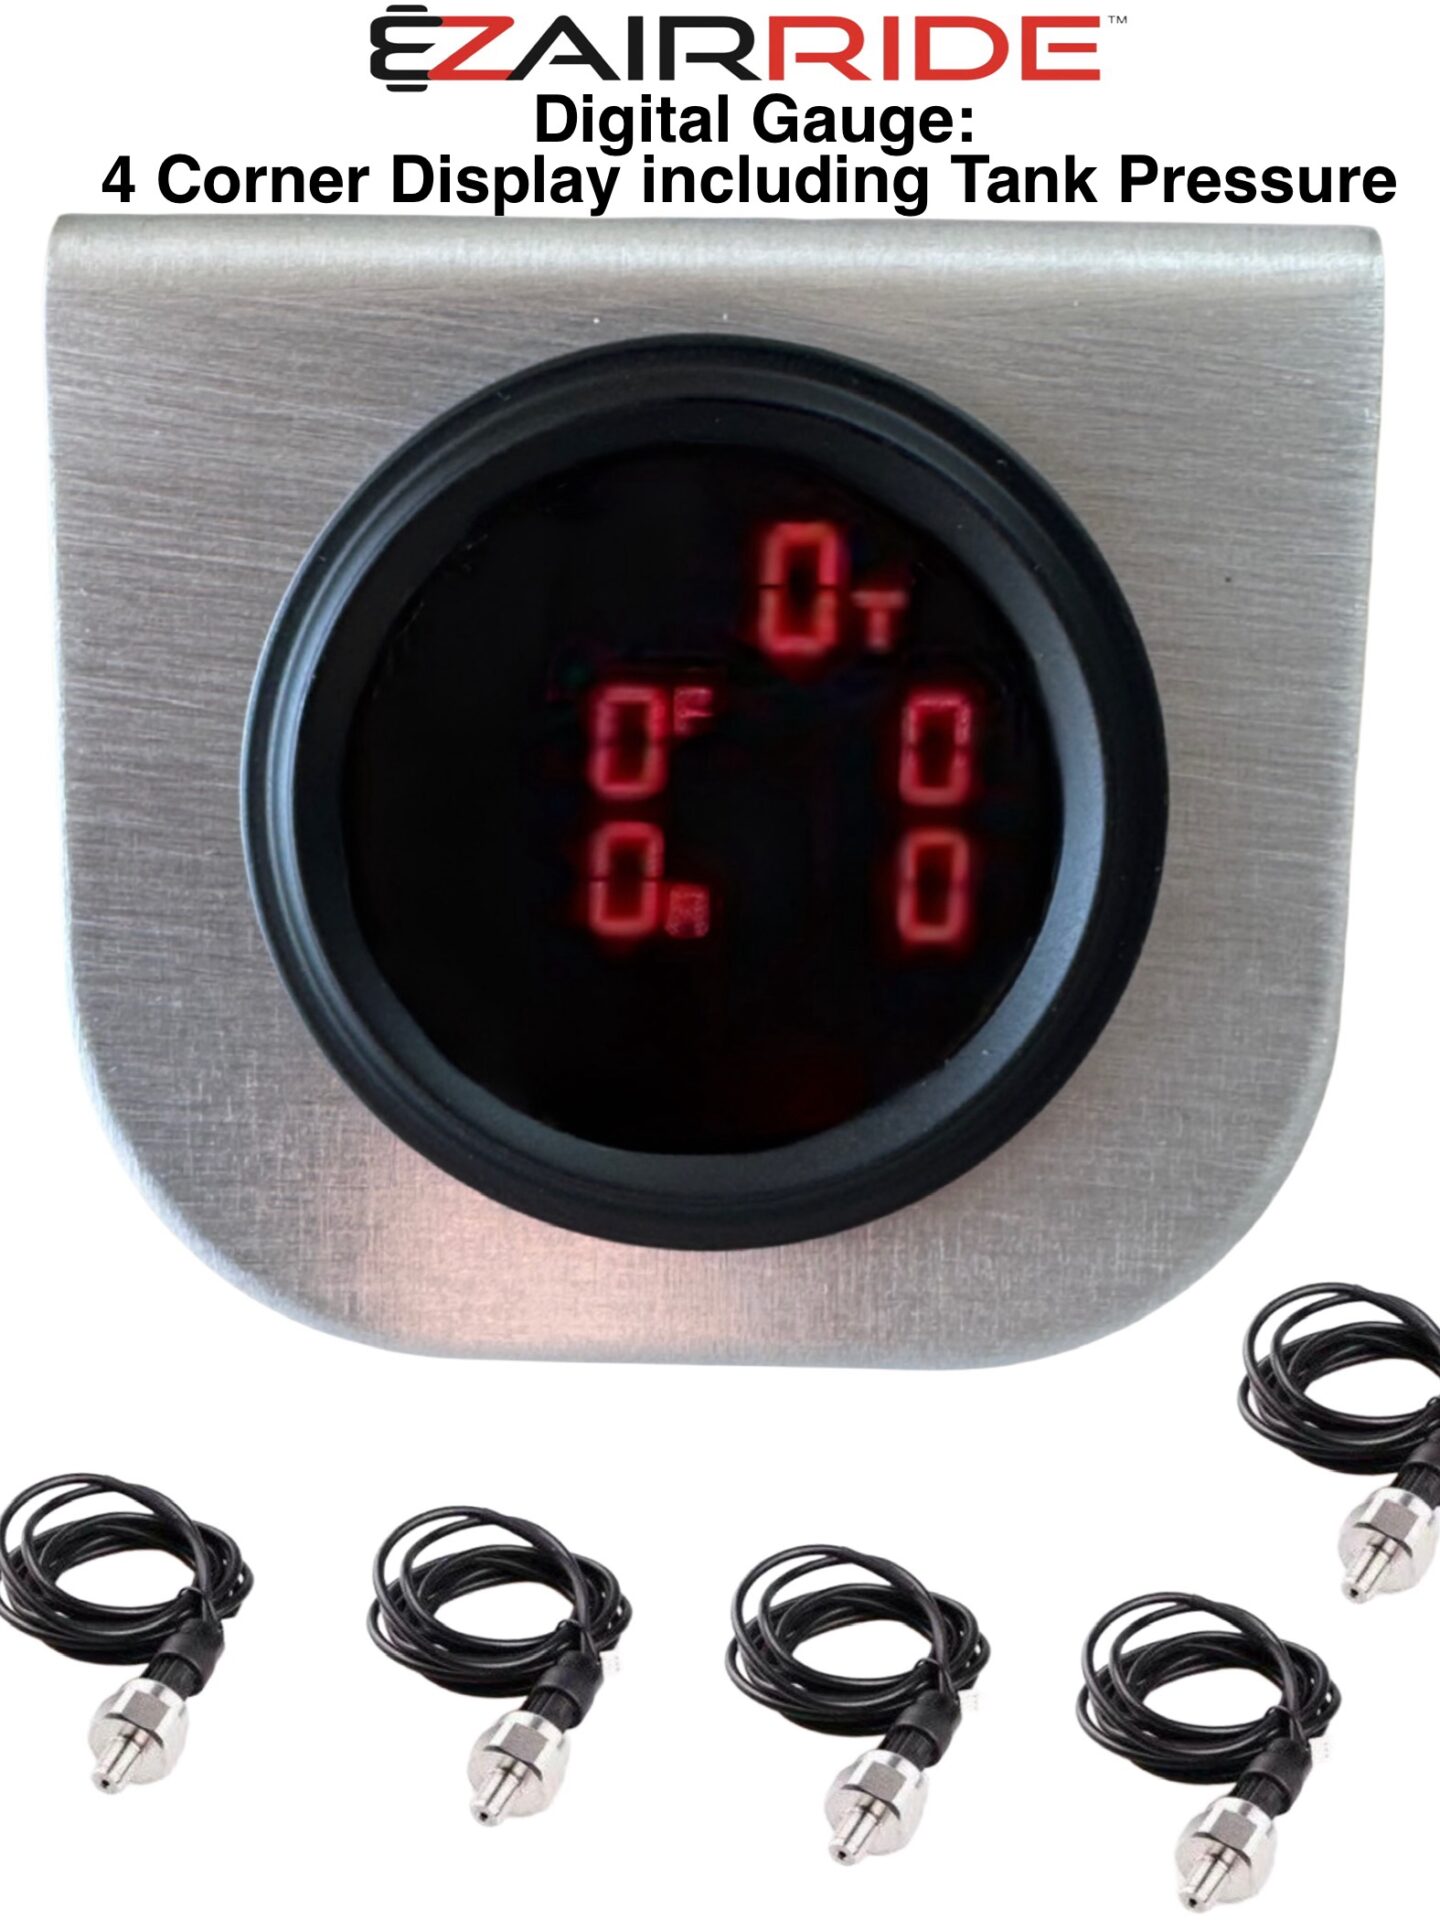
Real-Time Ride Height (Digital Air Gauges): Our digital gauge setups put your exact airbag pressures right in your line of sight, showing you the real-time pressure of all four corners independently so you know your exact ride height at a glance.
Single Digital Gauge Option: Displays all four corners and tank pressure seamlessly on a single screen—comes with a brushed aluminum bezel to hang from the dash, or an optional surface-mount plastic pod to mount on top of the dash or console. Alternatively, what many builders prefer is just to drop the gauge itself into a custom-made hole in a center console or in a dash.
Dual Digital Gauge Option: Features two independent readouts integrated into one sleek, black powder-coated panel designed to mount directly to the bottom of your dash—this panel also includes our built-in tank drain button (note that these two gauges indicate bag pressure only).
The Smart-Wire Advantage: These digital gauges completely eliminate the need to run air hoses and fittings through your cabin. Instead, they use simple plug-in wire connections with included 15-ft wire leads to easily route back to the manifold in the trunk. By replacing cabin plumbing with wiring, you eliminate potential leak points at the gauge and the manifold—allowing you to run just your 3/8″ lines from the bags to the manifold, which delivers the absolute fewest air connections you will find on any air ride system.
Whichever you prefer, simply specify your choice in the order comments at checkout.
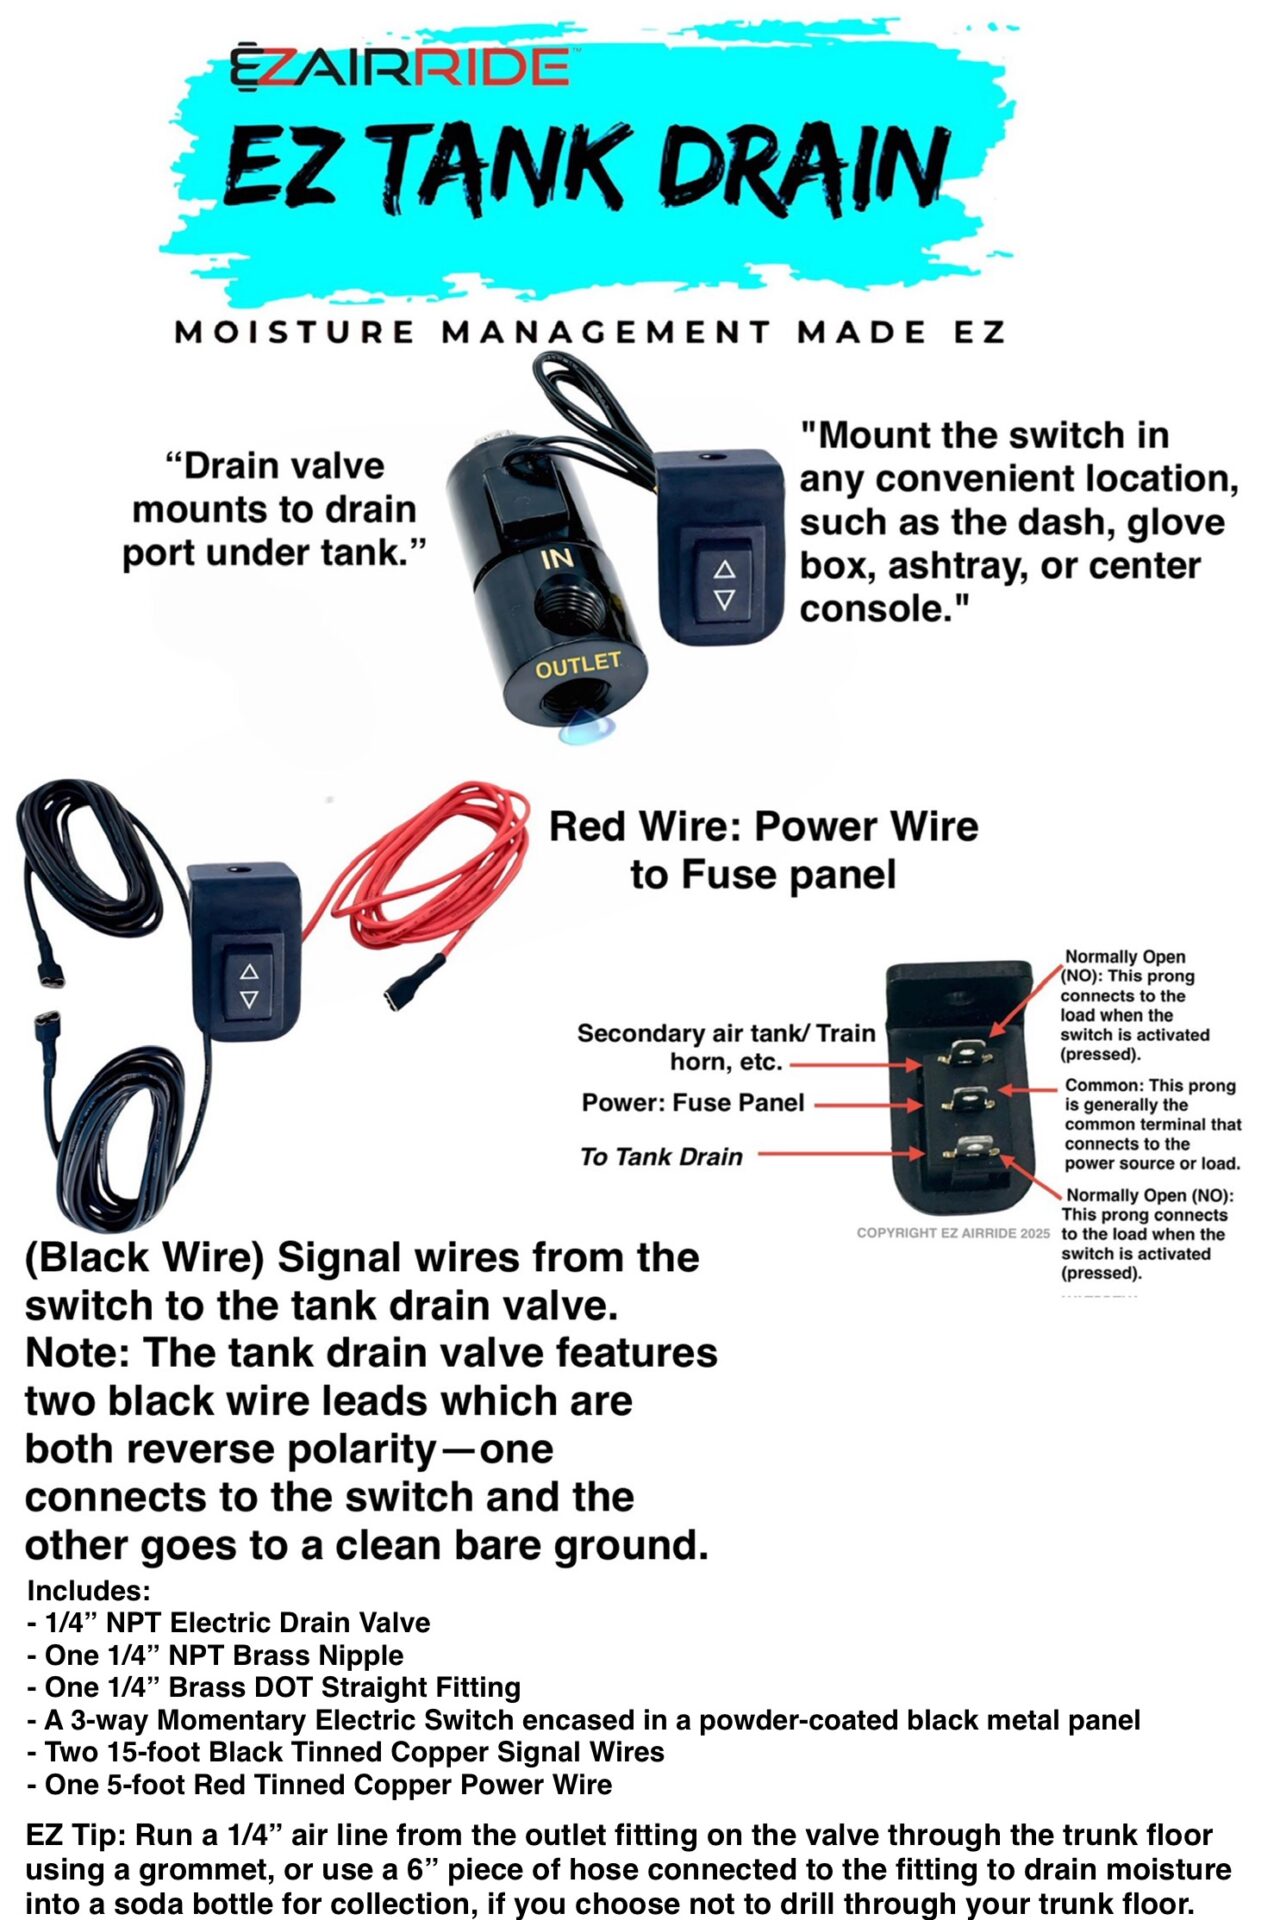
EZ Tank Drain Valve: Tucked-away tanks mean “out of sight, out of mind”—until draining leaves you hunched over in the trunk messing with a manual petcock. We eliminate that headache. This electric valve replaces the petcock with two simple wires: one grounds at the tank, while the other routes to the switch we provide in a sleek, black powder-coated bezel. You can easily mount that bezel anywhere you’d like—in the glove box, inside your ashtray, or even back in the trunk. Just touch the button to purge tank condensation and keep your hands clean.
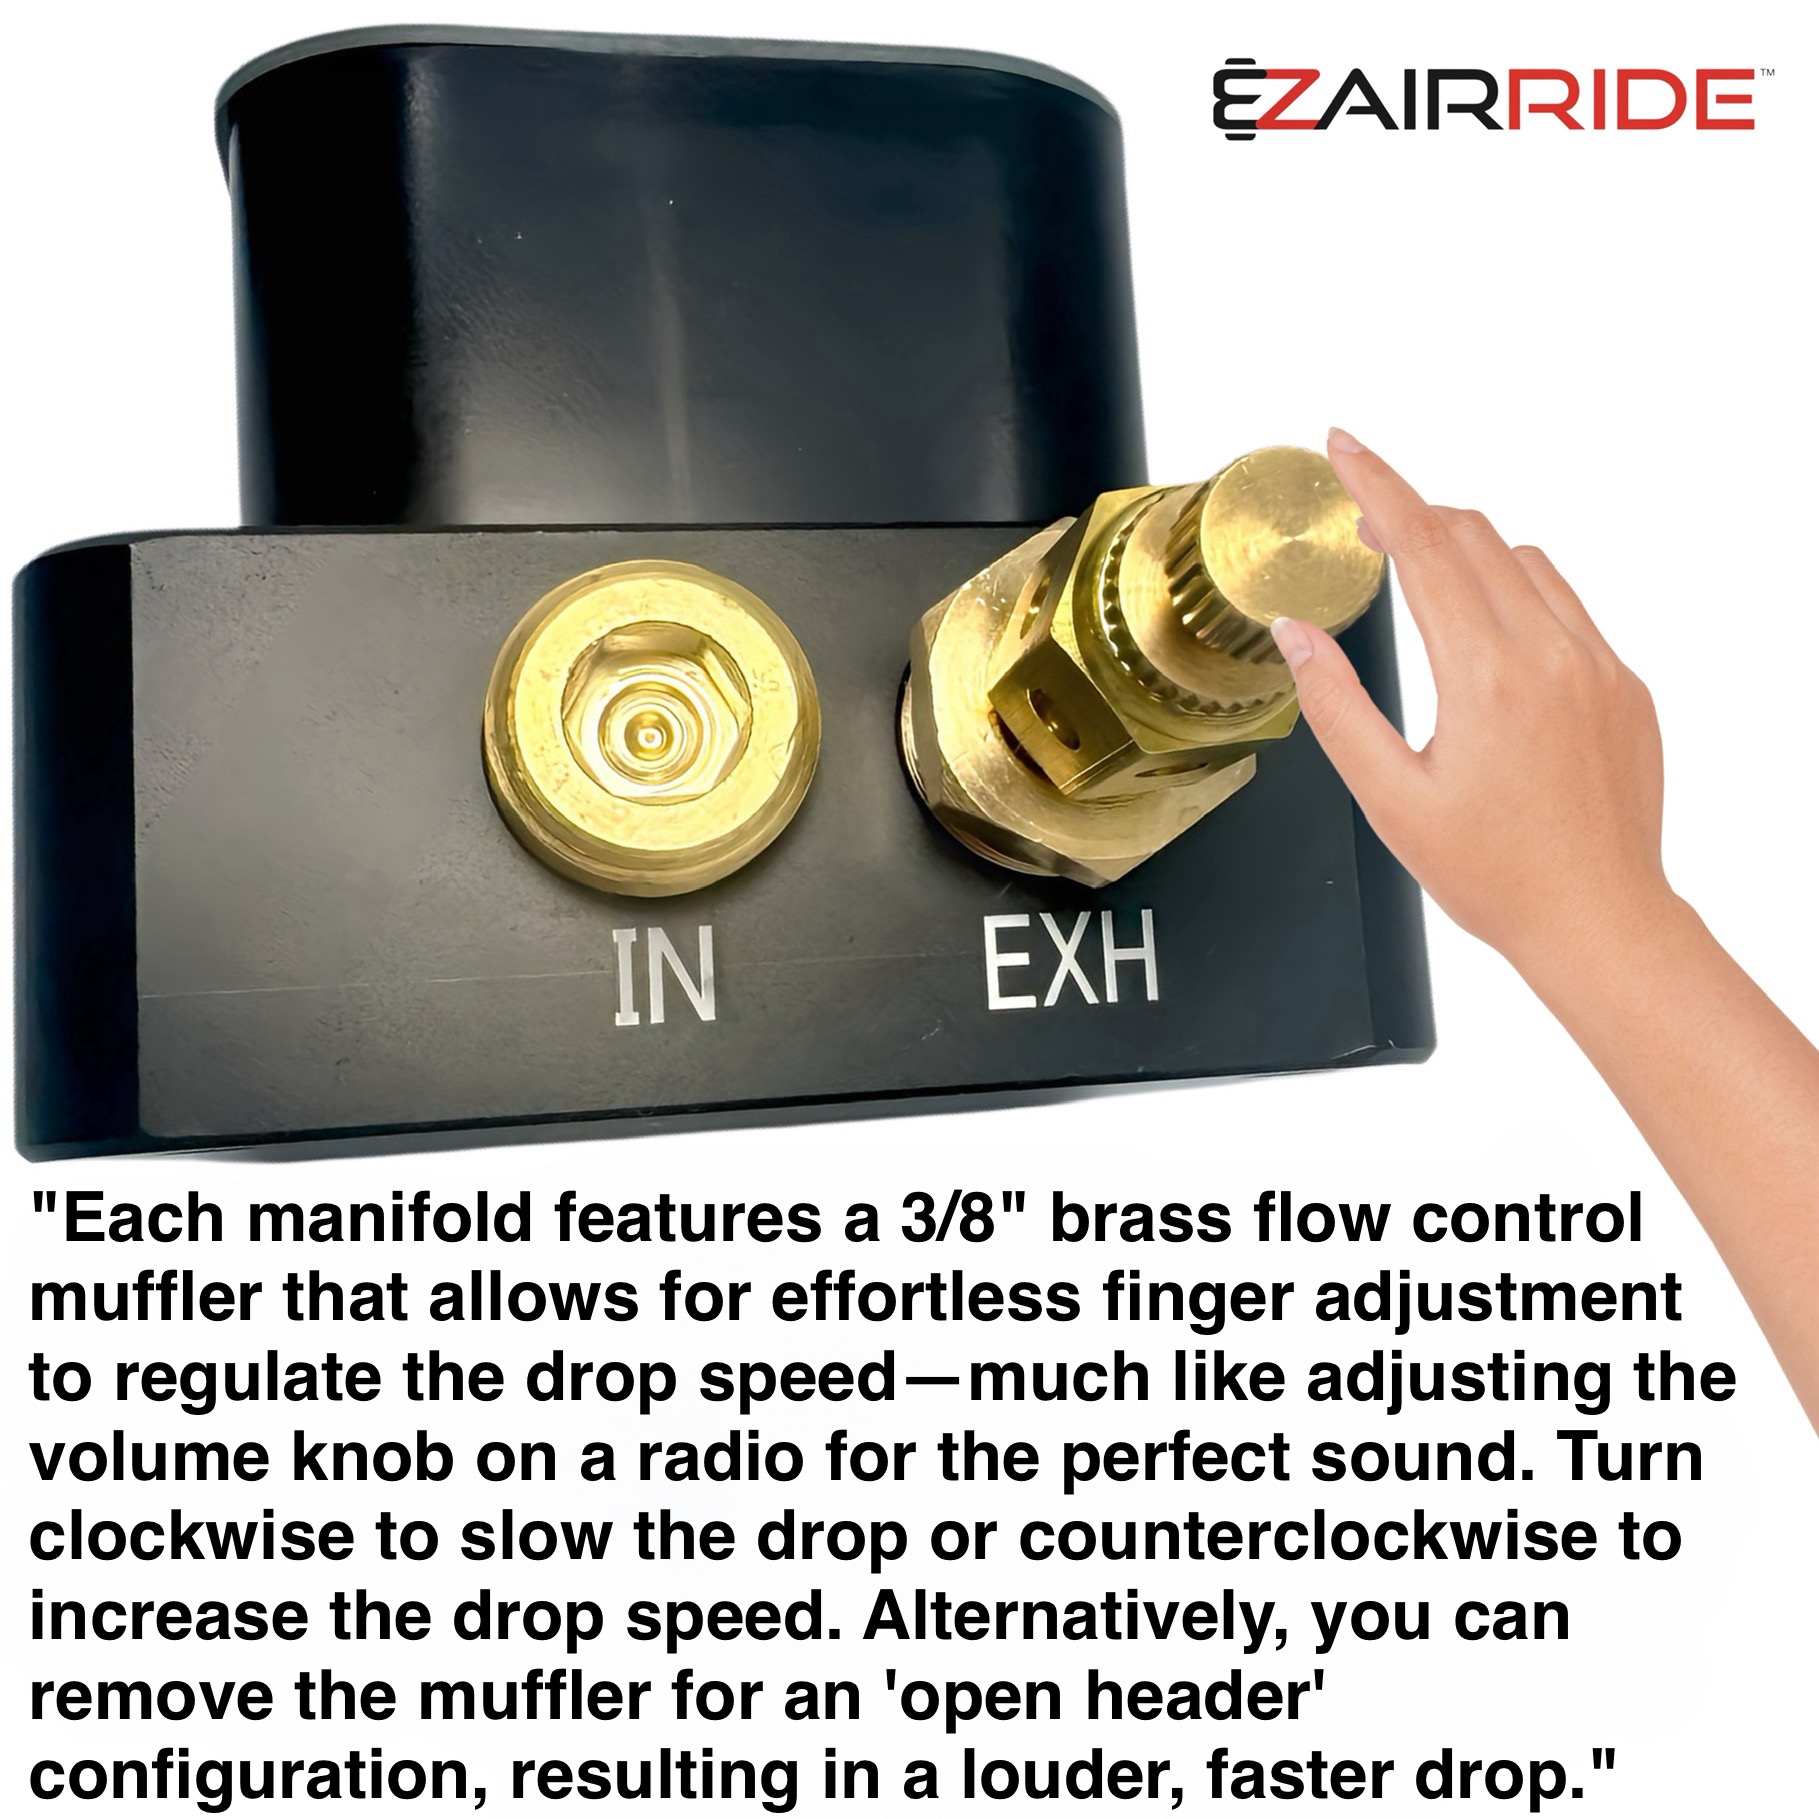
Dial-In Drop Control: Our electric manifolds feature adjustable slow-flow mufflers. Like turning down a stereo’s volume, you can adjust your drop speed so a passenger or kid never accidentally slams your oil pan or headers into the pavement.
What’s Included:
(4) Premium 2500-Series EZ AIRRIDE Airbags: Featuring a steel-braided waistband, a massive 600 PSI burst rating for unmatched pressure capacity, a razor-thin 2.8” compressed height, and a 10.8” extension for nearly 8 inches of usable stroke.
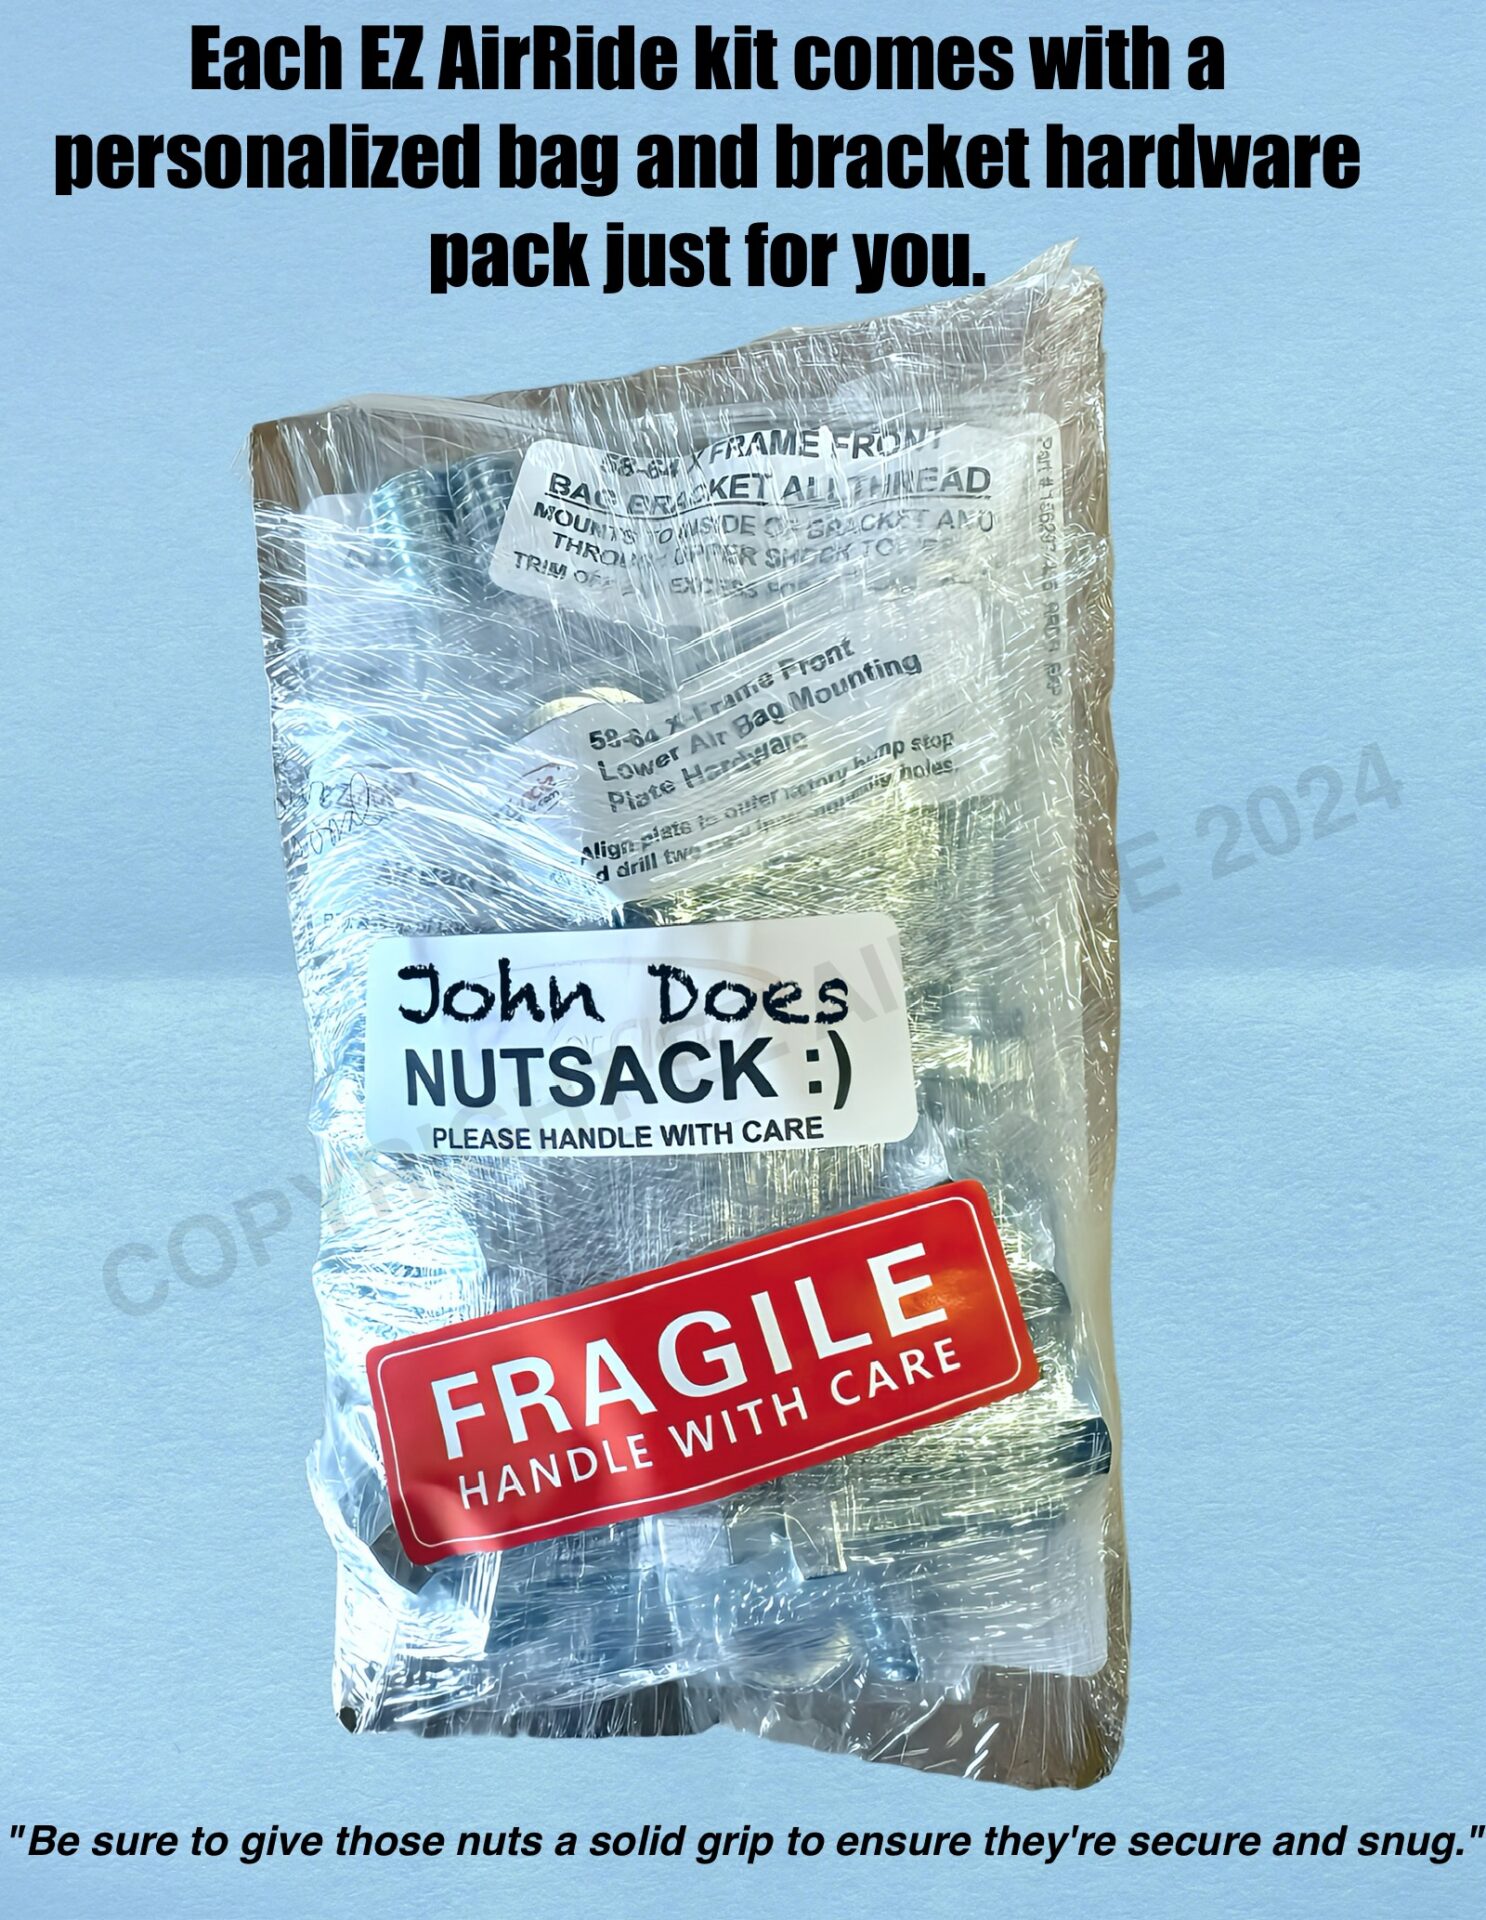
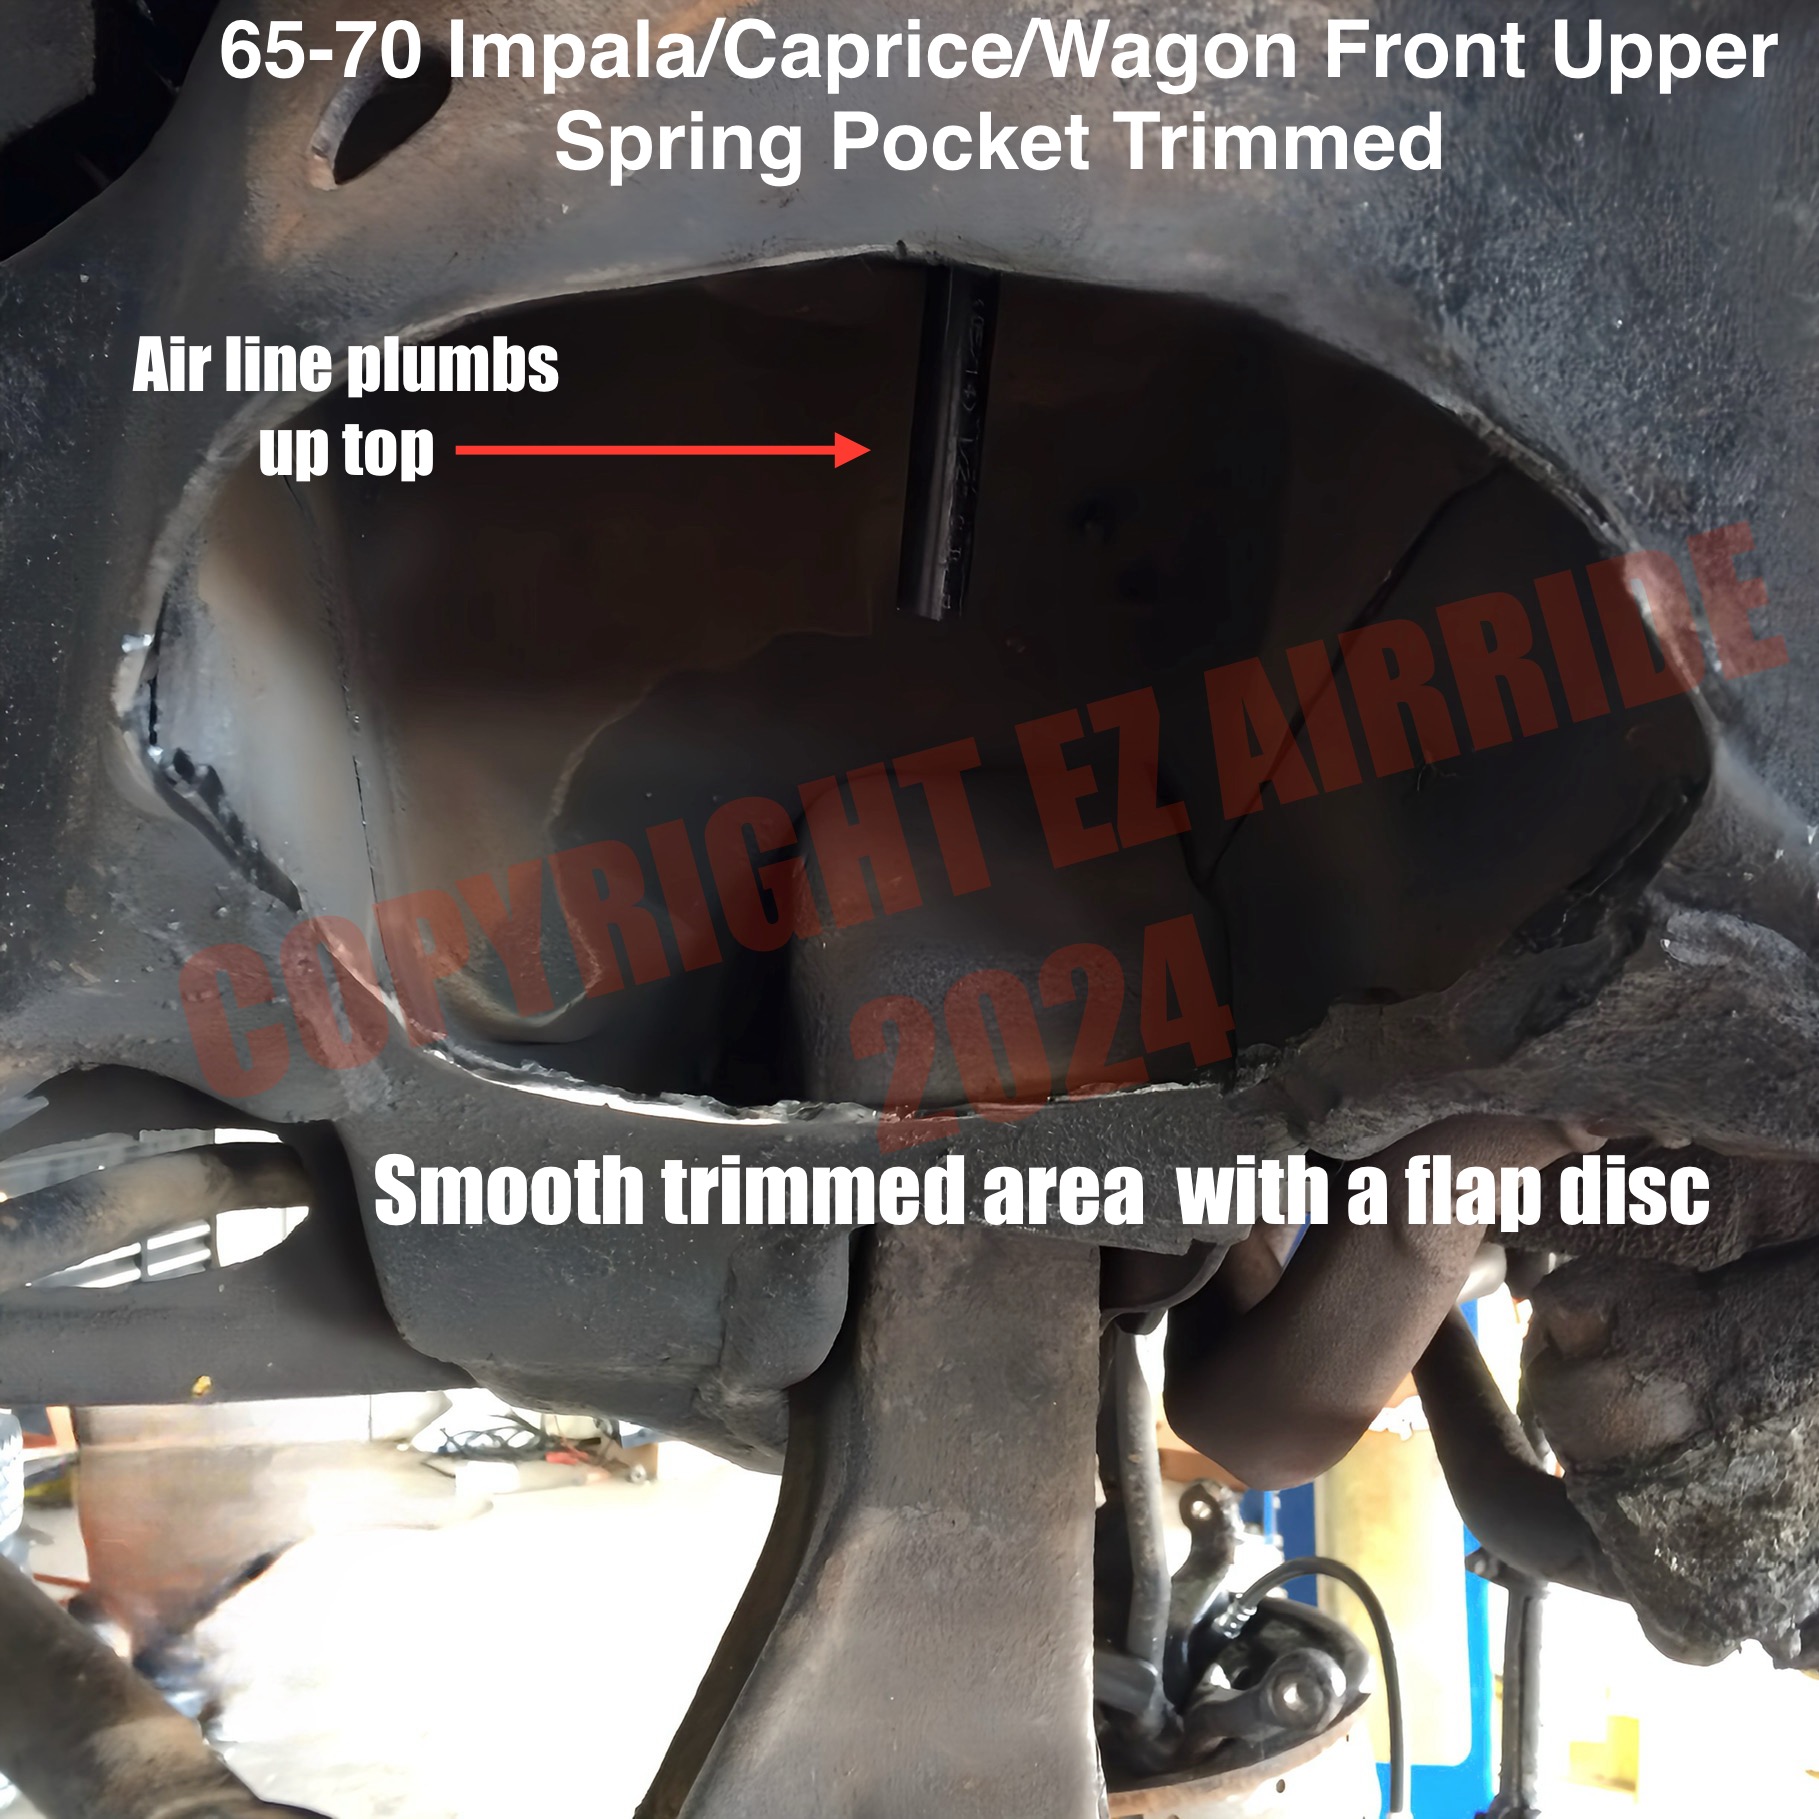
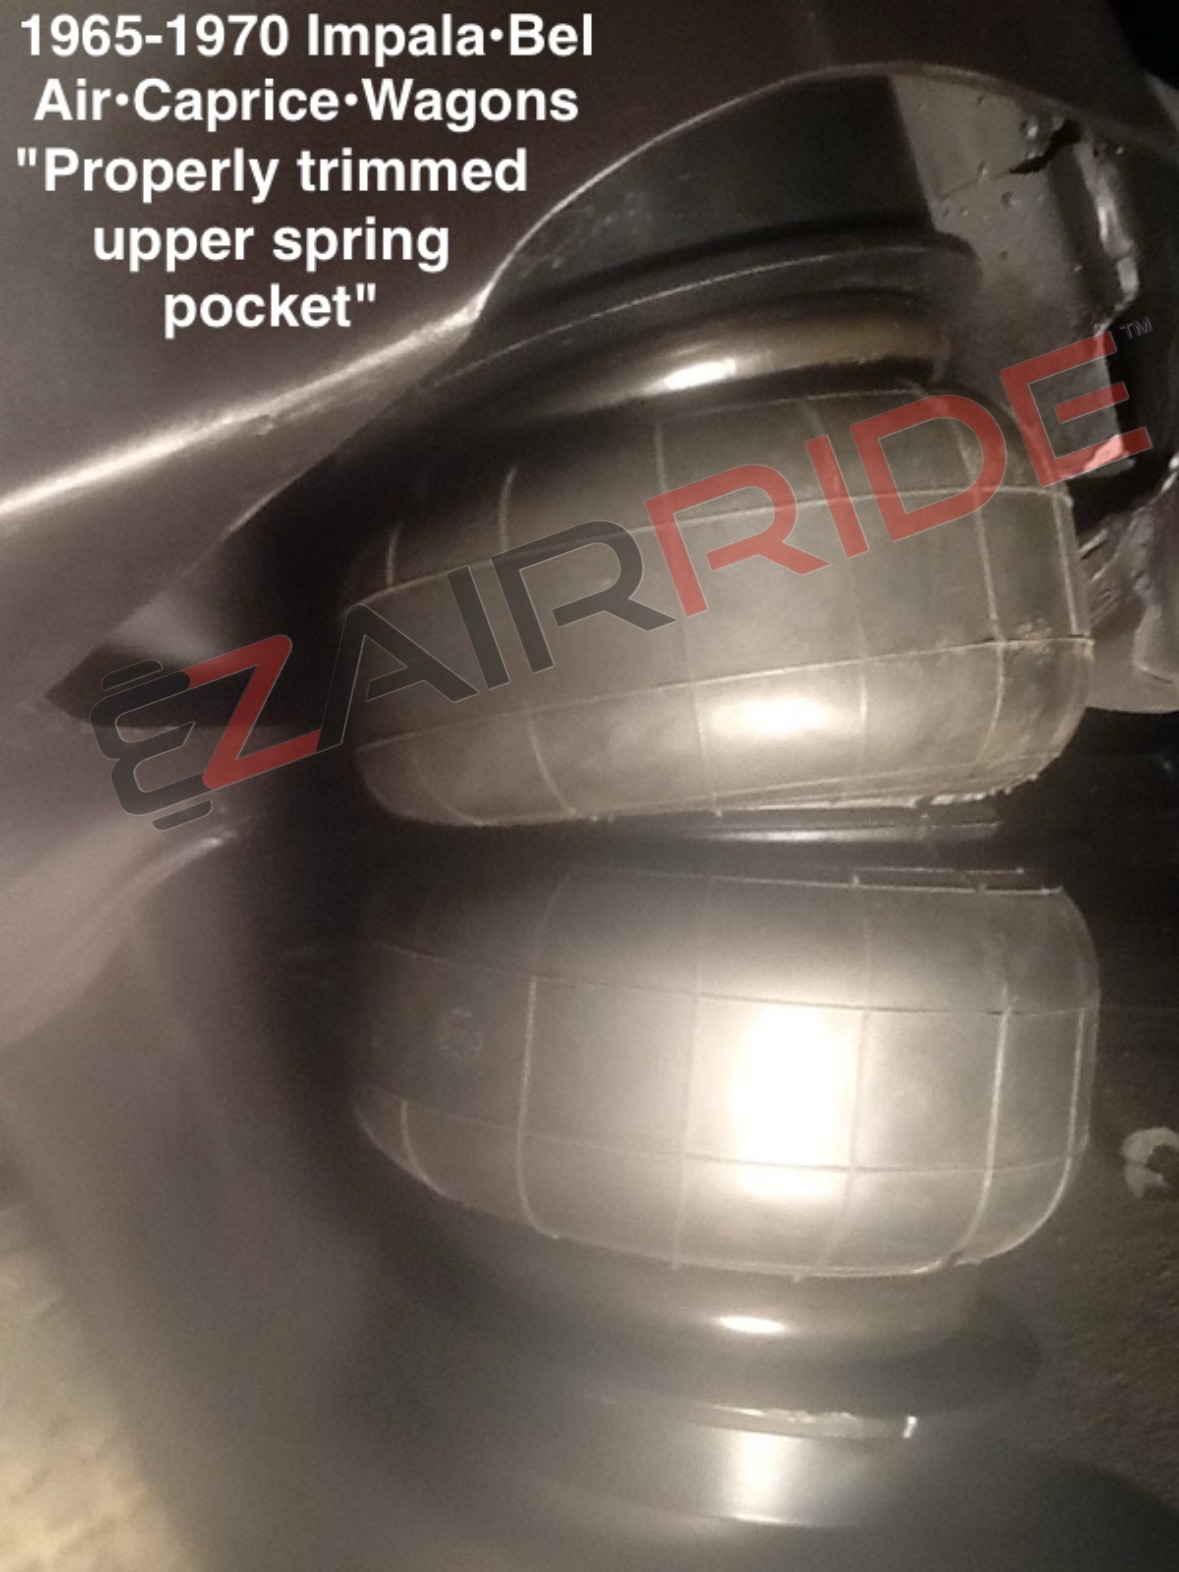
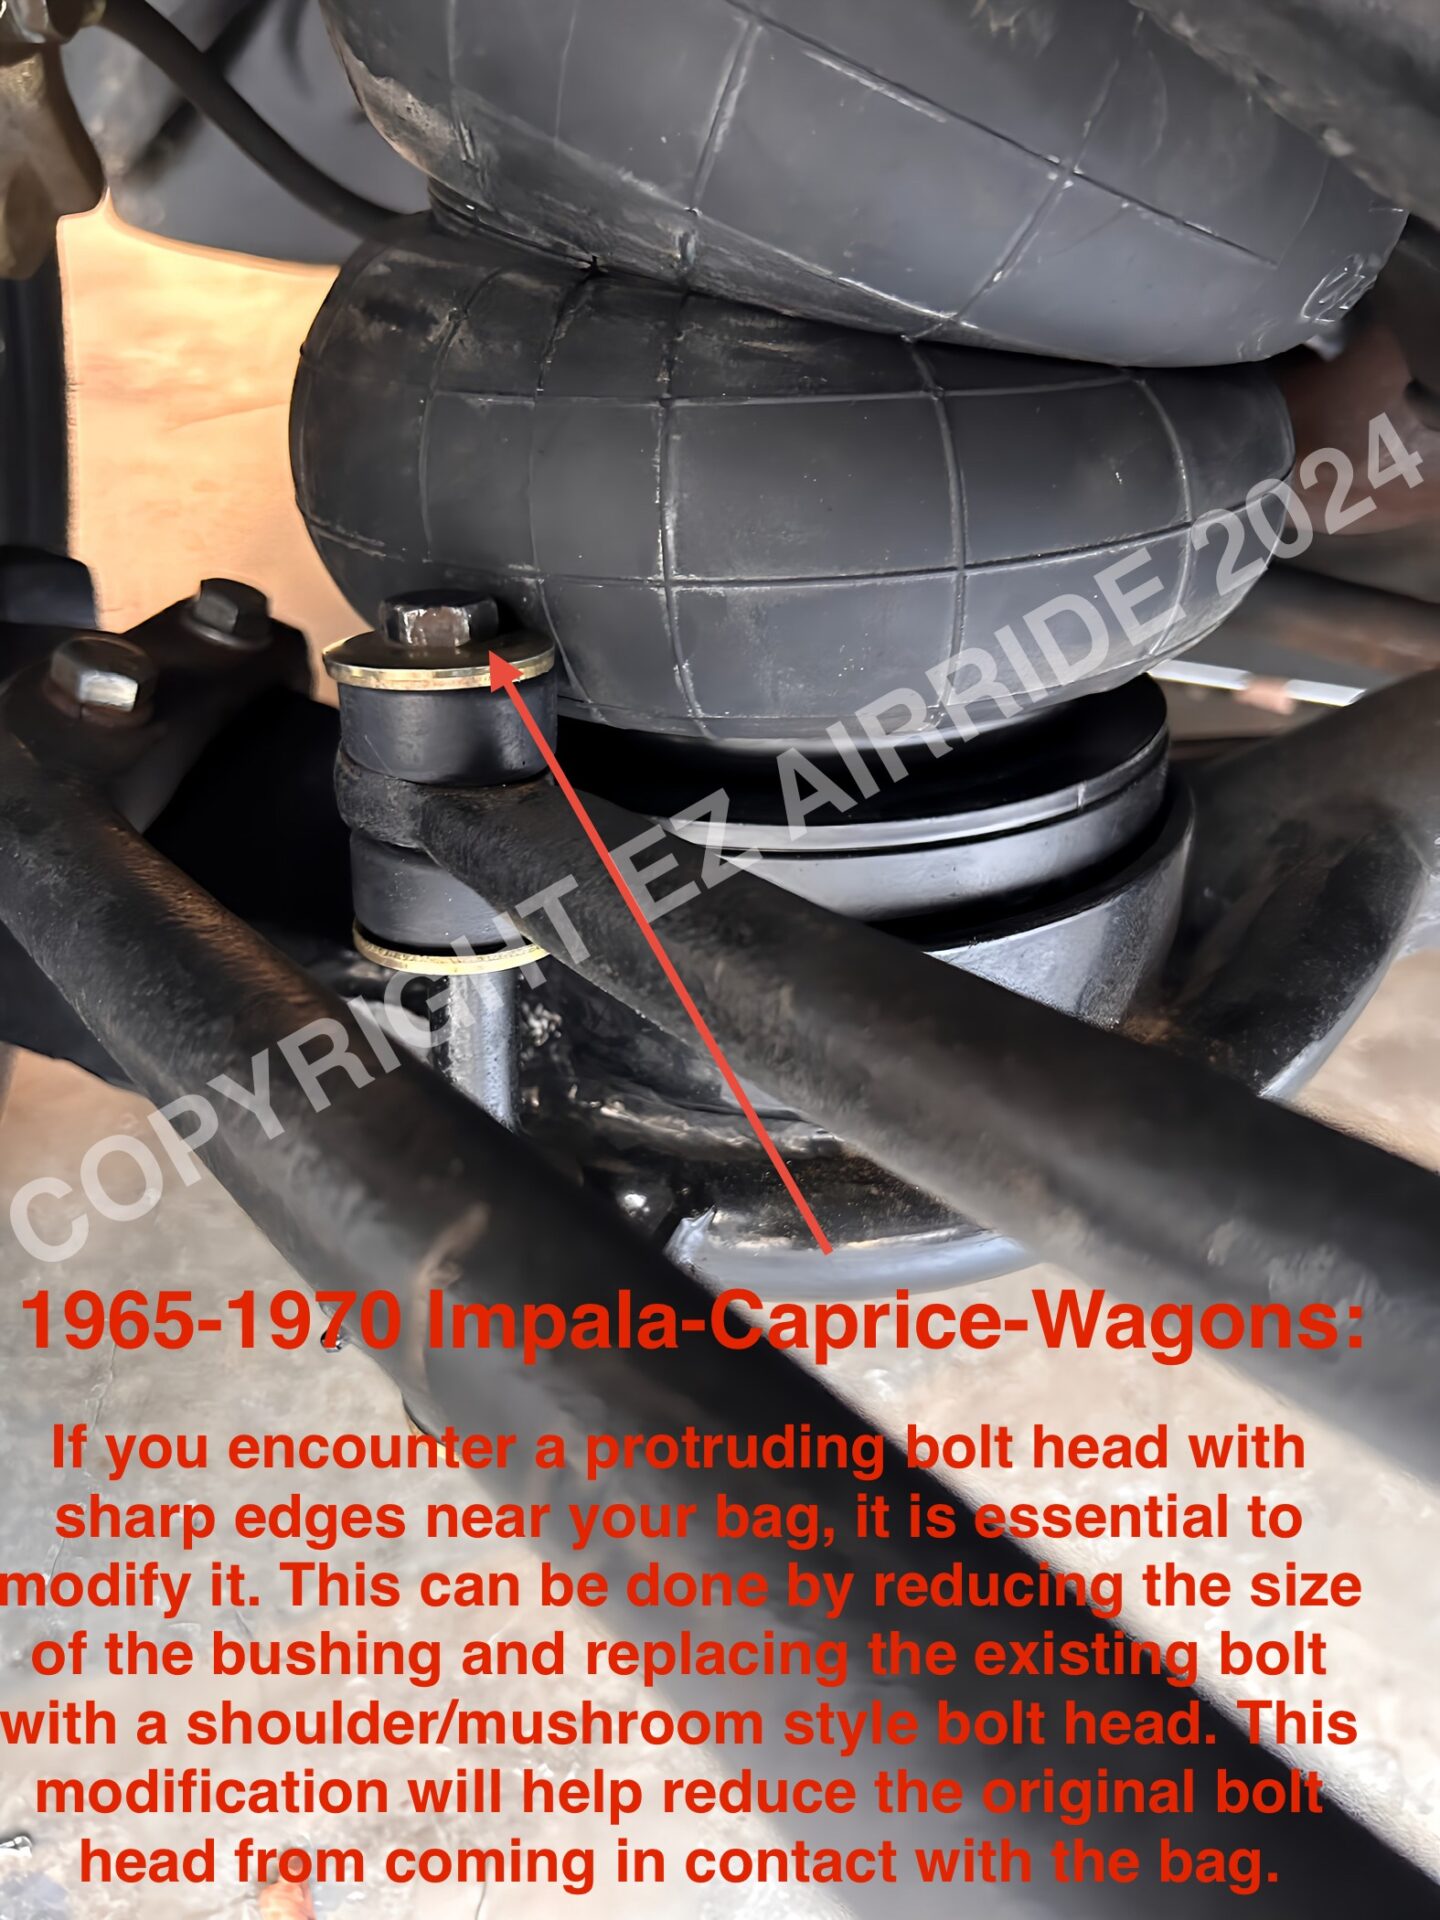
Complete Vehicle-Specific Bracket Kit: Heavy-duty, powder-coated front and rear brackets designed specifically for your chassis. Includes all necessary bracket-mounting hardware. (Note: As with all classic custom suspension builds, checking clearance around factory frame pockets during mock-up ensures long-term bag life).
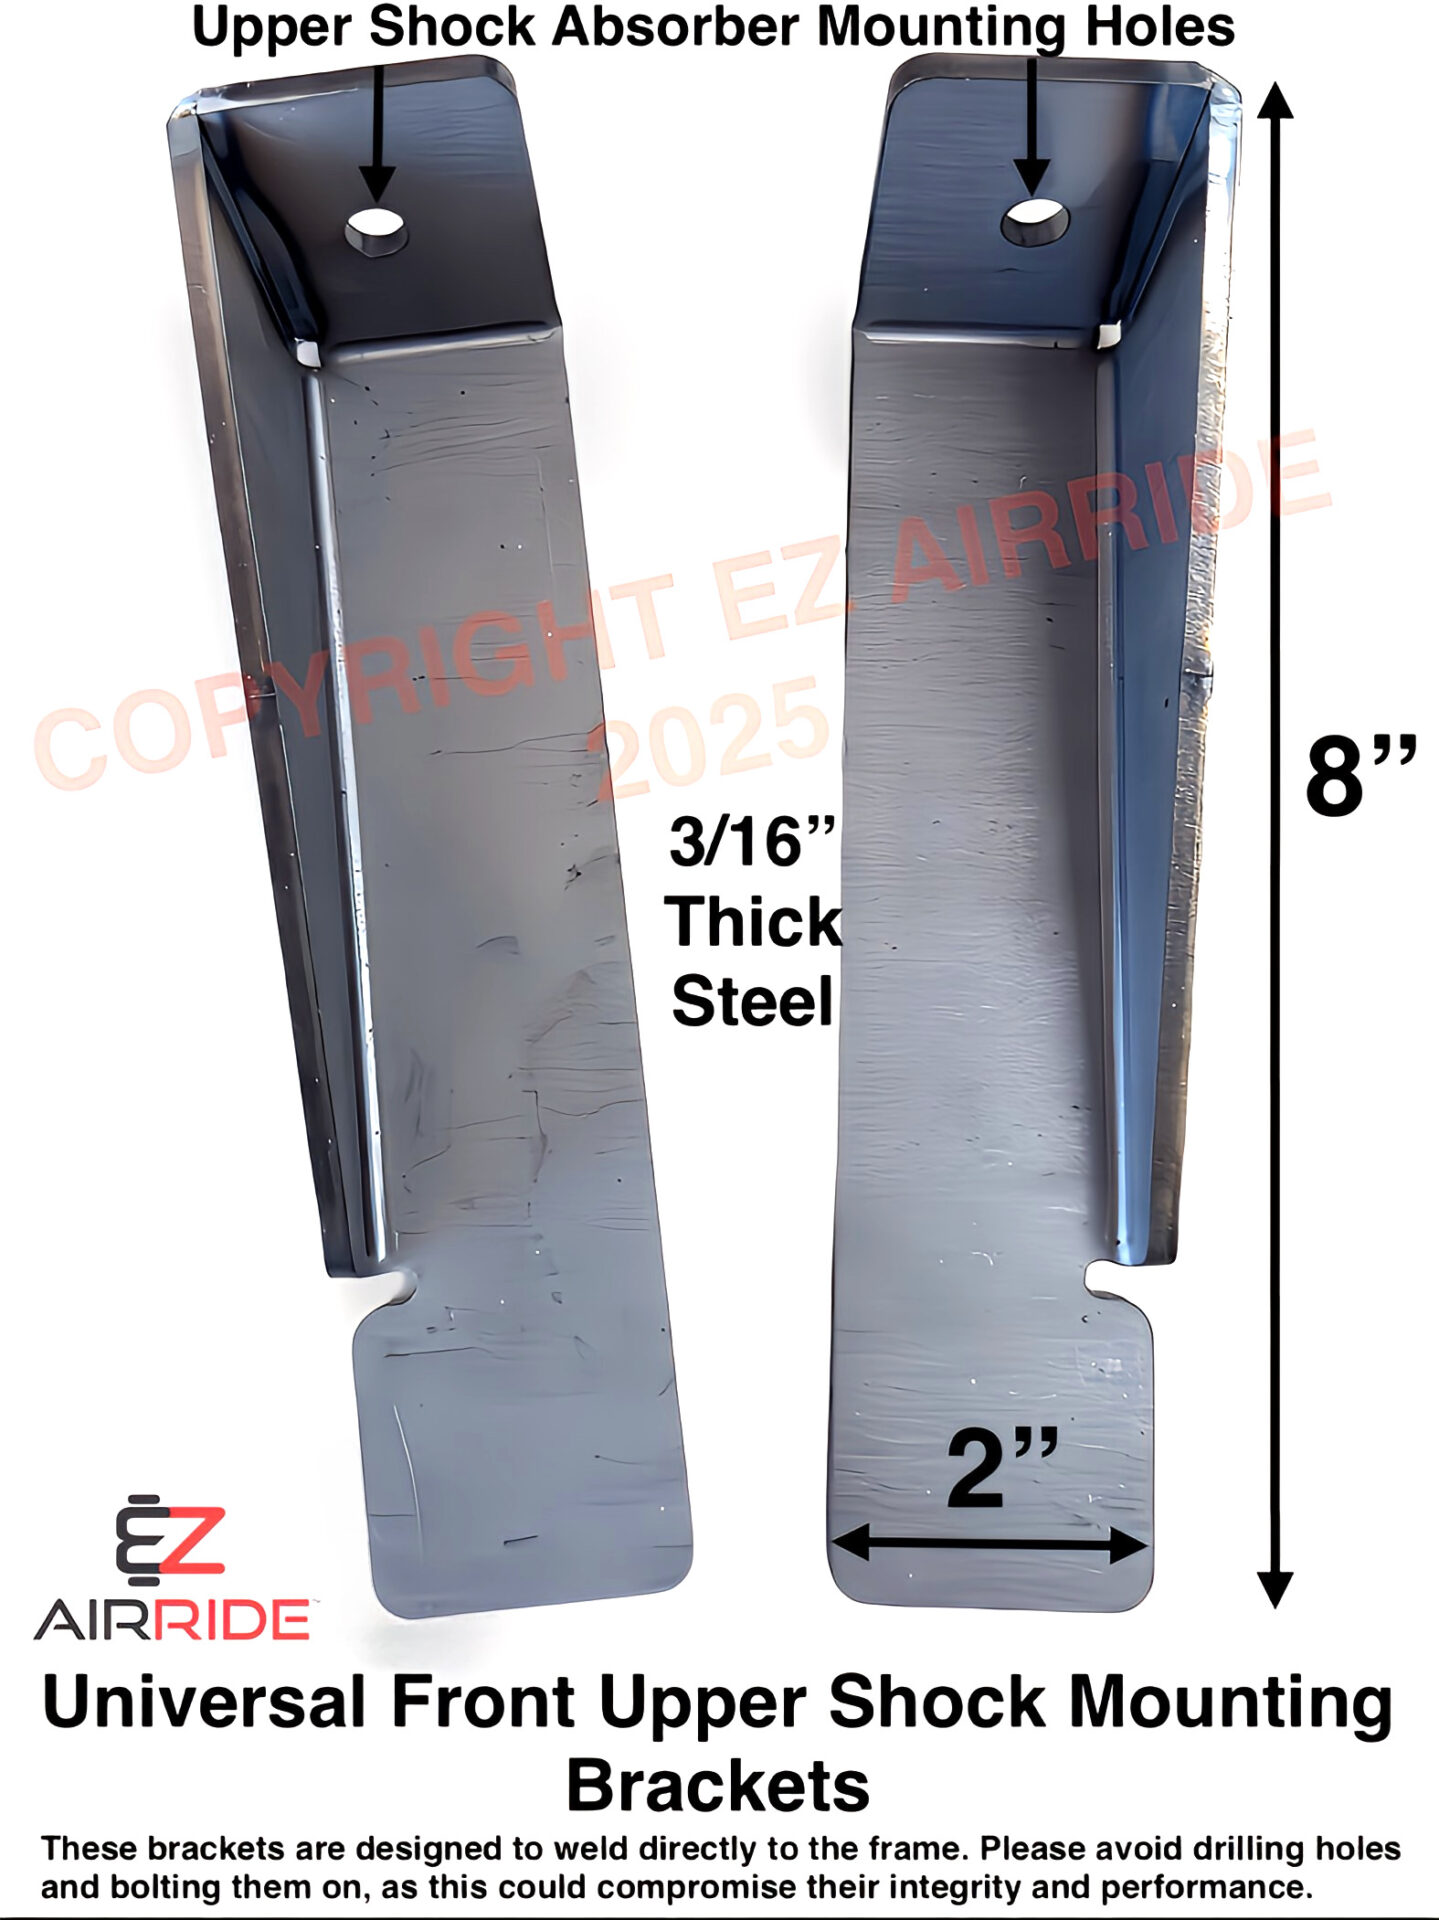
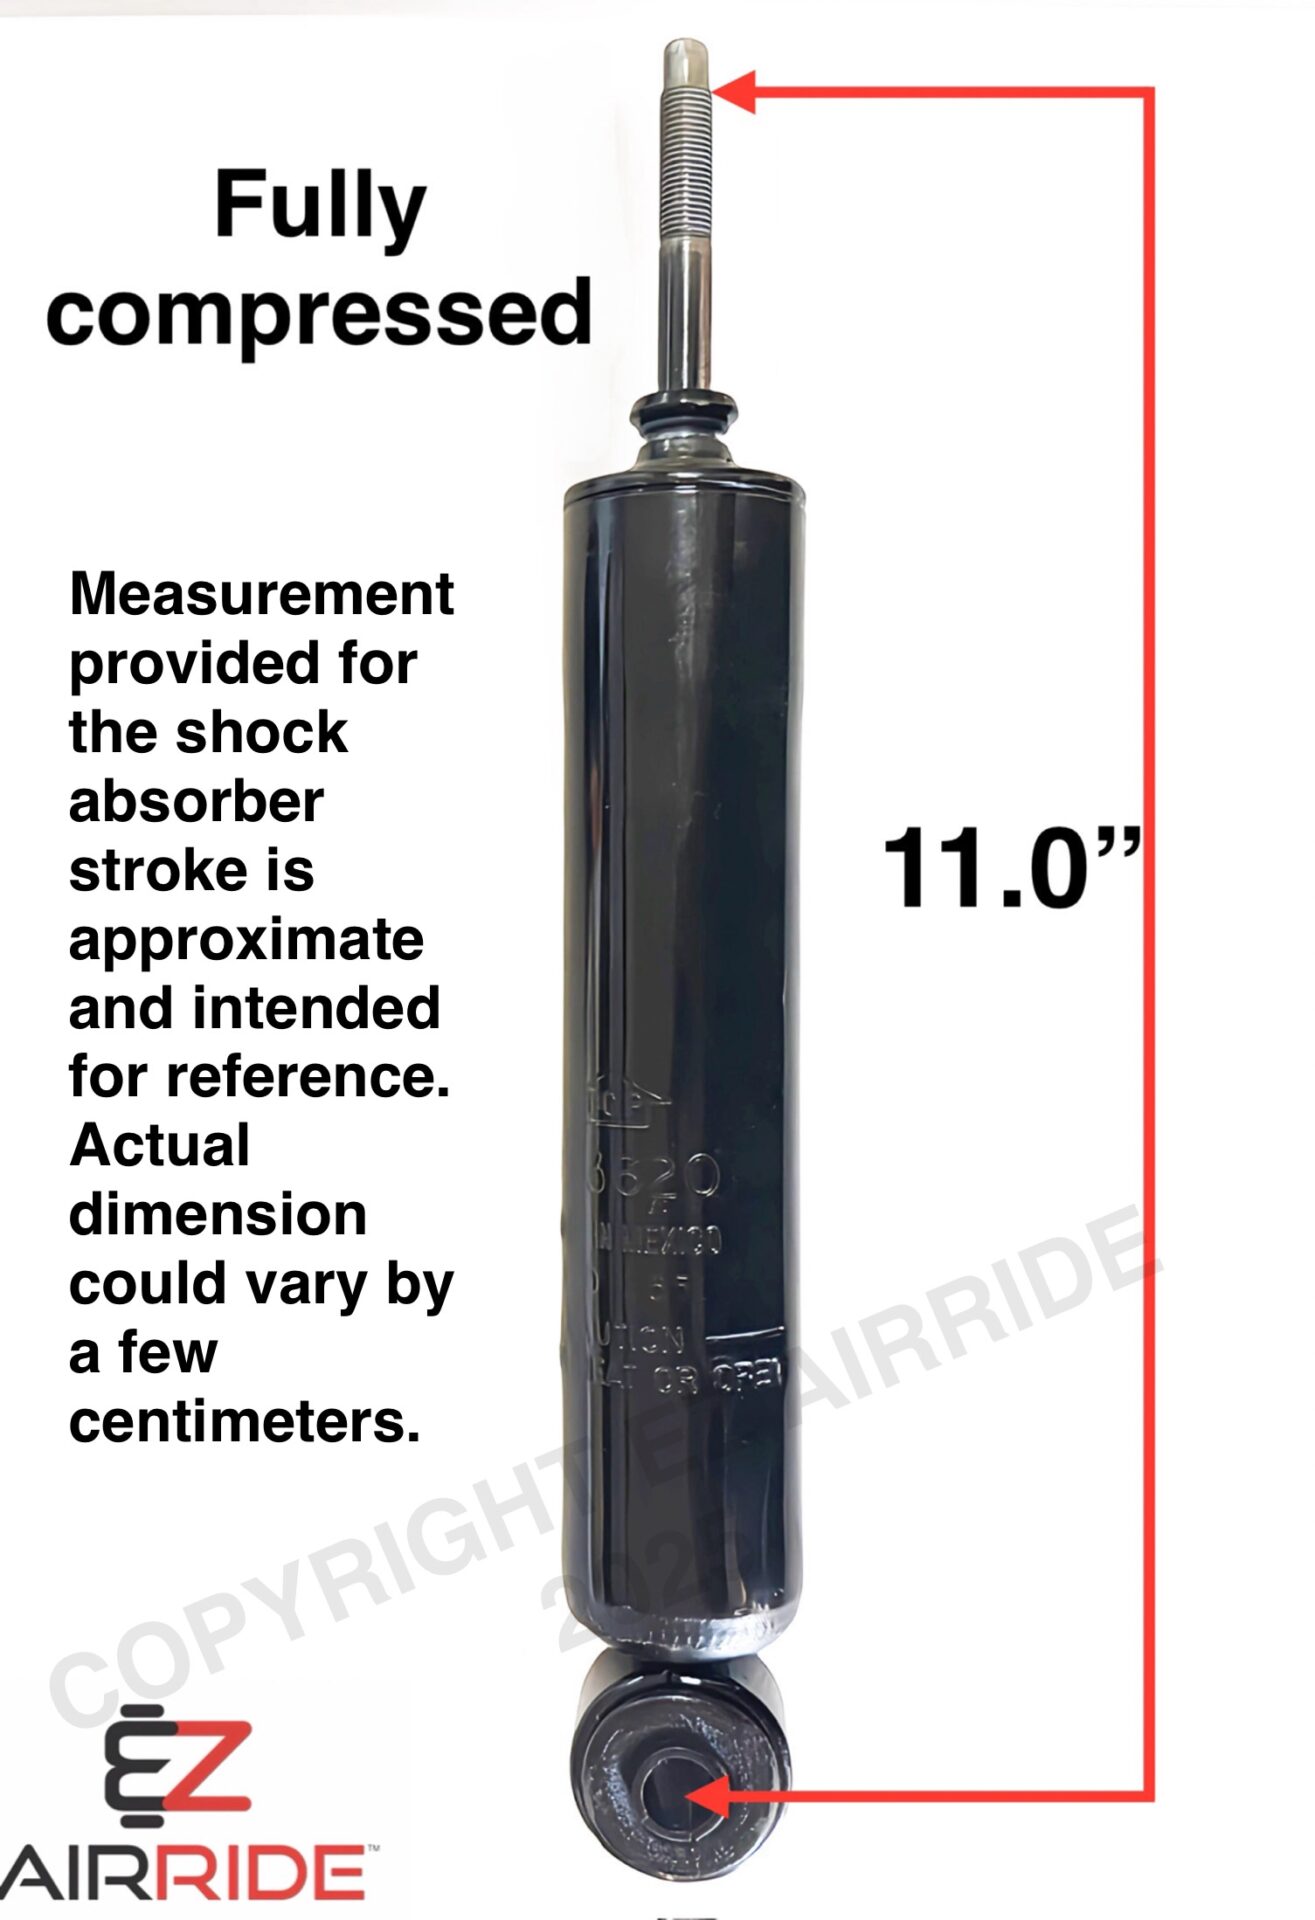
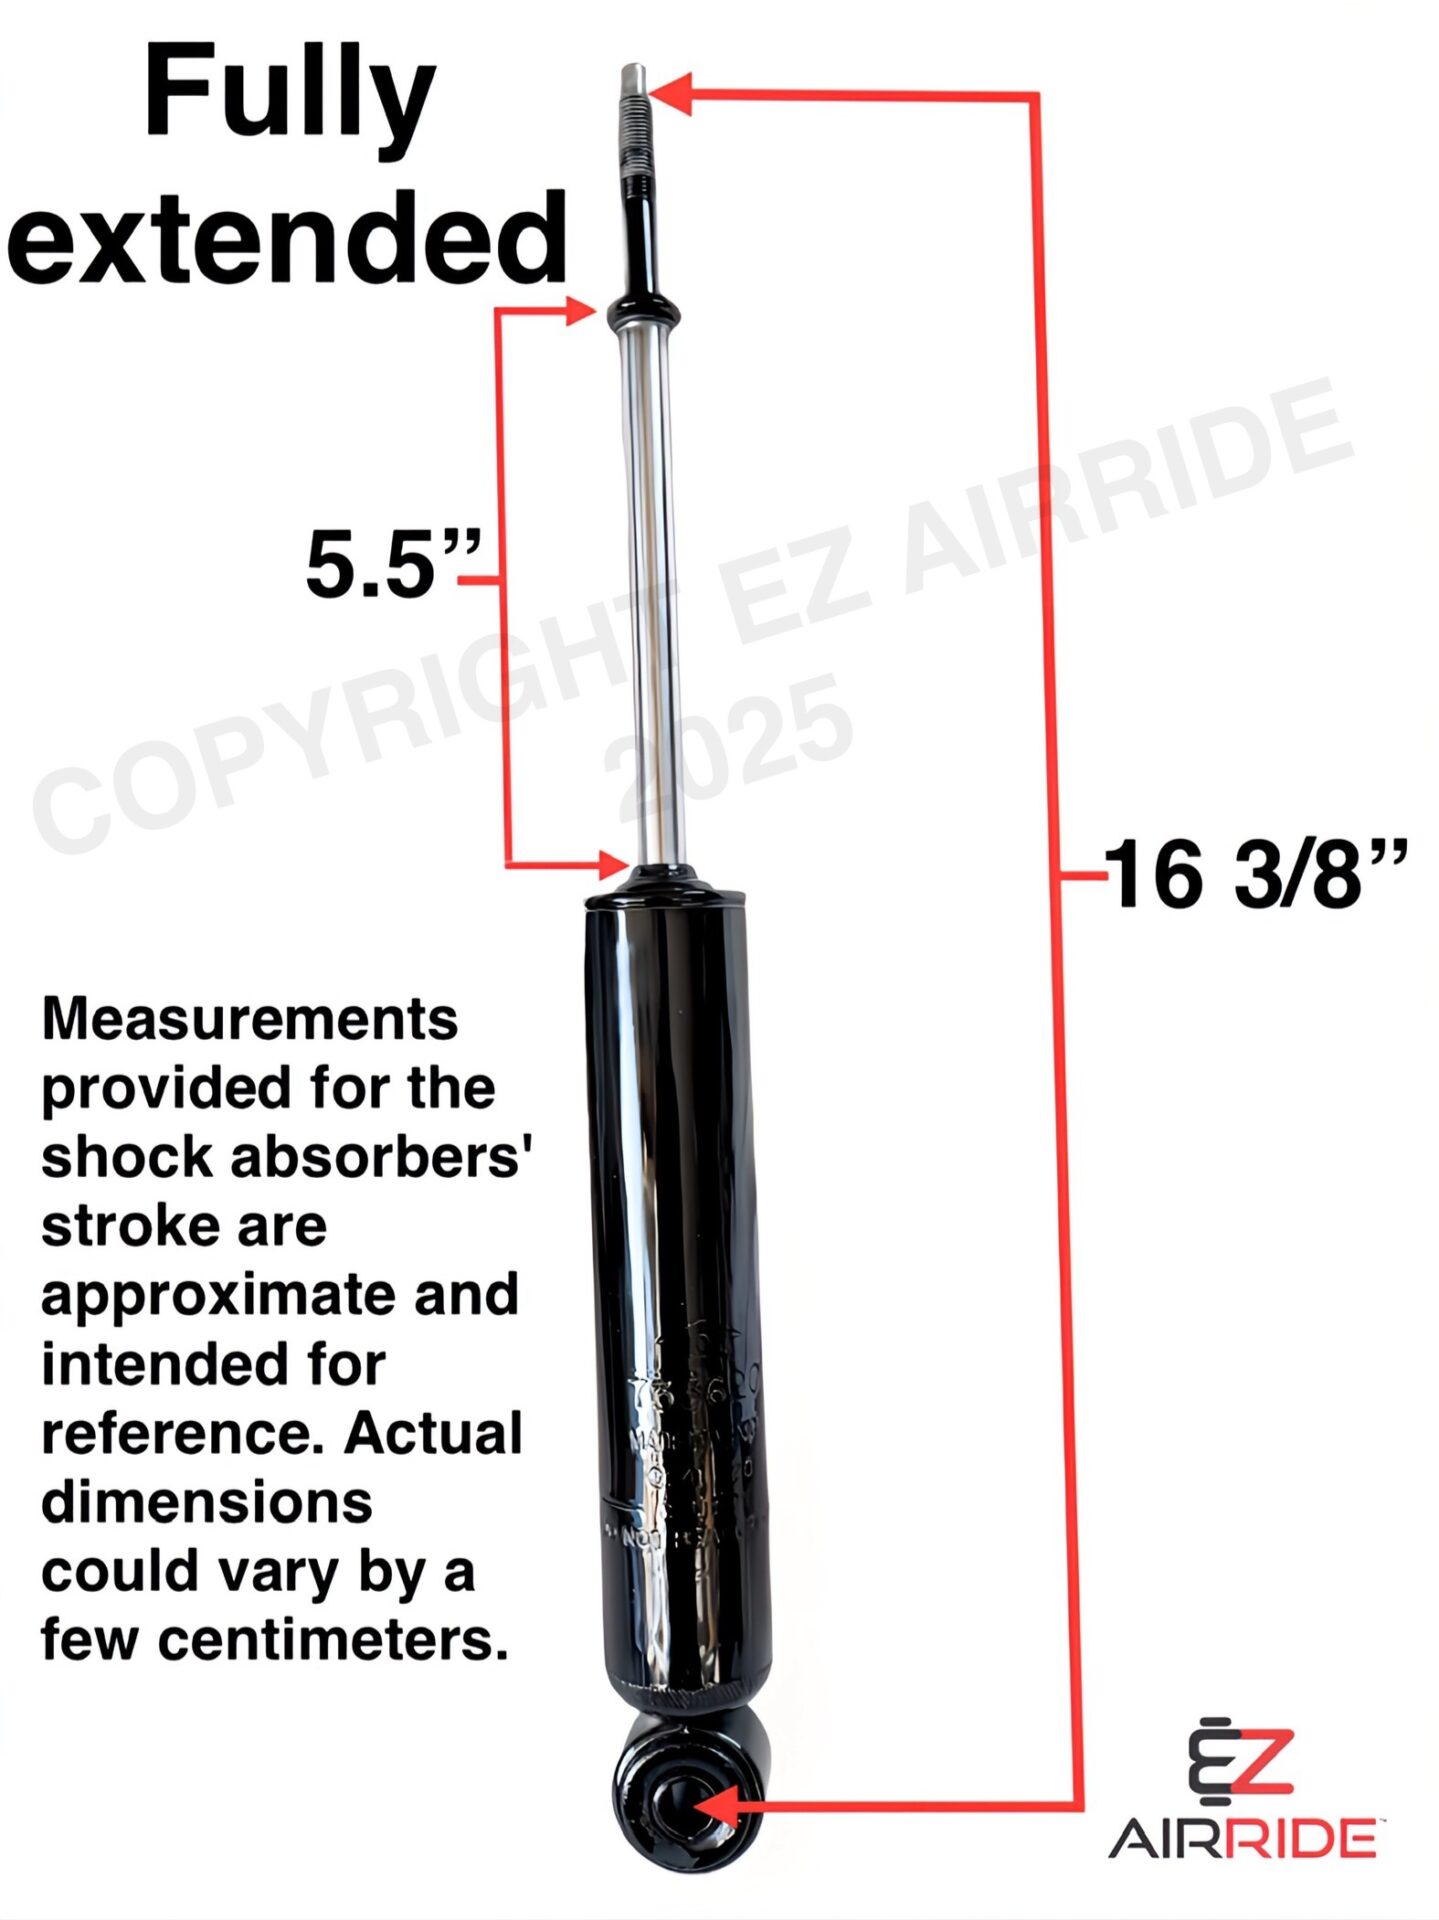
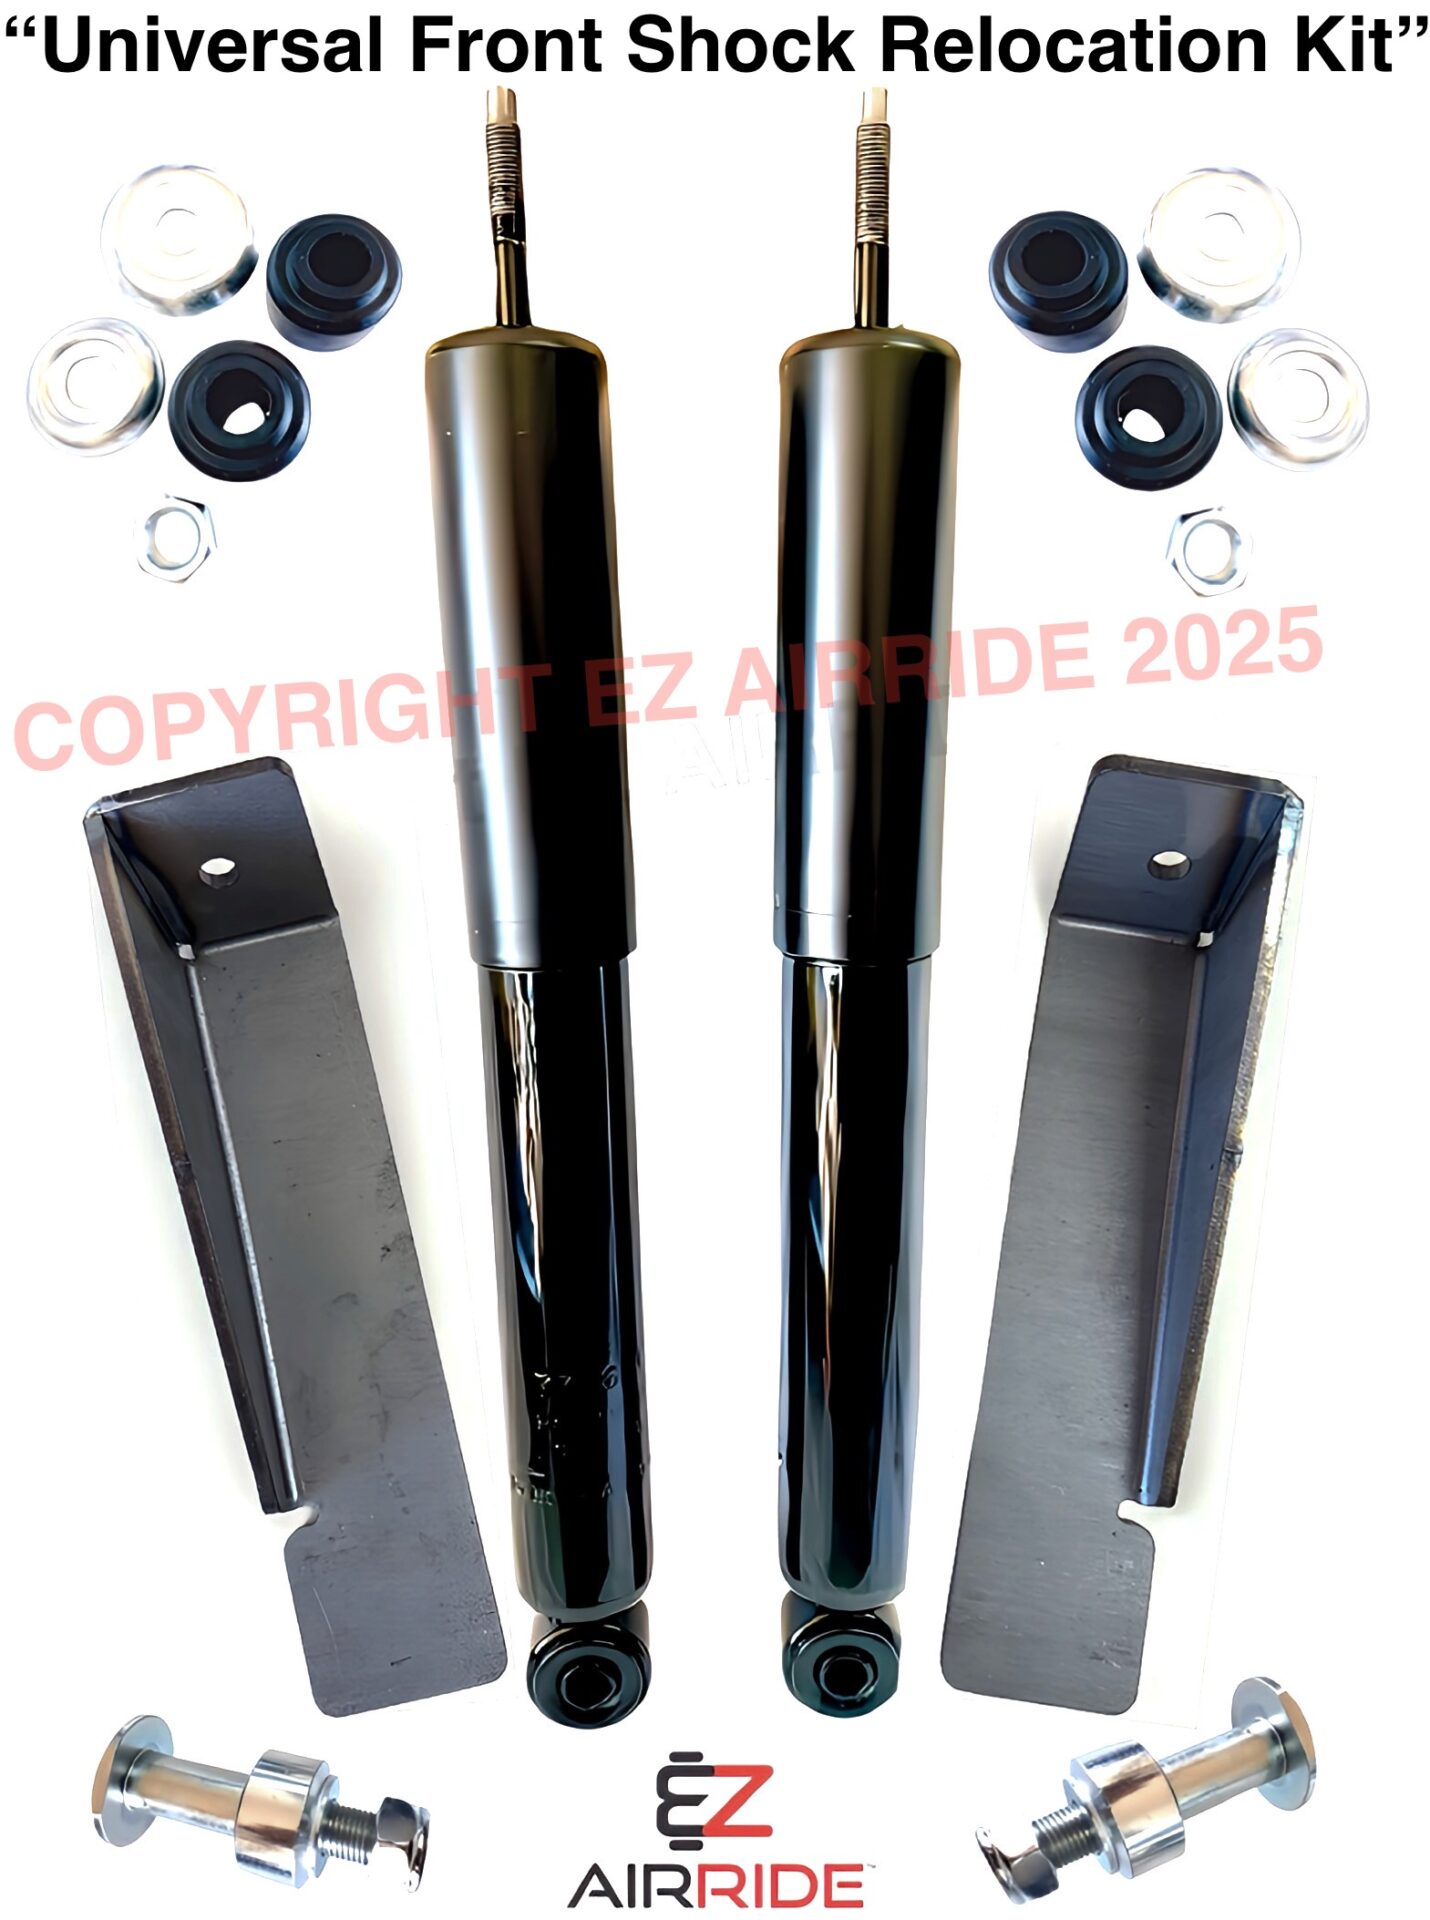
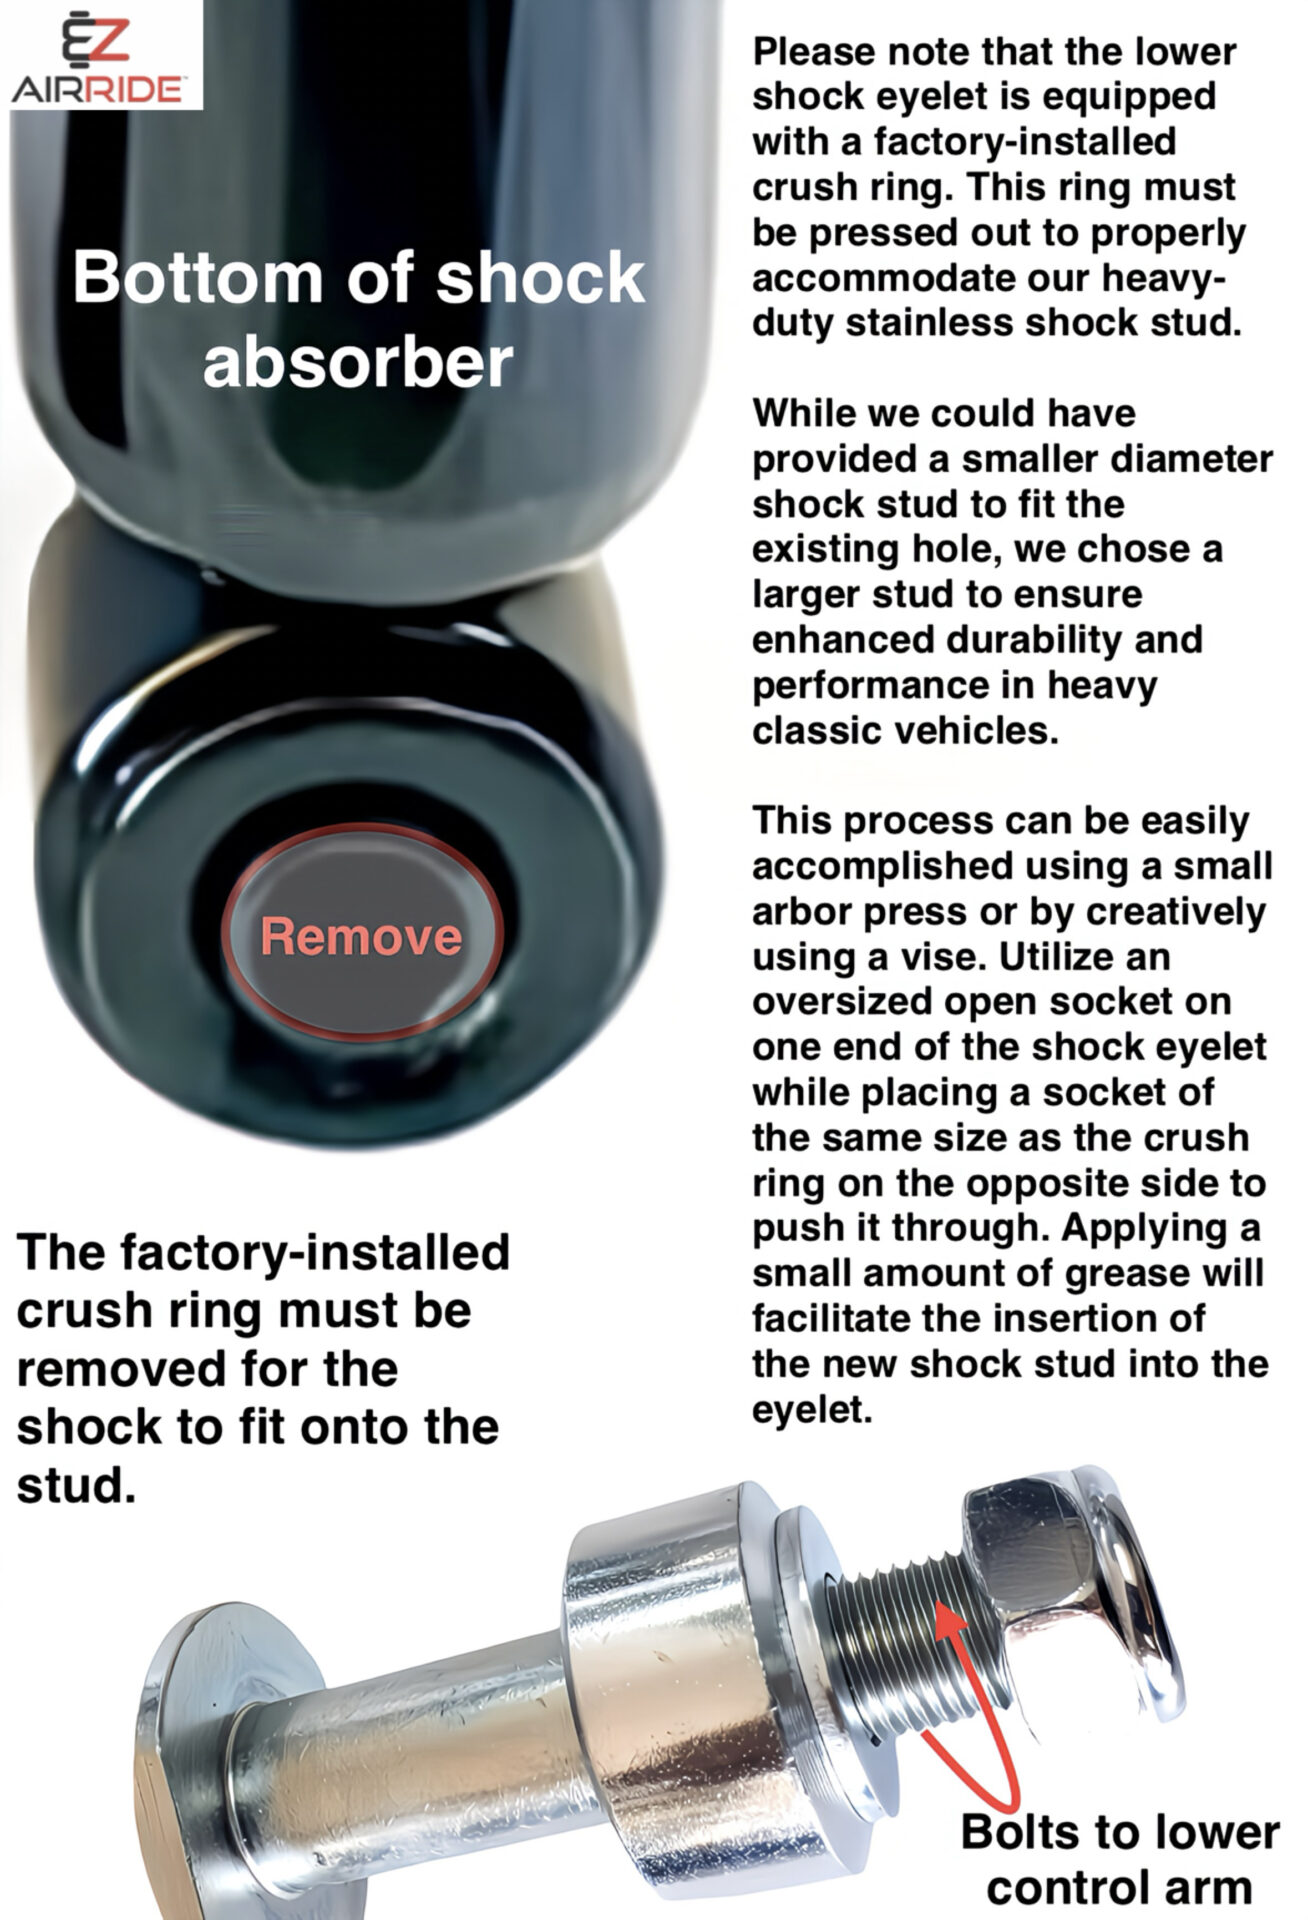
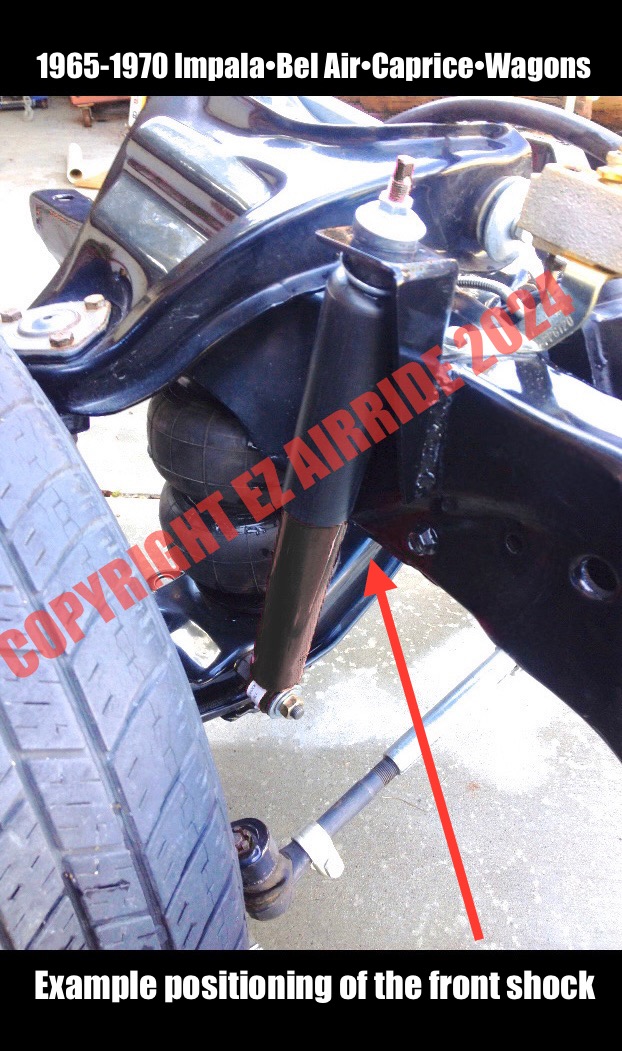
Front Shock Relocation Pack: Includes custom-designed shock towers, shock absorbers, and heavy-duty lower shock mounting studs to cleanly reposition your shocks away from the bags.
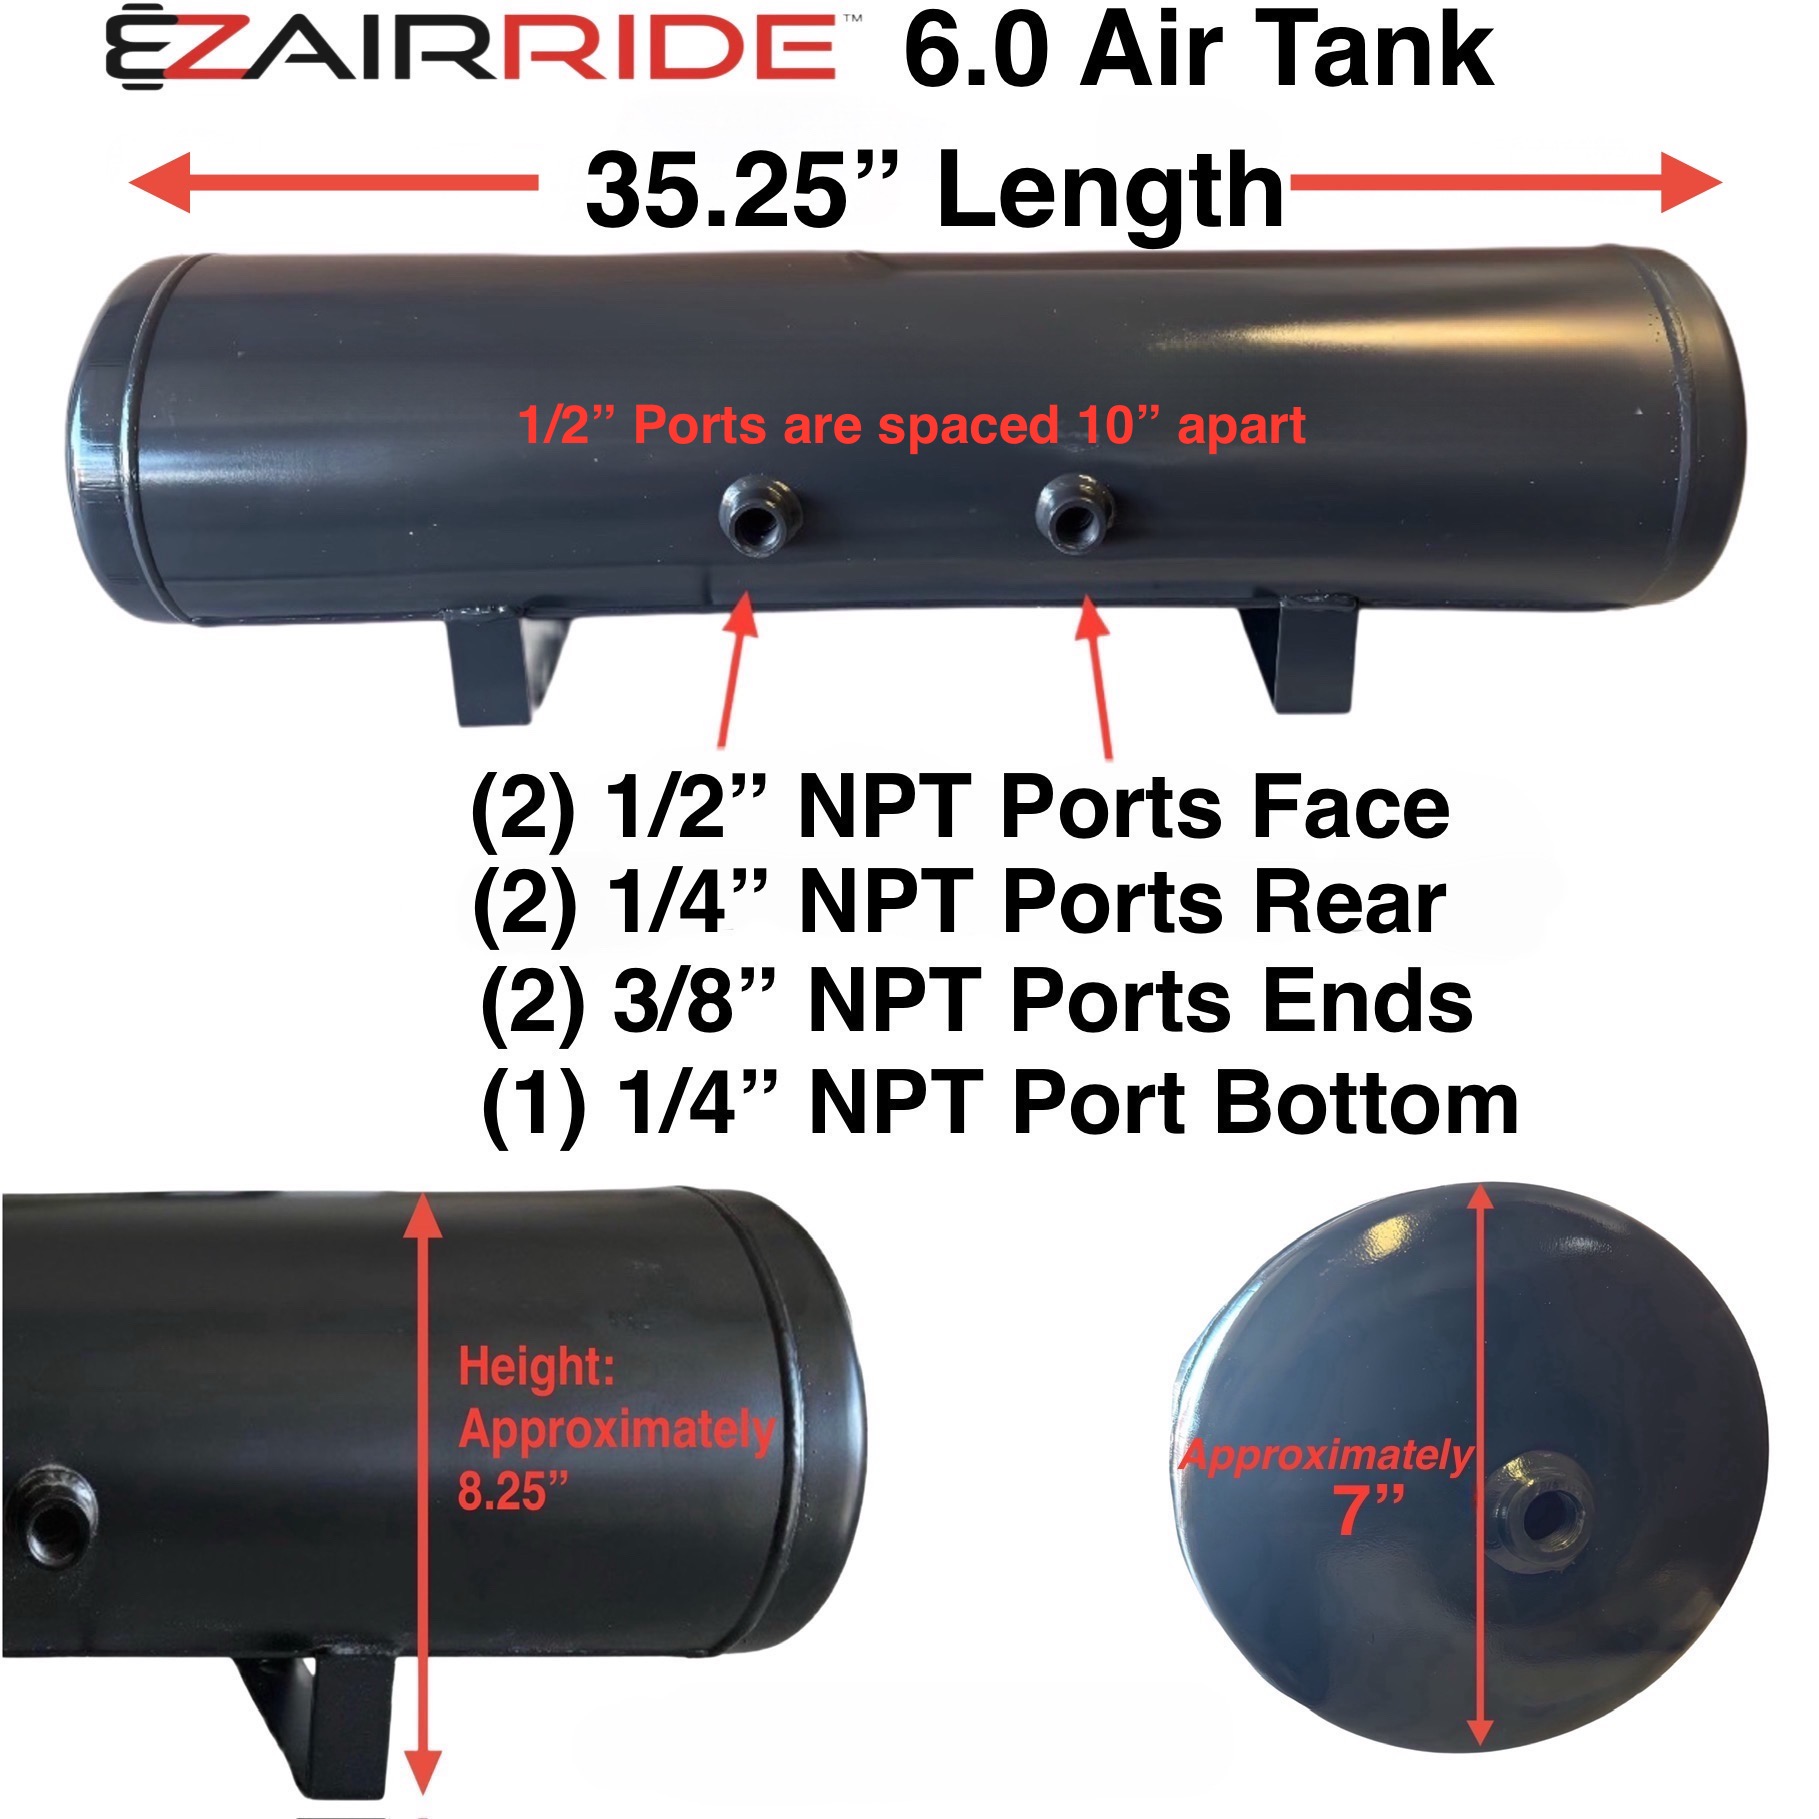
Exclusive 6+ Gallon Air Tank: High-capacity tank featuring a custom port configuration designed exclusively for this kit’s plumbing layout.
Elite Series 3/8″ Electric Manifolds: Featuring individual 4-corner air isolation and integrated slow-flow drop mufflers.
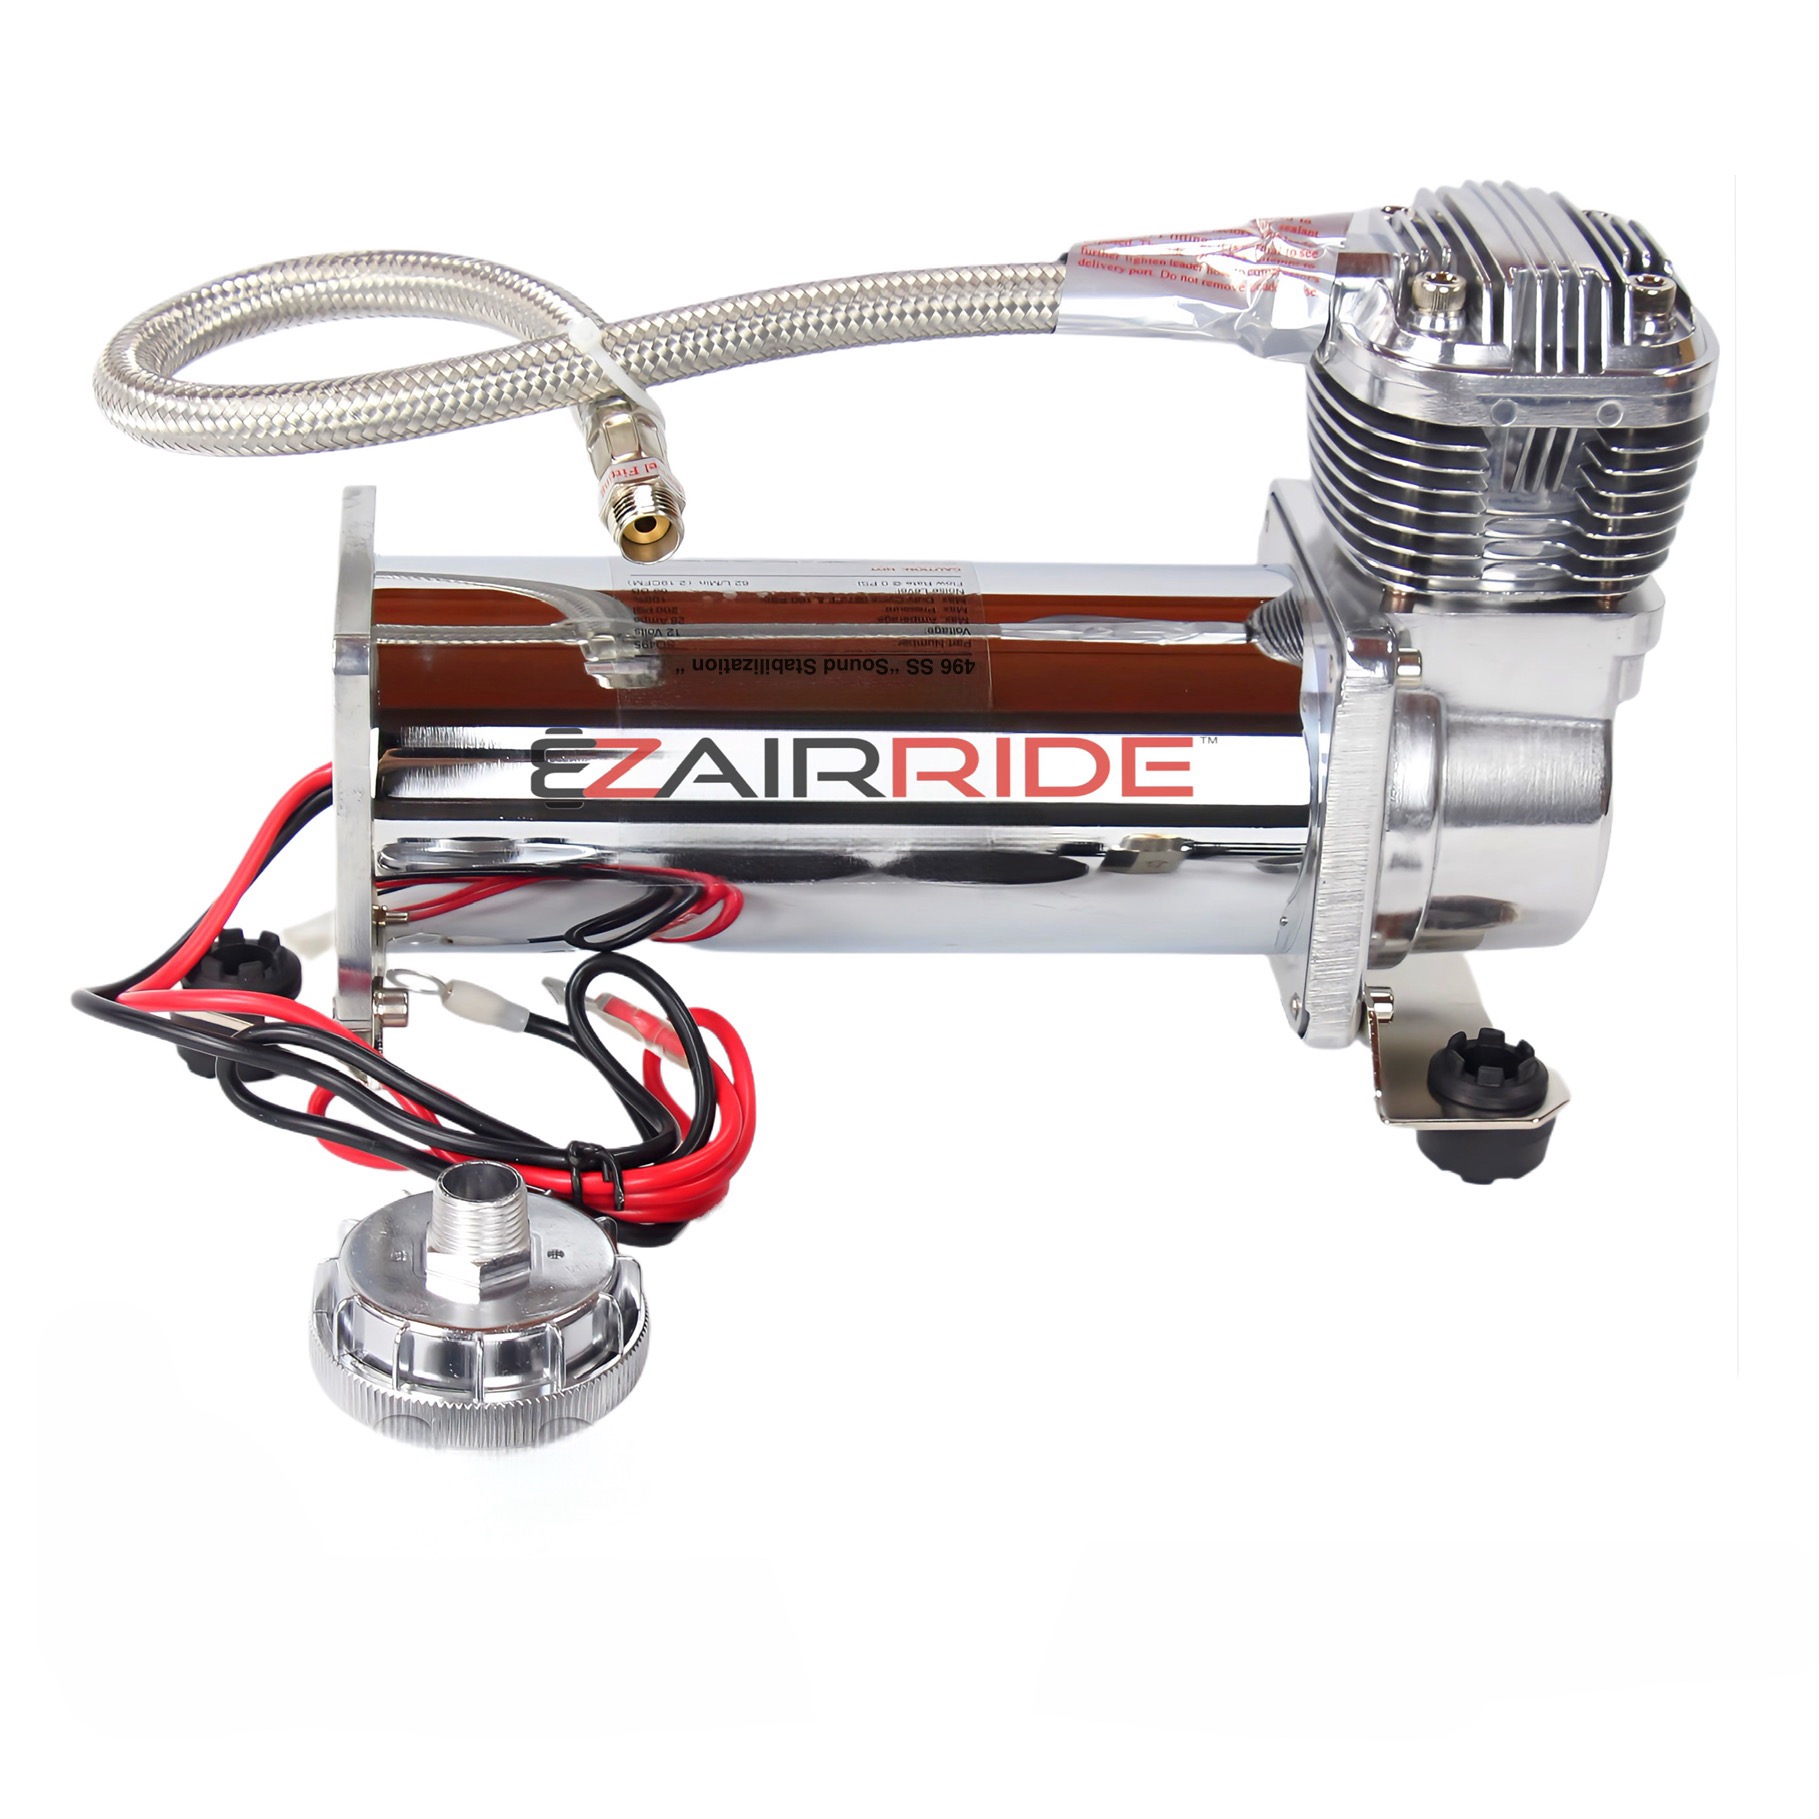
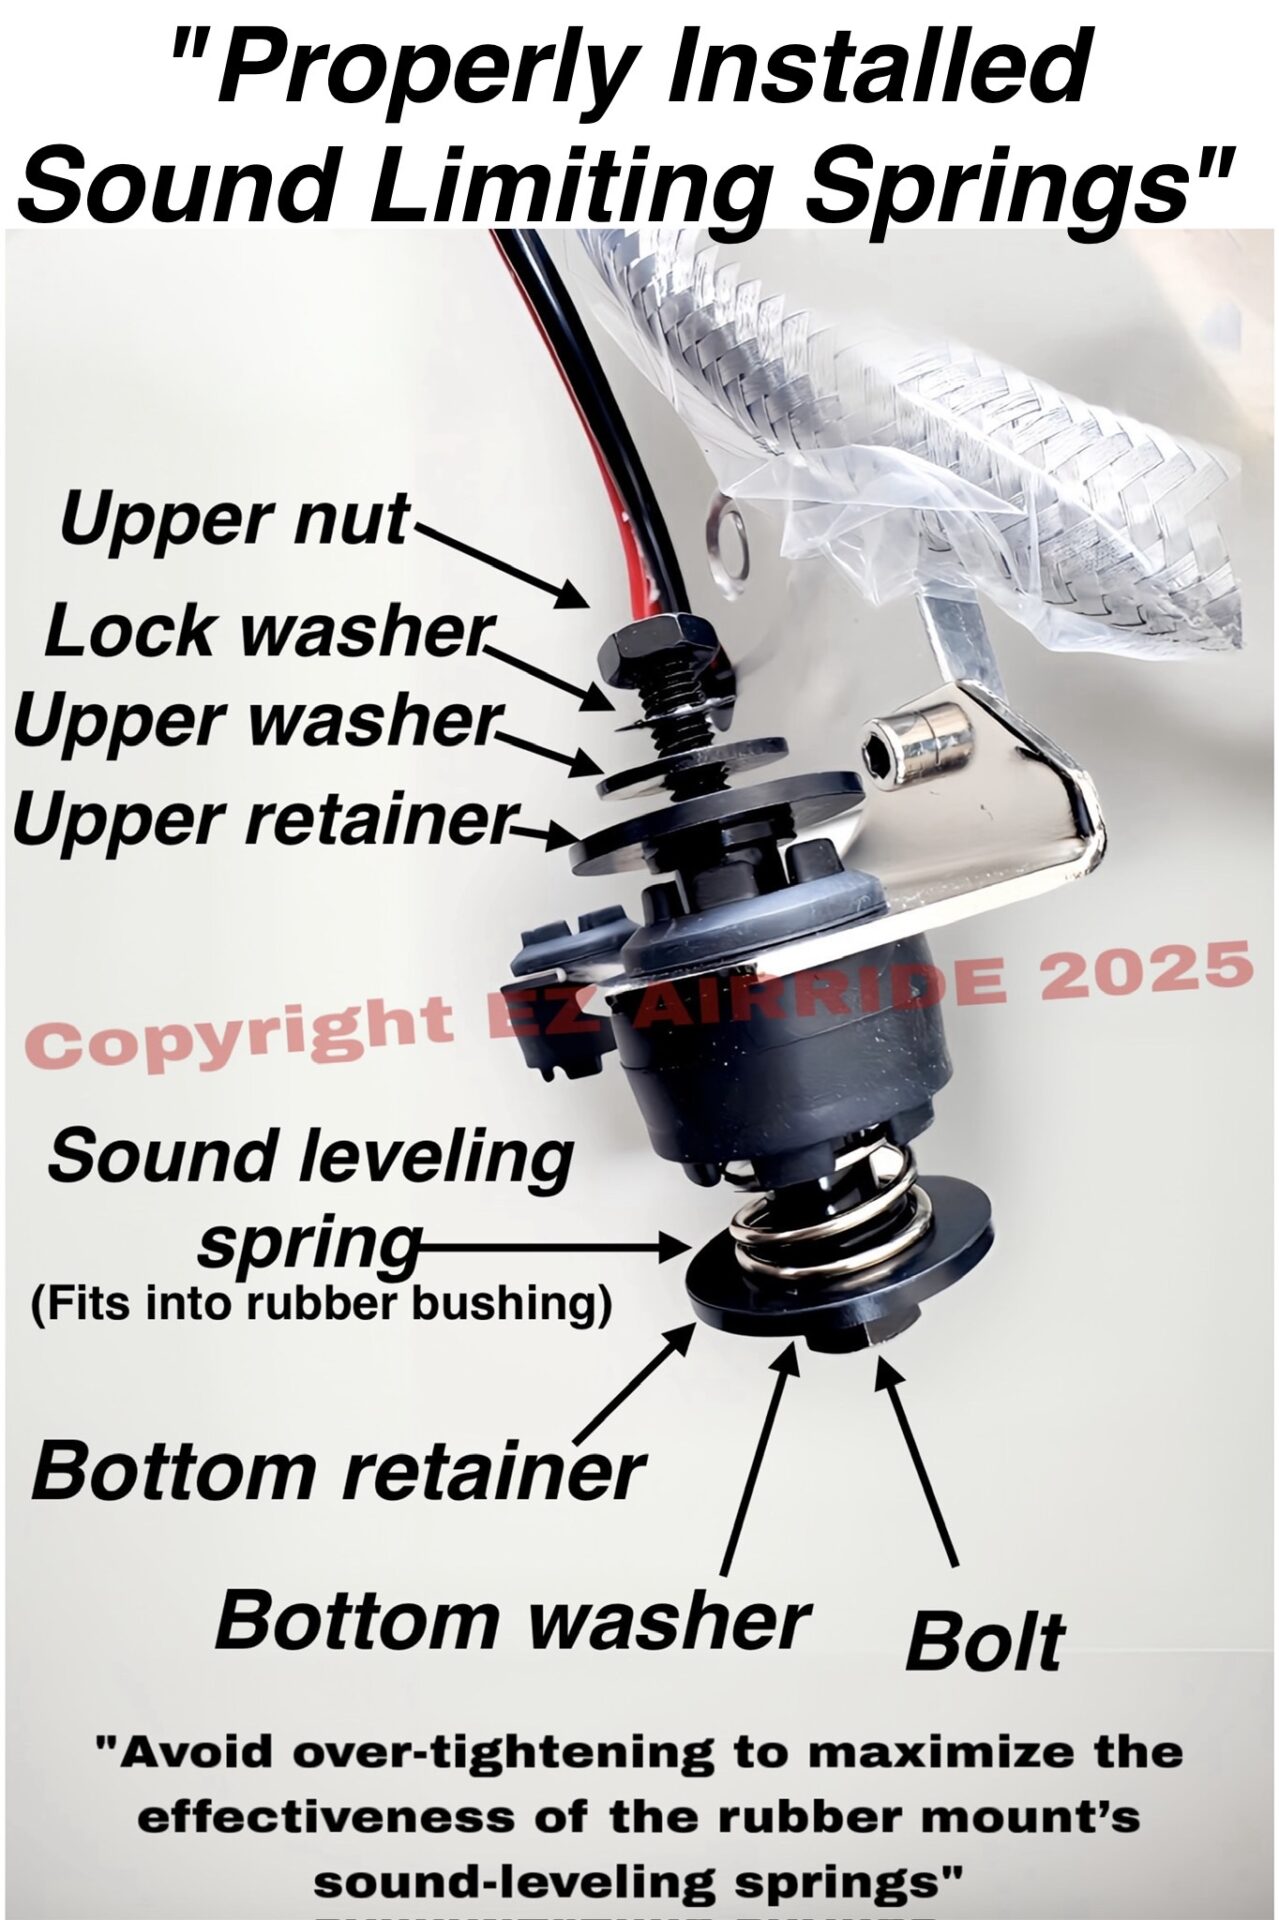
(2) 200 PSI High-Output Compressors: Features a 100% duty-cycle output, a 3/8″ stainless steel leader hose with a built-in check valve, and our exclusive anti-vibration “Sound Stabilizer” isolation mounting kits.
The EZ Tank Drain Valve Kit: Includes our compact electric drain valve, brass DOT fittings, dedicated wire leads, and the activation switch.
Elite Plus Digital Gauge Selection: Choose between our Single Digital Gauge that displays all four bag pressures along with tank pressure on one screen, or our Dual Digital Gauges mounted in a sleek, black powder-coated panel that displays all four bag pressures independently. Whichever setup you choose, each gauge comes complete with 15-ft long, plug-in wire harnesses that simply plug into the back of the gauge and route directly to your manifolds—completely eliminating cabin air lines.
Handheld 7-Button Switch Box: Ergonomic controller allowing for complete independent corner control, front-only lift/drop, rear-only lift/drop, and all-4 simultaneous lift and drop functionality.
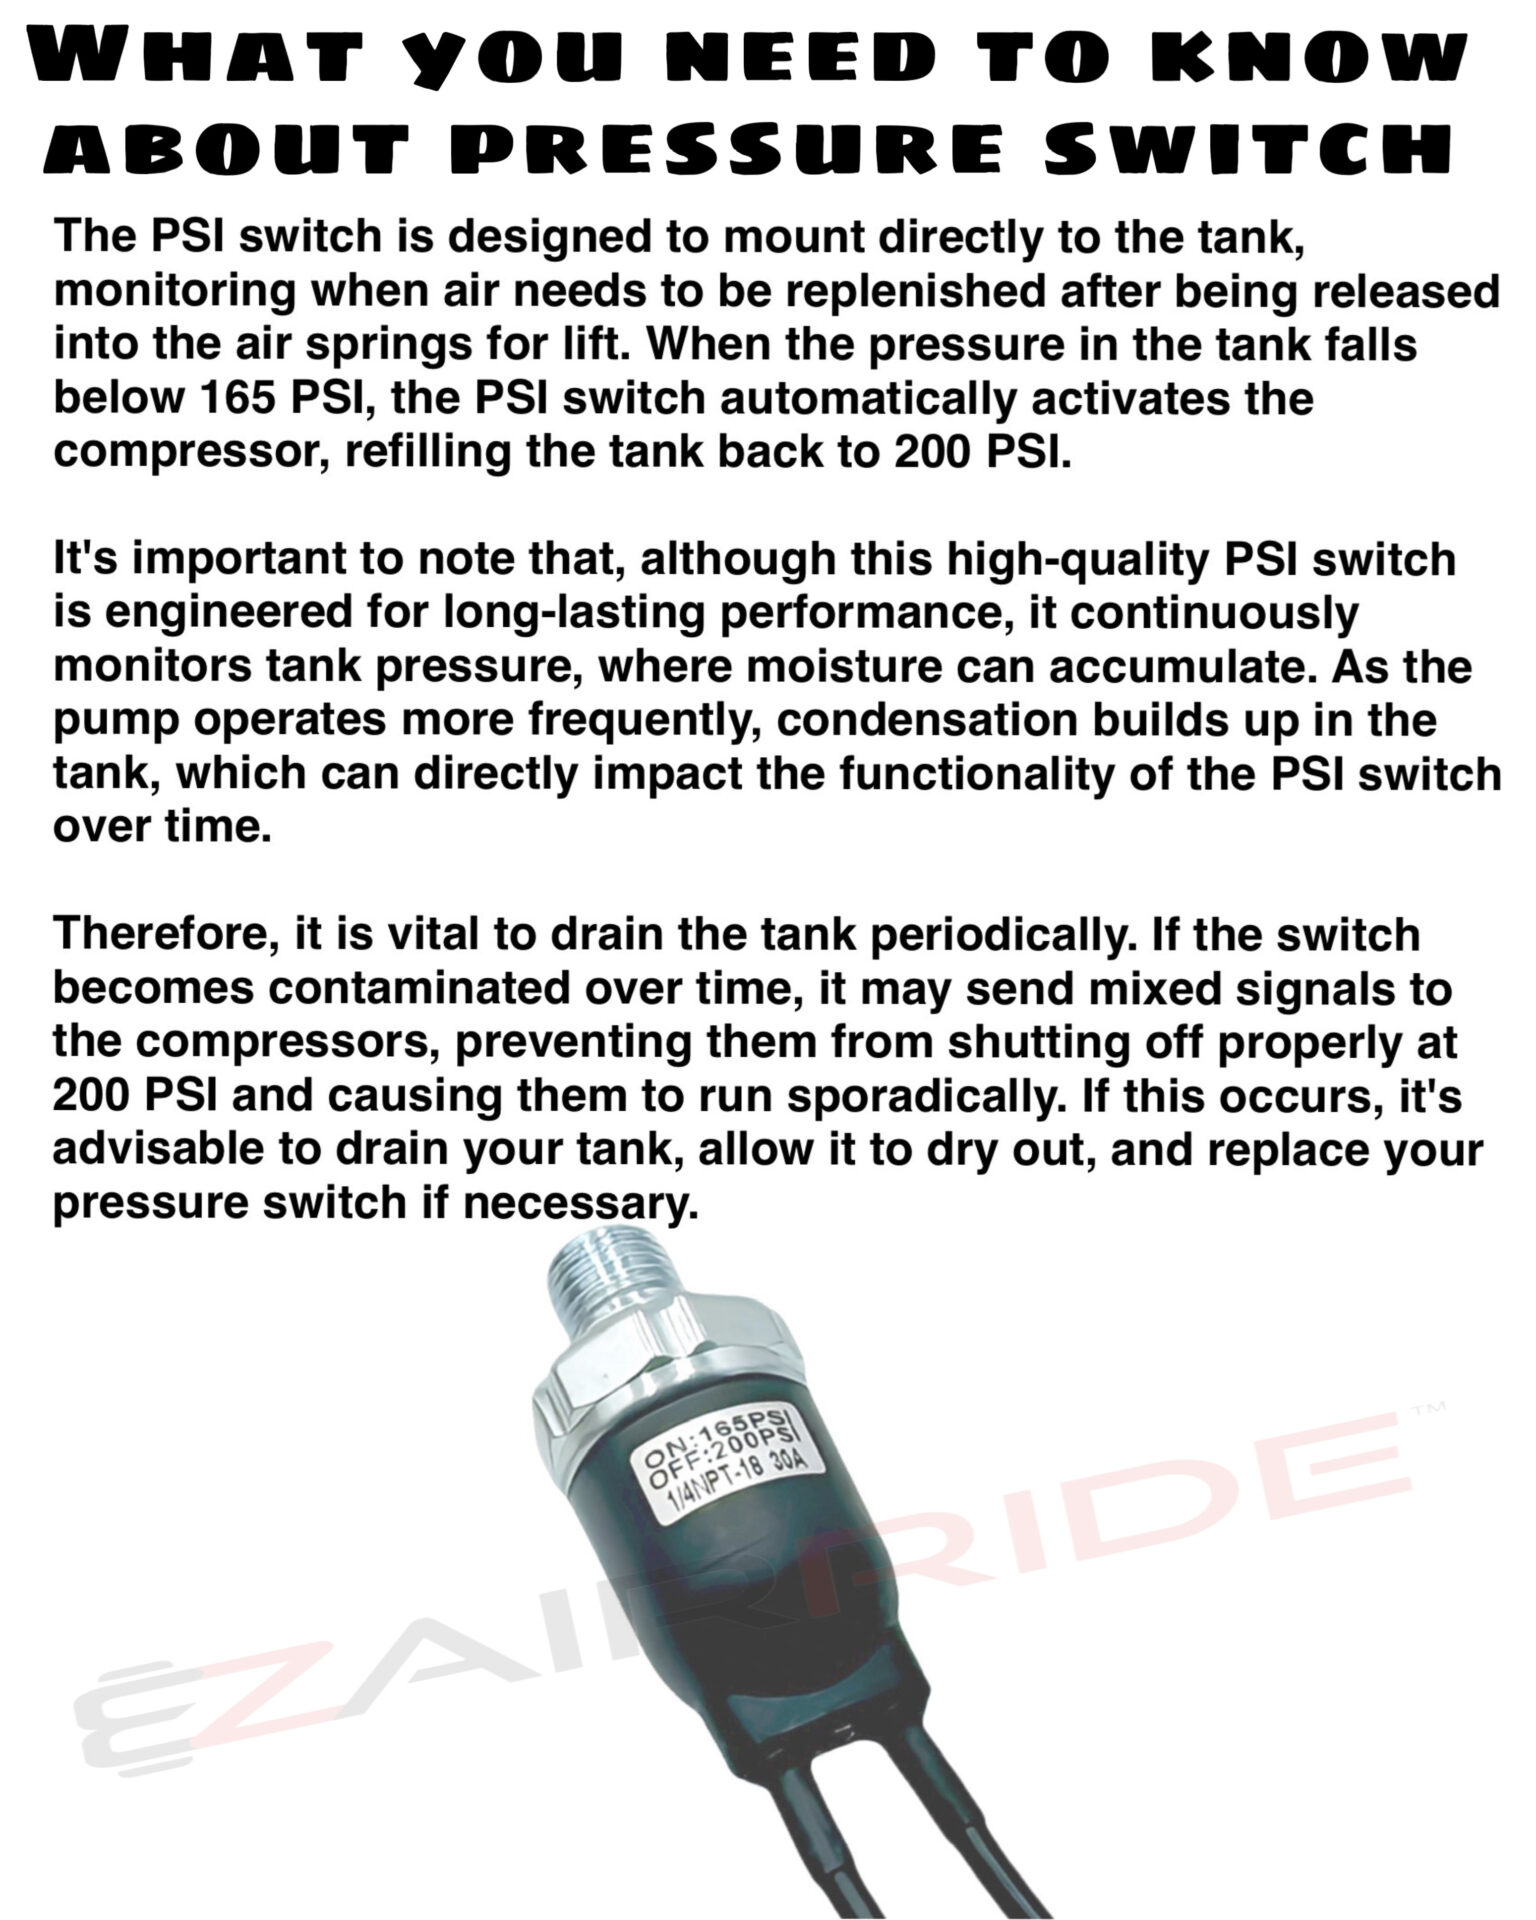
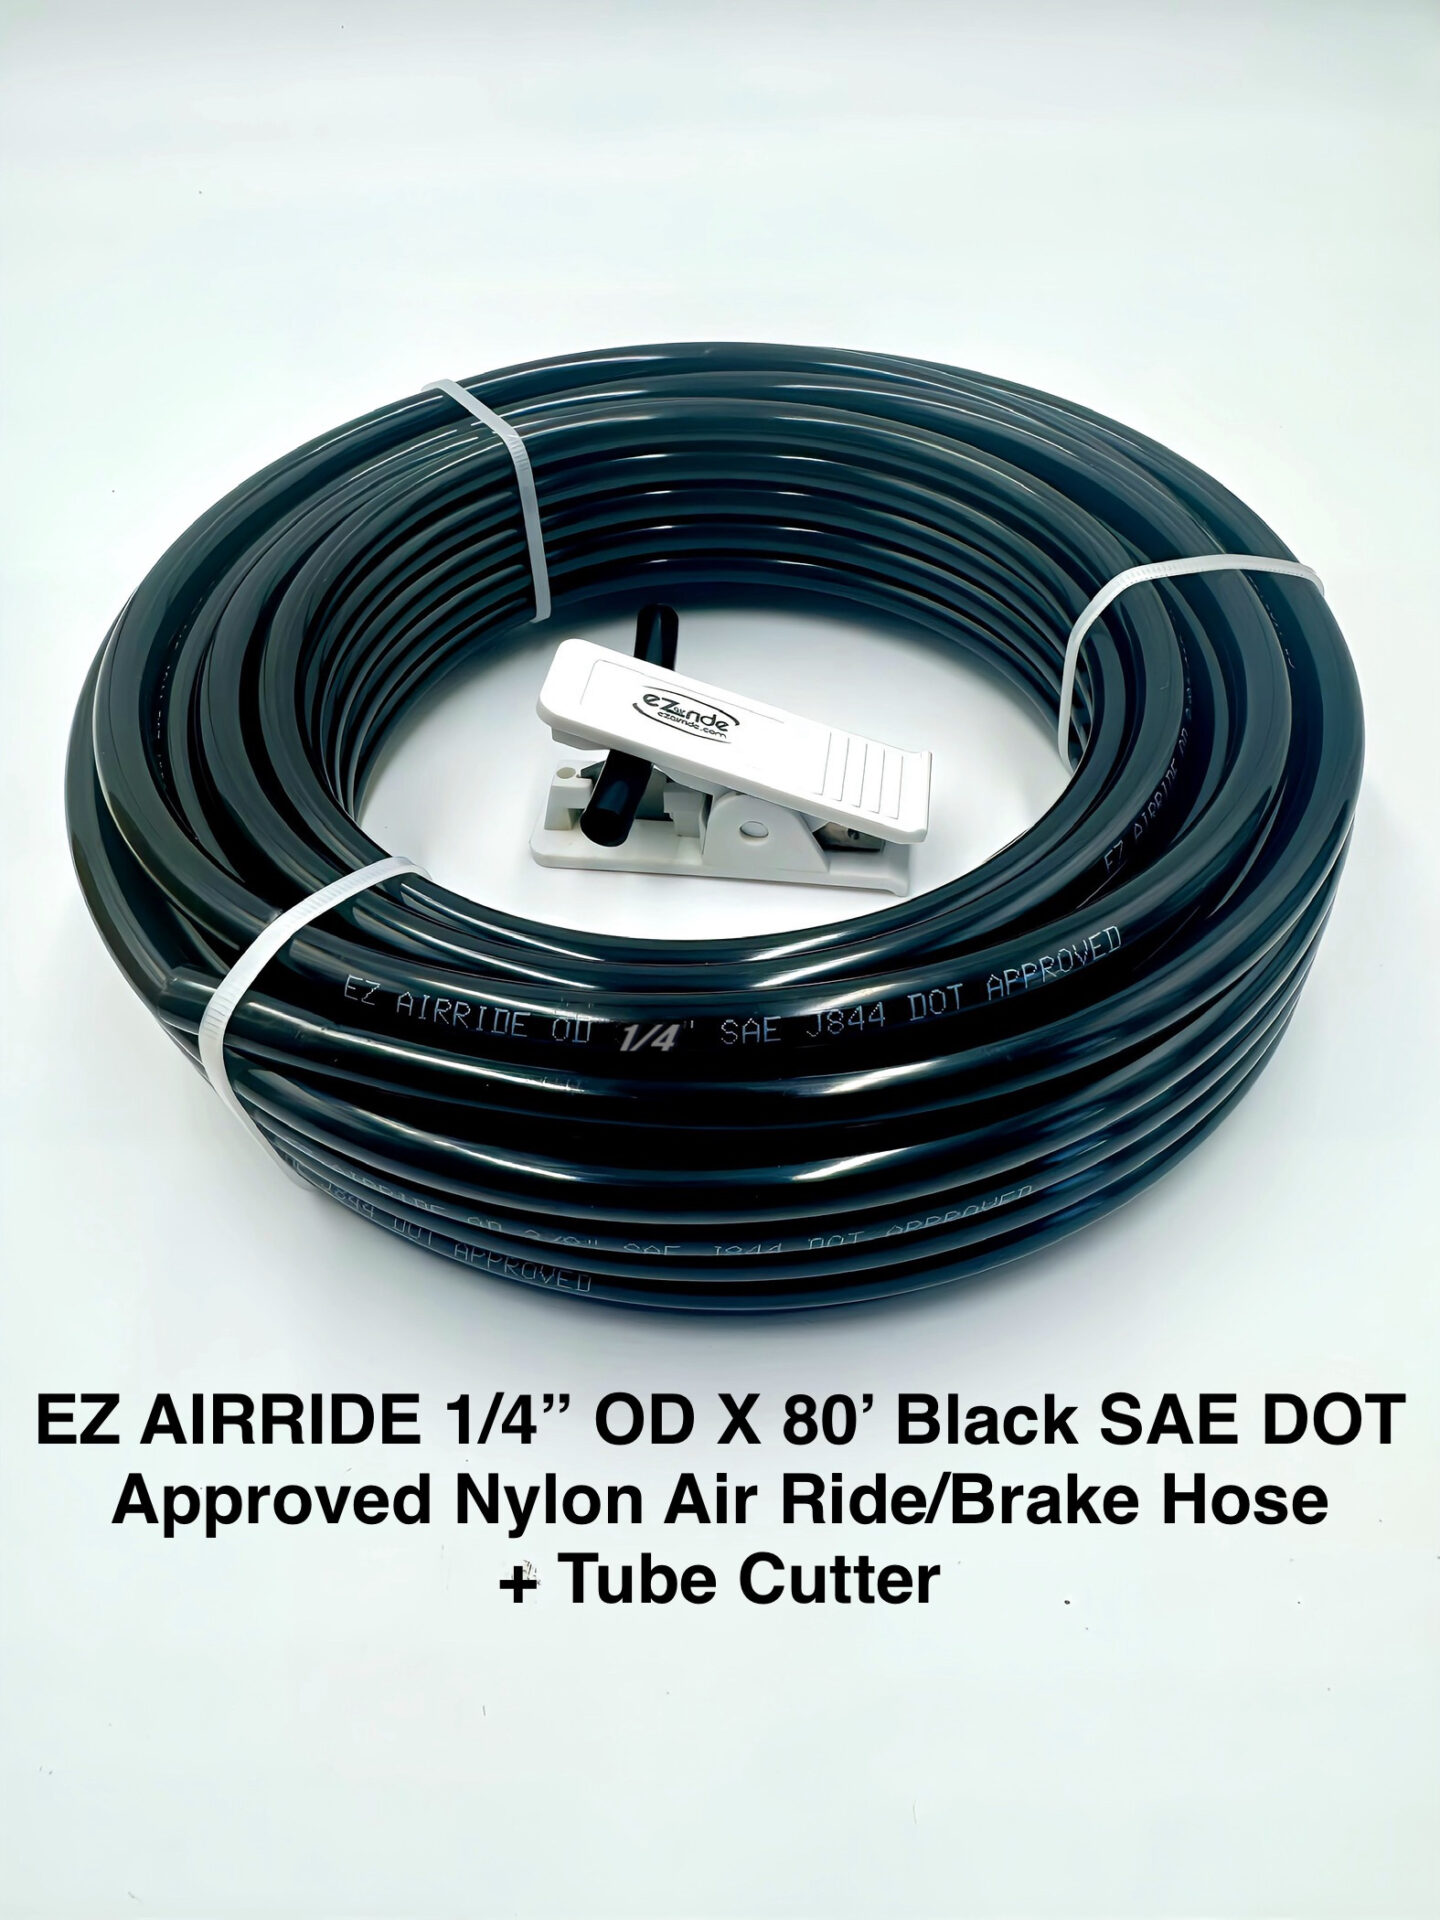
Complete Premium Plumb & Wire Pack: Includes 80 feet of 3/8″ DOT airline, (2) 20 feet of 8-gauge UL-listed power wire, w/Integrated 40-amp “Slow-Blow” integrated fuses, (2) clear diagnostic LED relays, a 165–200 PSI pressure switch, a dedicated tubing cutter, and Premium-Grade AirTight sealant.
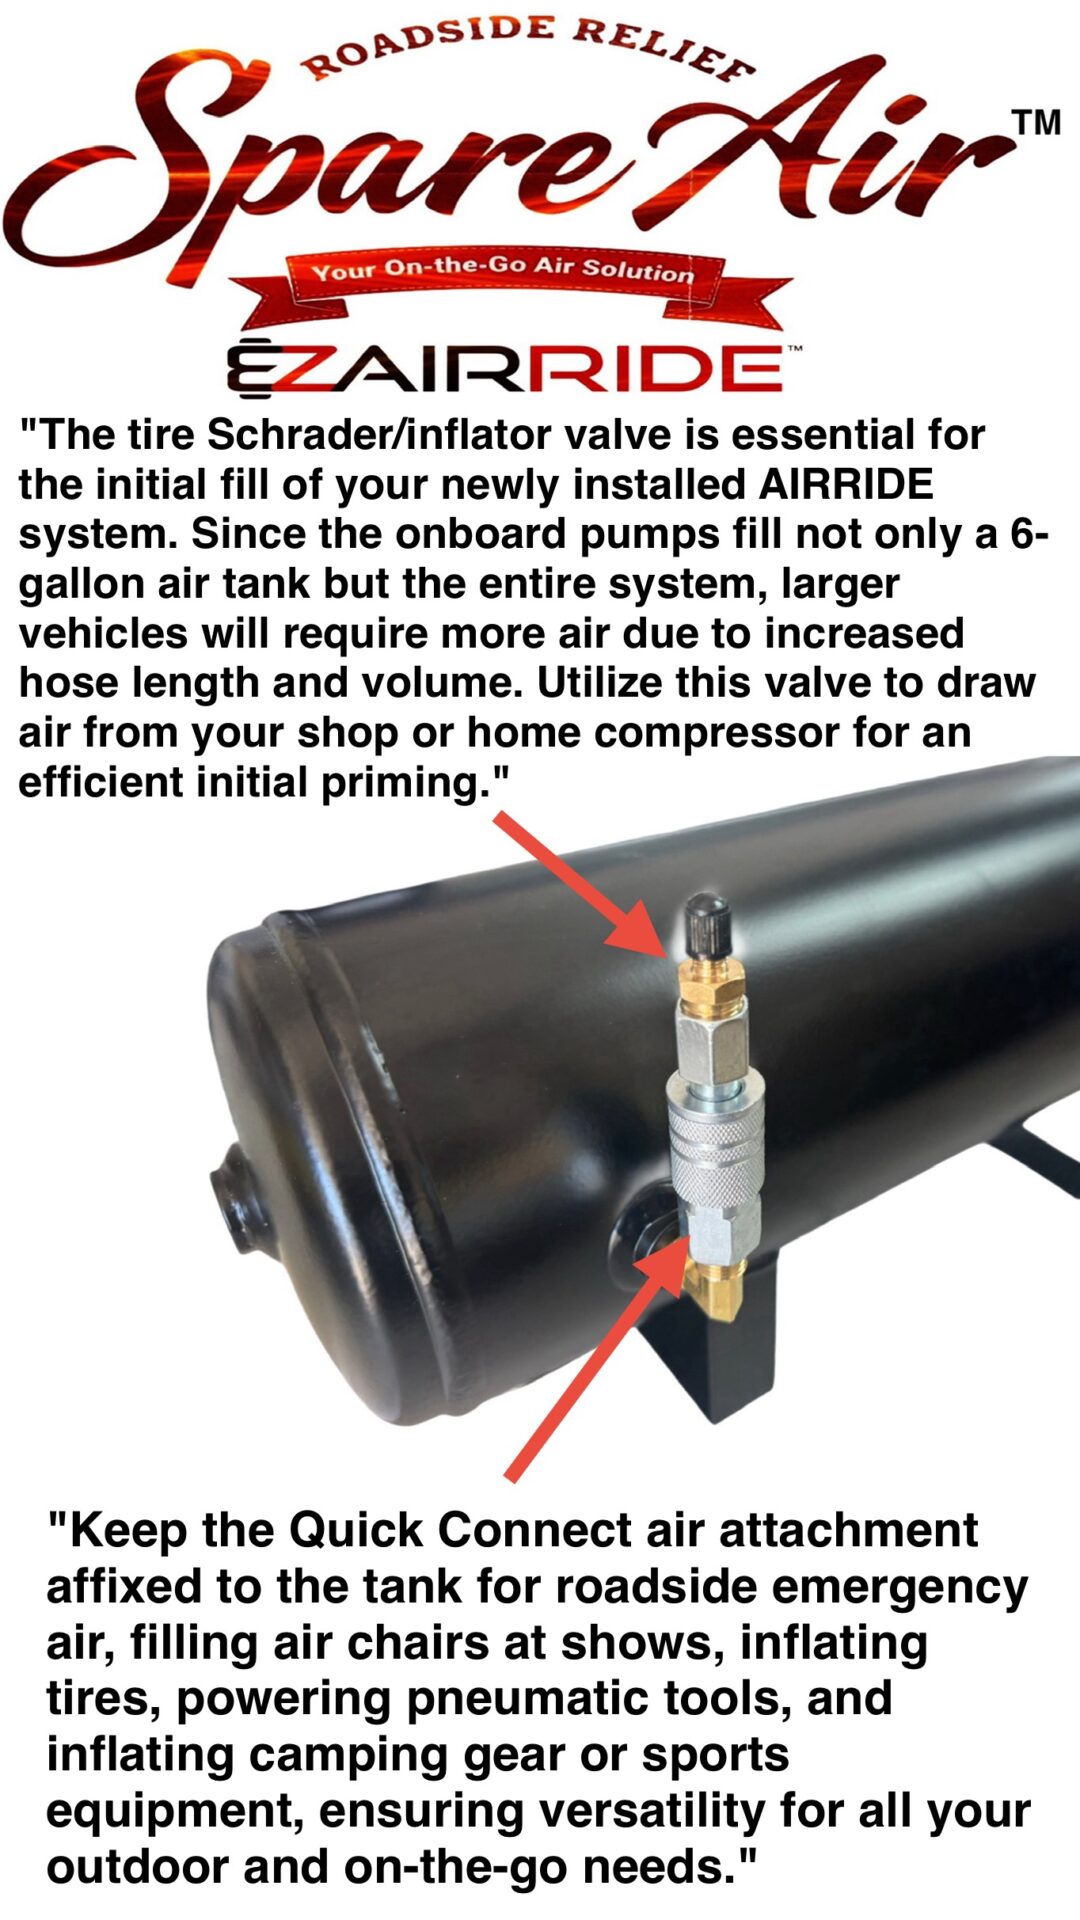
“Spare Air” Roadside Relief Kit: Onboard air accessory package including a tank quick-connect, a 20-foot air coil hose, a 6″ air chuck, and a tire Schrader valve.
Genuine DOT Brass Fitting Pack: A complete collection of premium DOT-approved brass fittings for your bags, tank, manifolds, and gauges to ensure a reliable seal.
The Bottom Line:
- Not Just a Box of Parts: When you unbox your Elite Plus Kit, you are getting a complete, fully synchronized air suspension system designed to work together specifically for your vehicle’s chassis.
- Zero Guesswork: Every fitting, line, and bracket is perfectly matched to fit your ride right out of the box—with no extra trips to the hardware store.
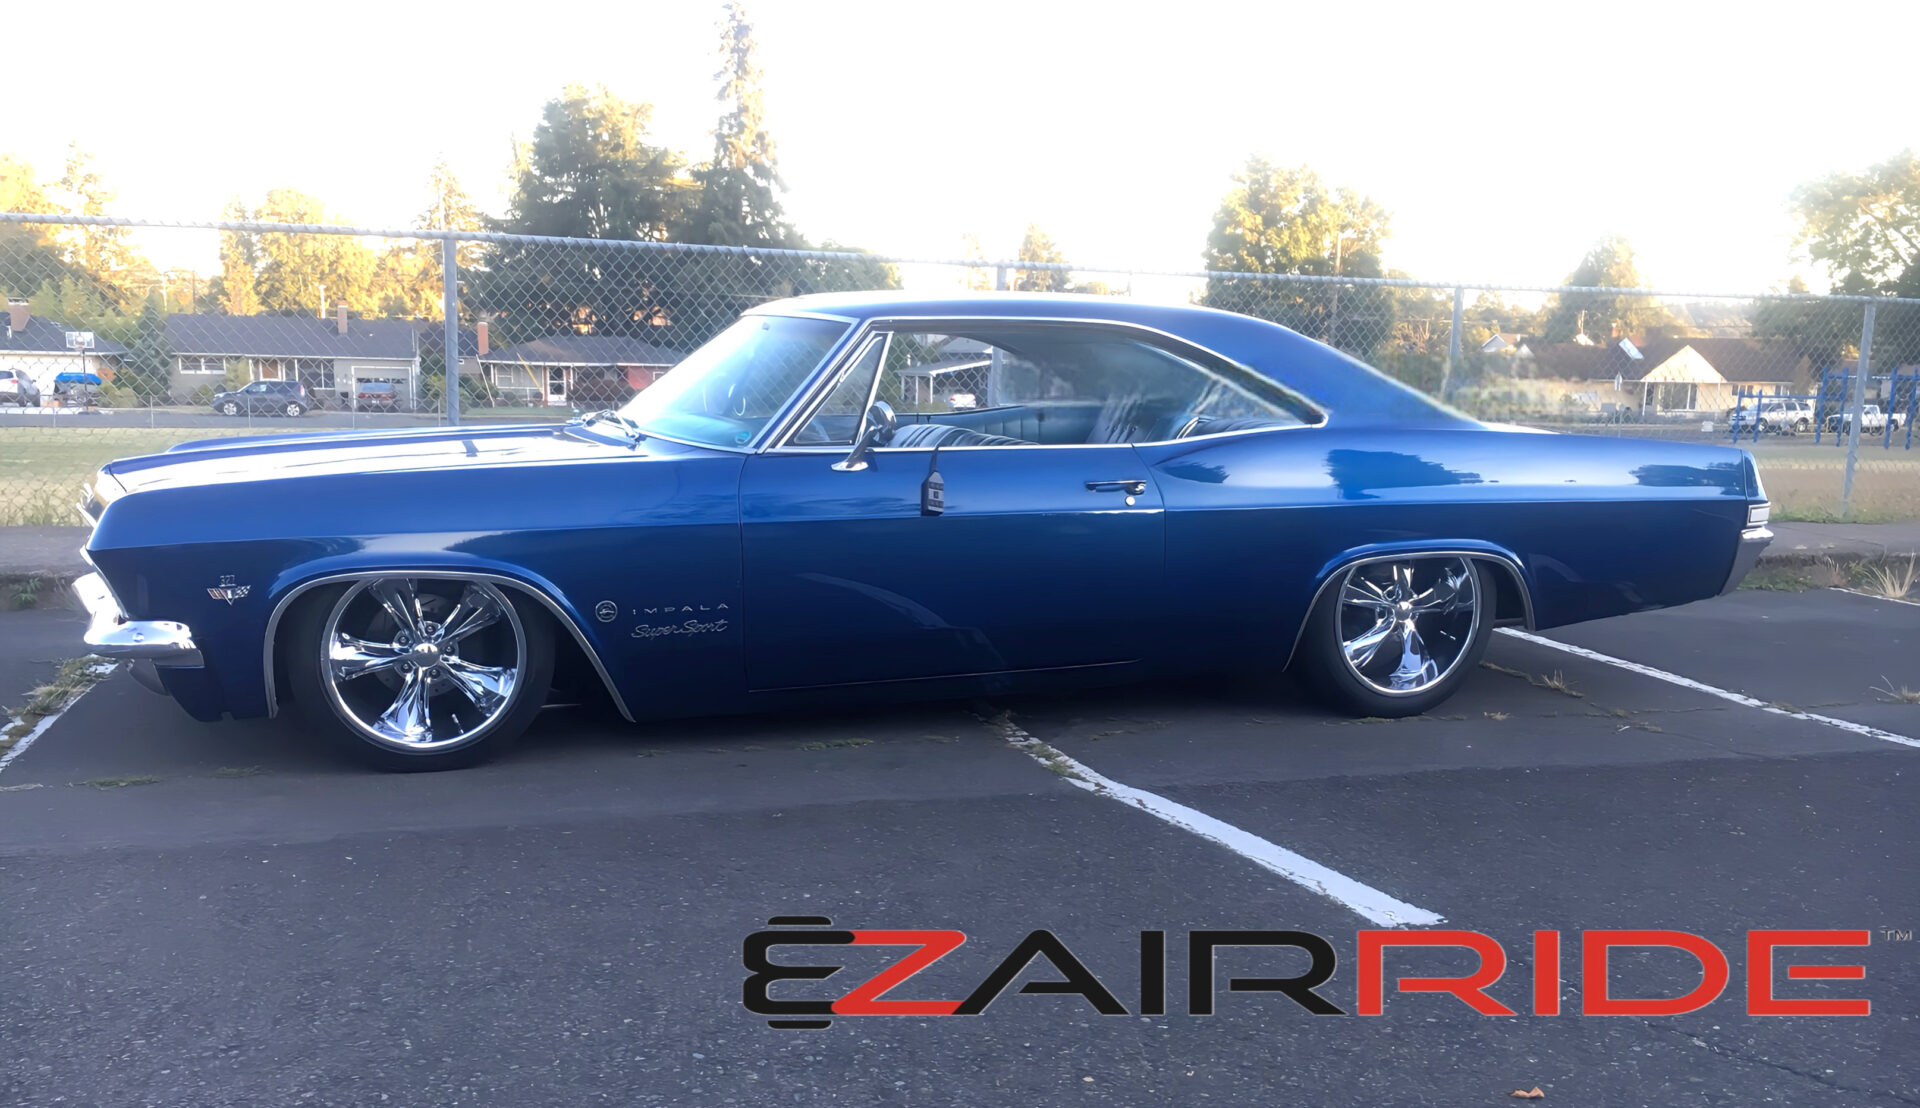
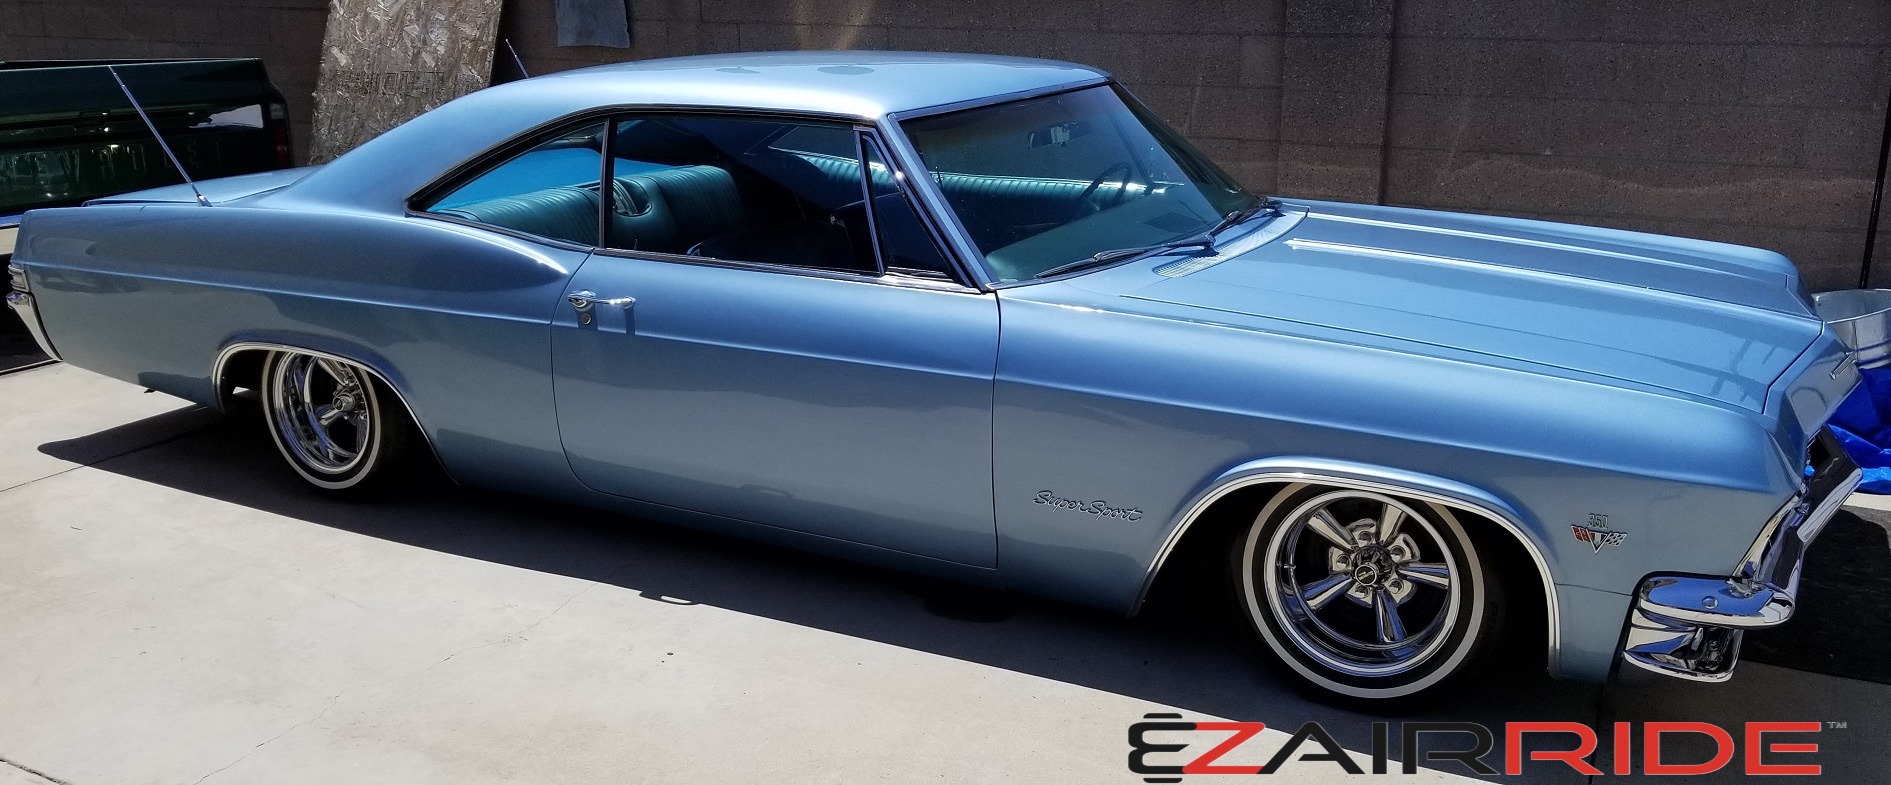
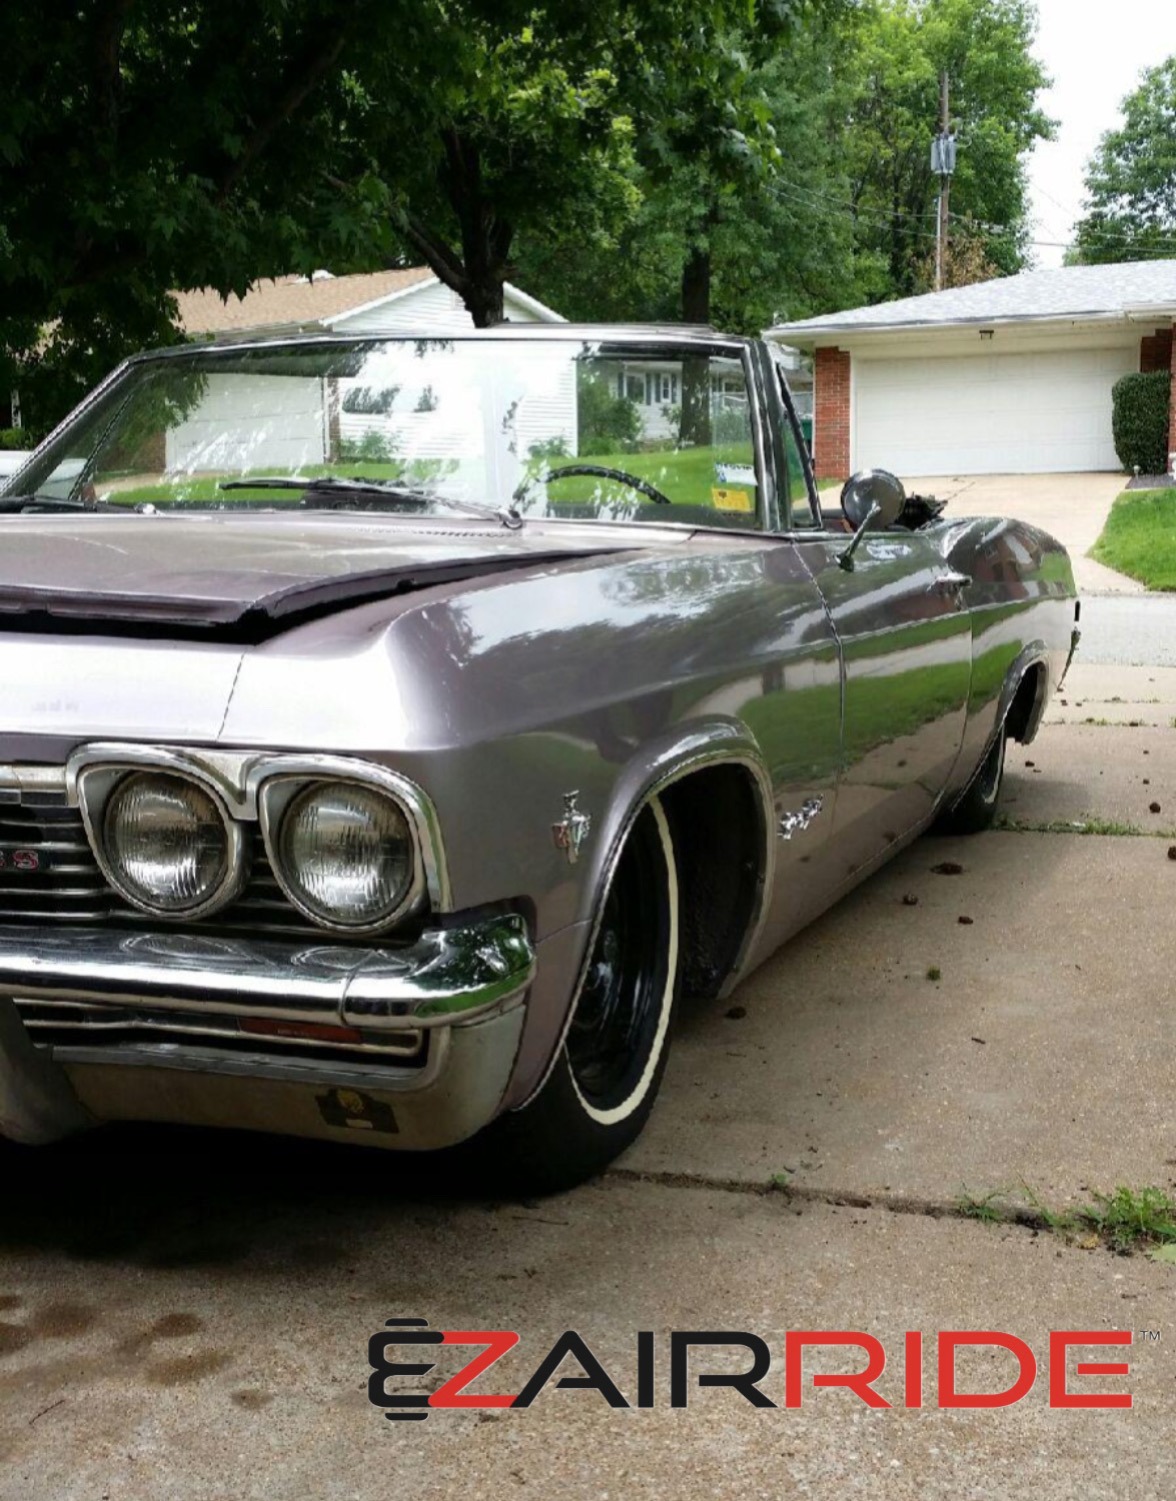
- Built to Cruise: Bolt it on, drop it low, and finally enjoy the smooth, dynamic ride quality your classic cruiser deserves.
Frequently Asked Questions
Is everything I need actually included in this kit?
The short answer is yes—and then some. Because “everything” means different things to different builders, we don’t expect you to just take our word for it. Check out our thumbnail galleries for a direct, visual checklist of every single component you will receive.
This is a completely synchronized system. You get the 600 PSI-rated bags, vehicle-specific brackets with mounting hardware, and our front shock relocation kit to properly dampen and enhance your overall ride quality. For simple front-and-rear management, we include the 3-button handheld switch box (comes with our own bonus 8-foot jacketed 4-wire extension), a dual-needle dash gauge panel, and four 3/8″ ported 280 PSI valve assemblies that you will pair together using our provided custom pre-tapped brass branch tee fittings. Feeding the system is our exclusive 6+ gallon custom-ported air tank and the 100% Continuous Duty Cycle 200 PSI compressor featuring our anti-vibration “Sound Stabilizer” isolation kit.
We also include all the crucial plumbing, electrical, and installation incidentals the other guys leave out: a premium DOT airline combo consisting of a 60-foot roll of heavy-duty 3/8″ main line and plenty of 1/4″ gauge line, a 165–200 PSI pressure switch with a 10-foot keyed ignition lead wire, 20 feet of 8-gauge UL power wire with a 40-amp Maxi fuse, a clear diagnostic LED relay, a dedicated tubing cutter, high-performance AirTight sealant, a genuine DOT brass fitting pack, and our “Spare Air” roadside relief kit.
Aside from basic shop tools and the elbow grease, it is all in the box.
Are rear shocks included with this kit?
Our complete air ride kits do include the front shock relocation kit—which is mandatory on most classic GM cars because the factory front shock runs directly through the inside of the coil spring where your new airbag needs to sit.
But for the rear, because the factory shock mounts completely on the outside of the spring, it stays right where it is. That is why we do not include rear shocks, and it’s designed to save you money.
Because our premium rear airbags deliver an unheard-of 8 inches of usable stroke, the bags themselves shoulder 98% of the work. The more stroke a bag has, the less air pressure it takes to lift the vehicle, creating a naturally smooth ride. Because the airbag is doing all the heavy lifting, your classic cruiser only needs an inexpensive, basic gas shock to control body rebound.
In fact, buying expensive, heavy-duty performance shocks will actually take away from your ride quality because those stiff shocks will constantly fight against the dynamic movement of the airbags.
Our Recommendation: If your current rear shocks are ancient, leaking, or say “Hi-Jacker” (or any other type of air shock) on them, definitely replace them. But don’t waste your hard-earned money on high-dollar replacements—just swap them out for a standard, budget-friendly set of traditional gas shocks from your local auto parts store, and let our synchronized air system do the rest. And yes, to be completely clear: you still 100% must run a rear shock on your air ride system.
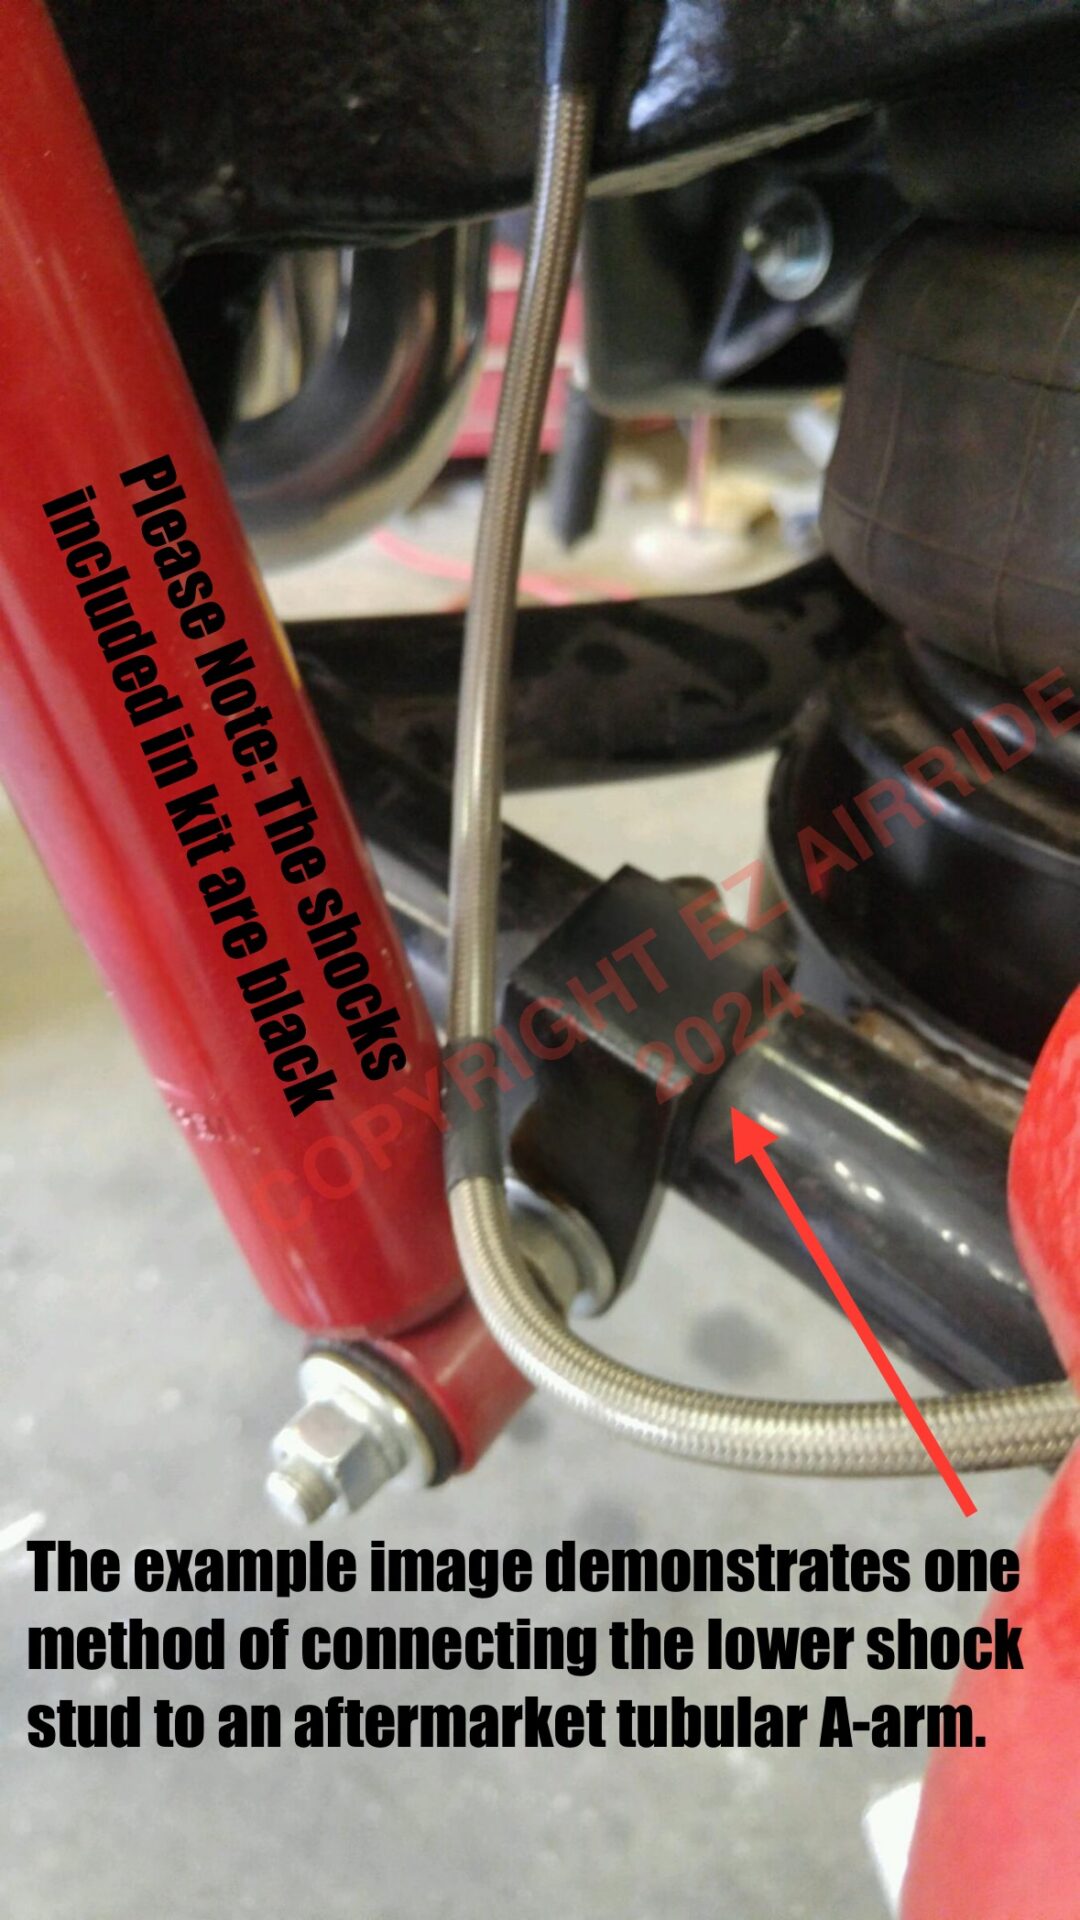
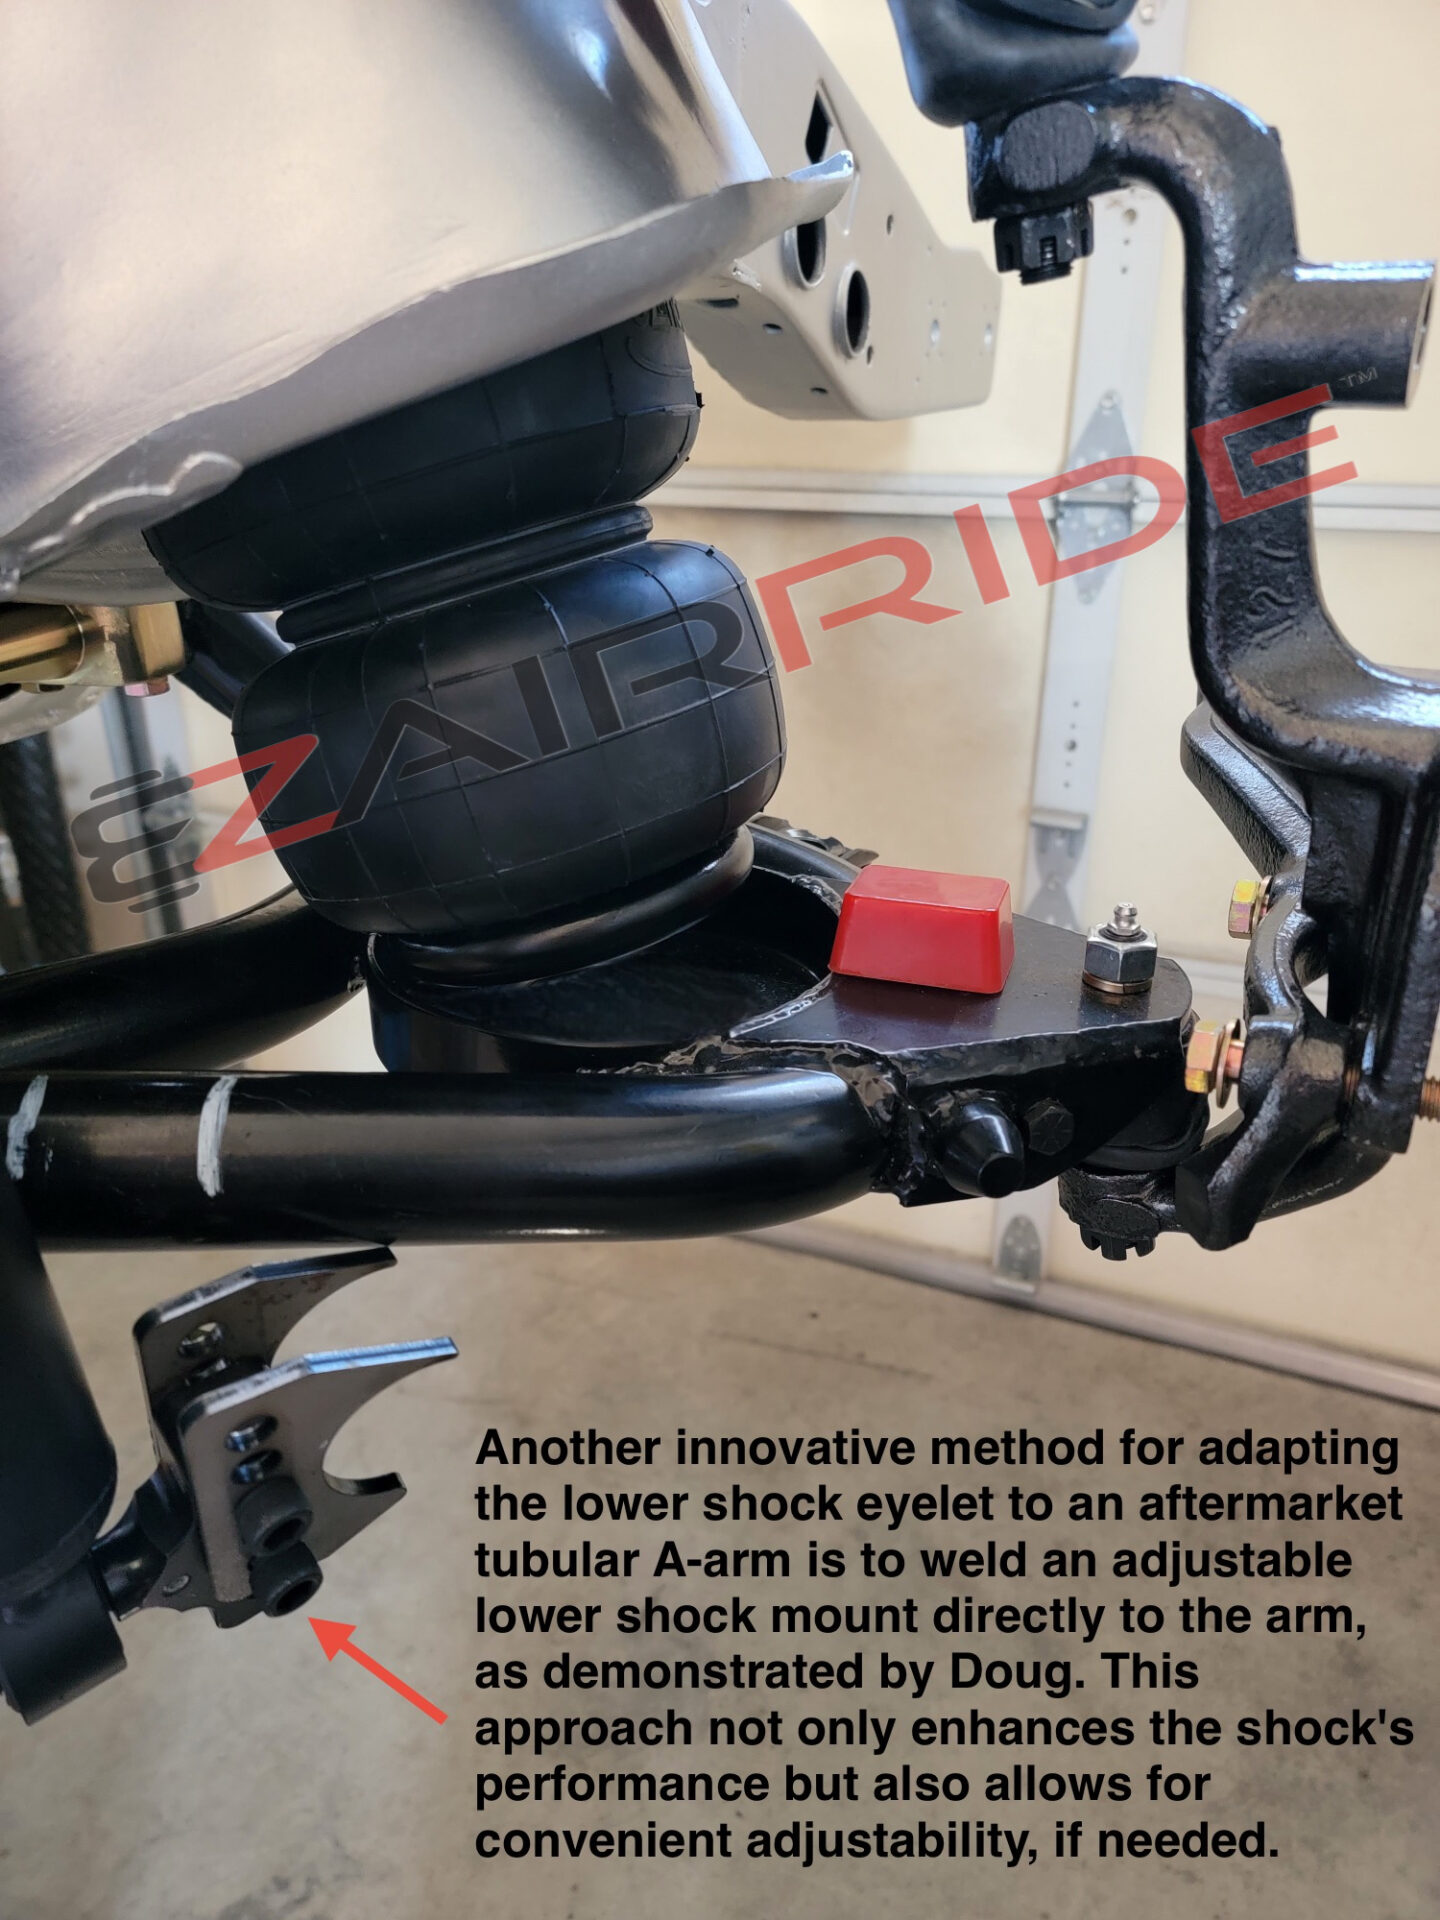
Do I need to buy aftermarket tubular control arms or drop spindles to run this kit?
No—and in most cases, you are actually better off sticking with your factory components.
Many big-name brands and online salesmen will push a $7,000 bill filled with tubular A-arms and drop spindles under the guise that they are “mandatory” for air ride. Based on our 12+ years of hands-on installation experience, here is our take on why we design our kits around your factory components, and why doing your air ride first will save you massive headaches:
Factory Arms vs. Aftermarket Tubular Arms
Our Elite Plus vehicle-specific brackets are engineered precisely to drop into the factory lower control arm spring pocket. If you swap to an aftermarket tubular arm, the stamped geometry of the pocket changes, and standard lower brackets typically won’t seat correctly without modification.
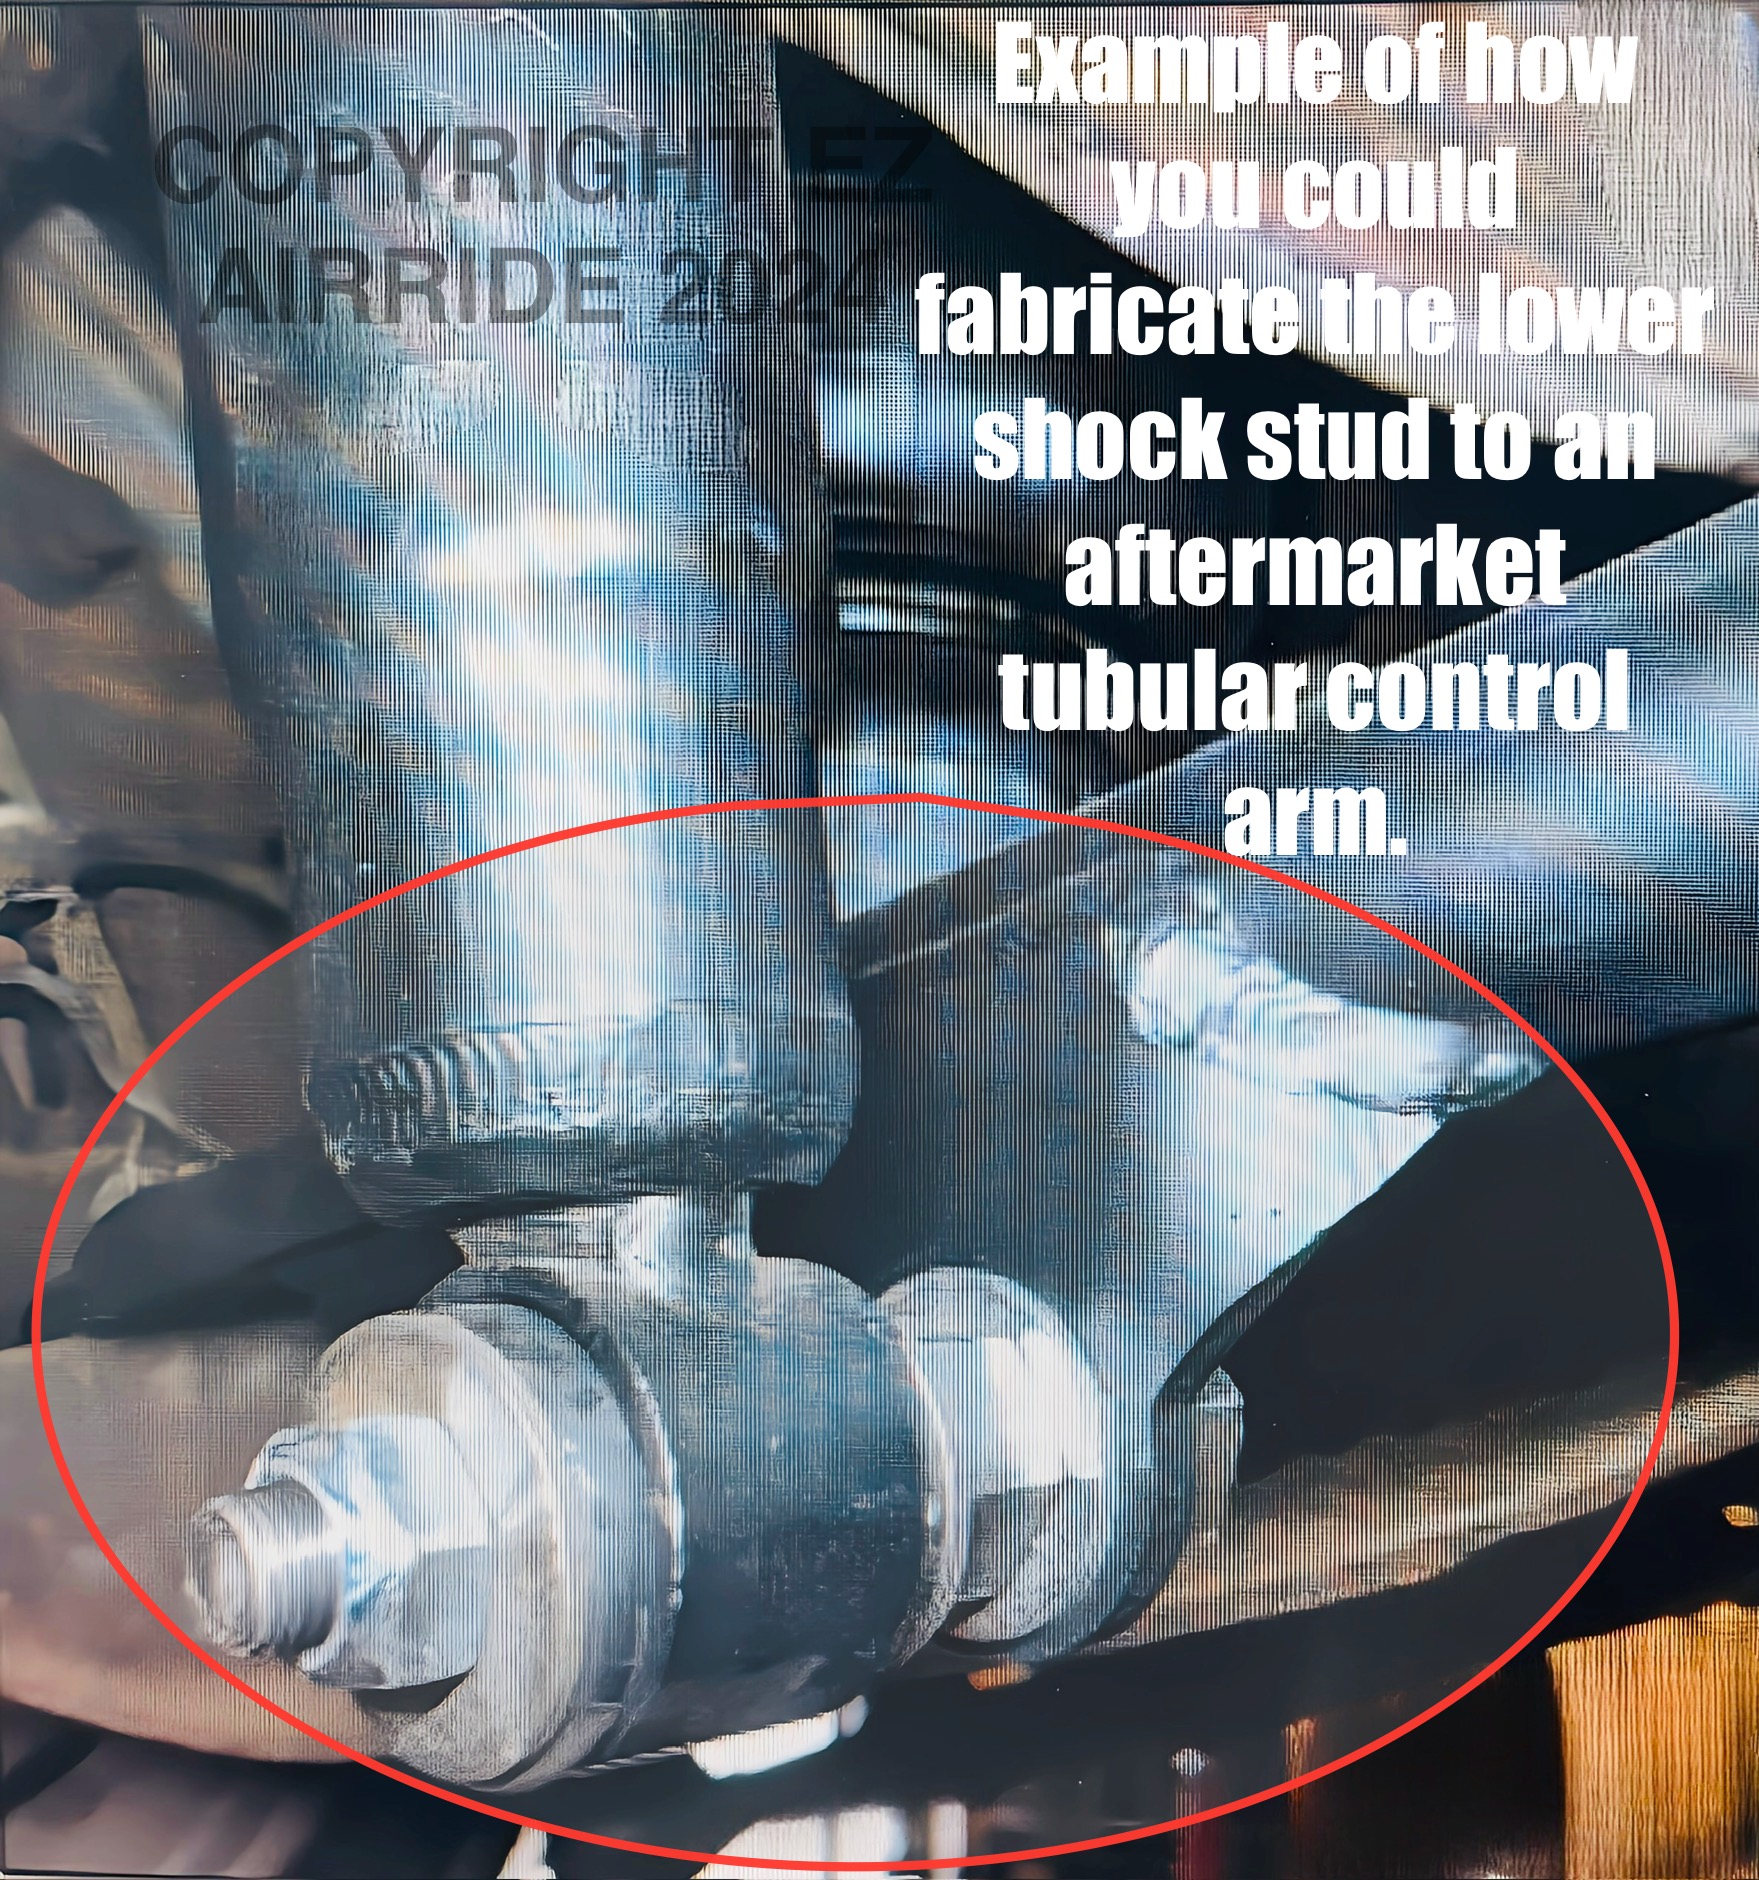
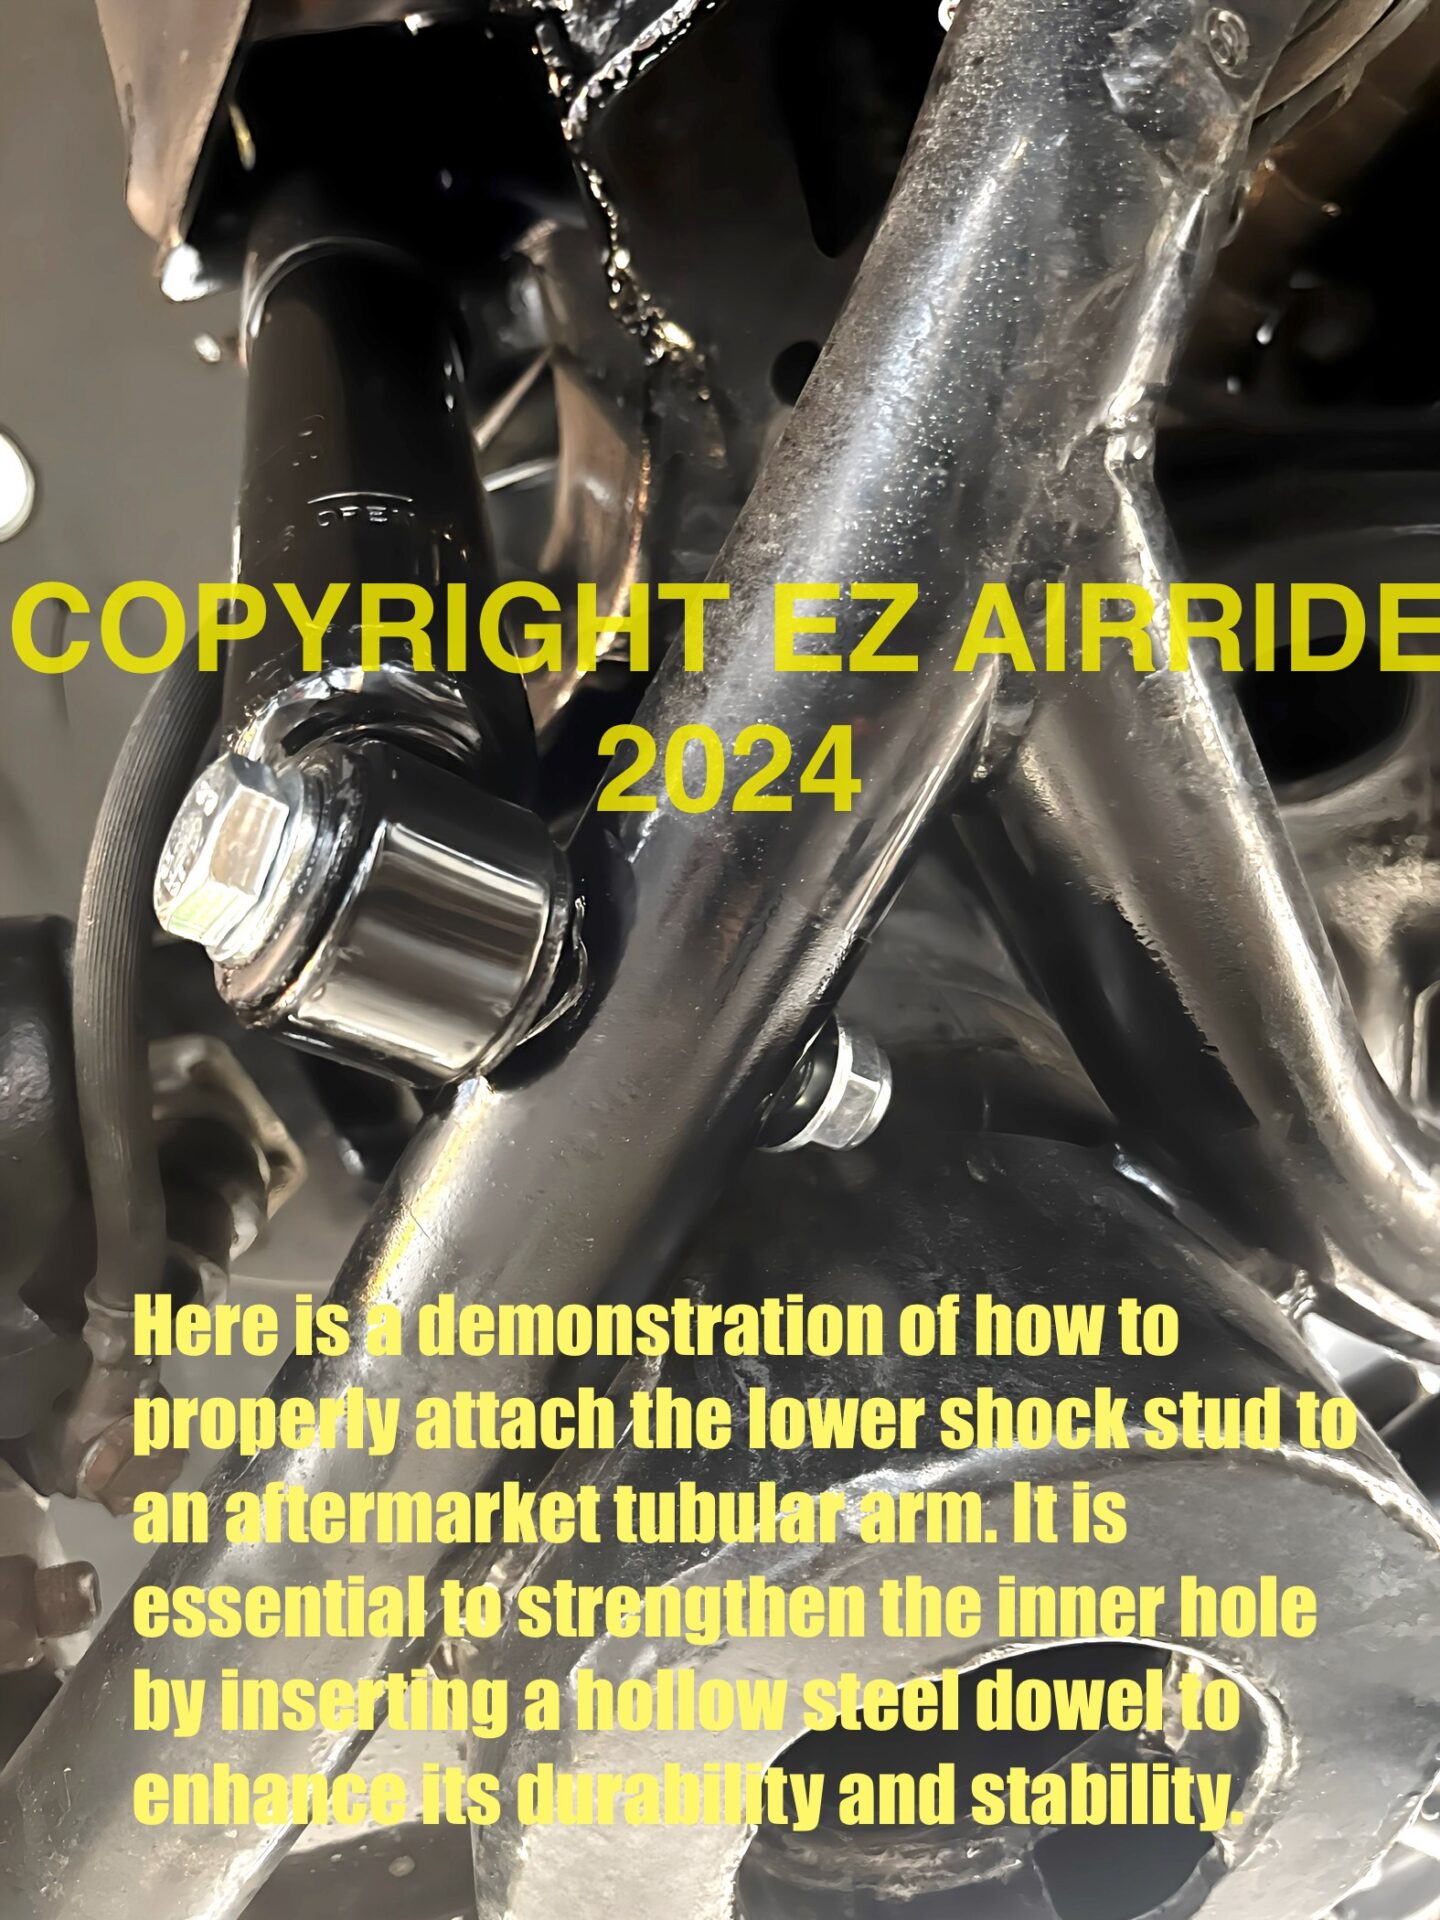
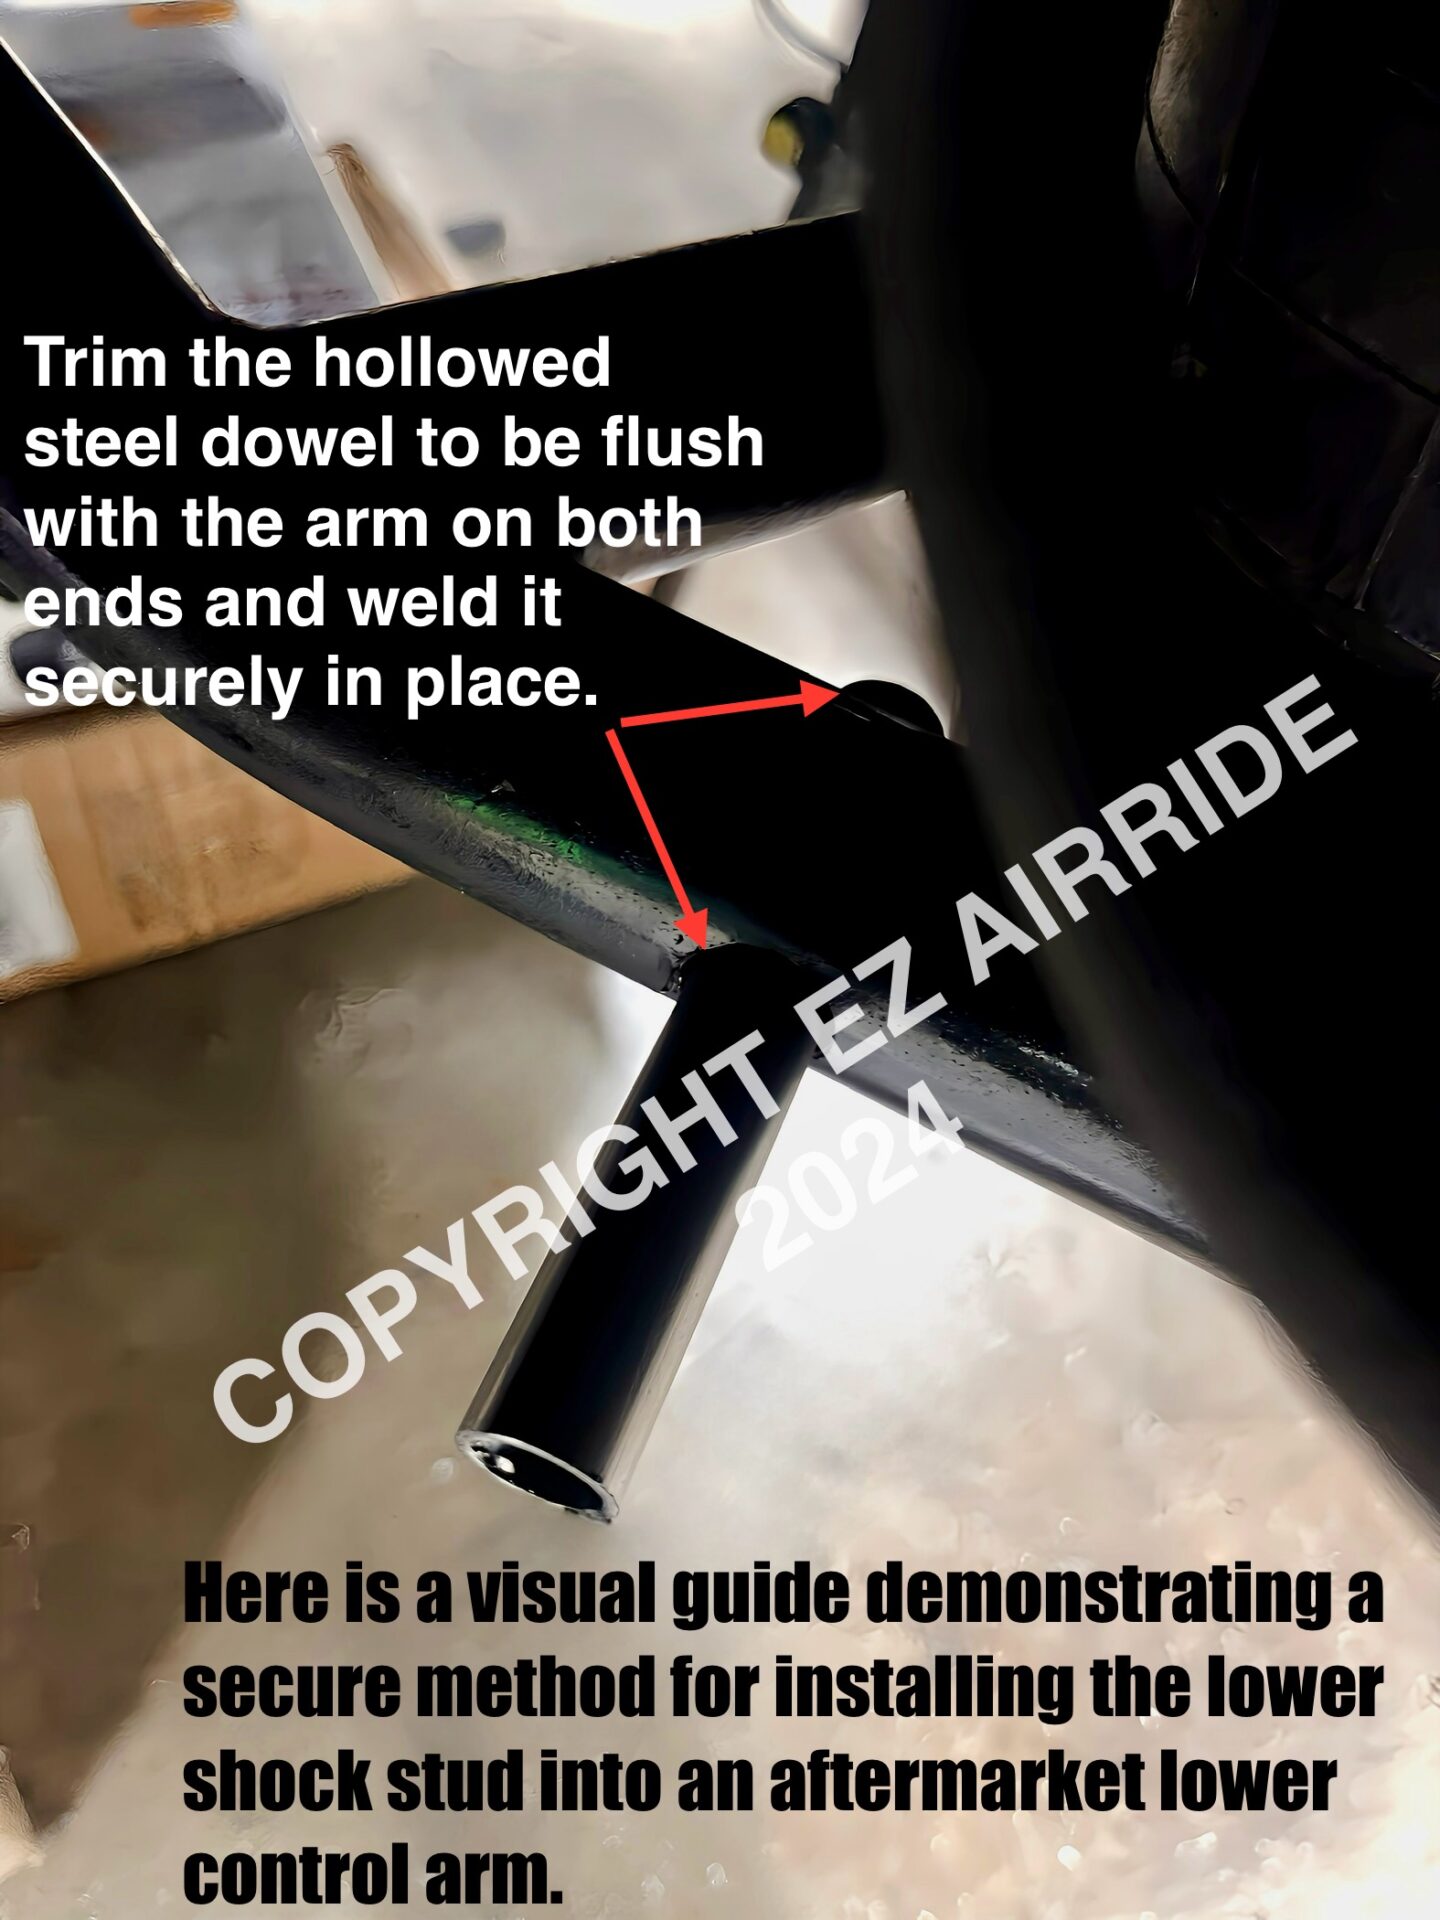
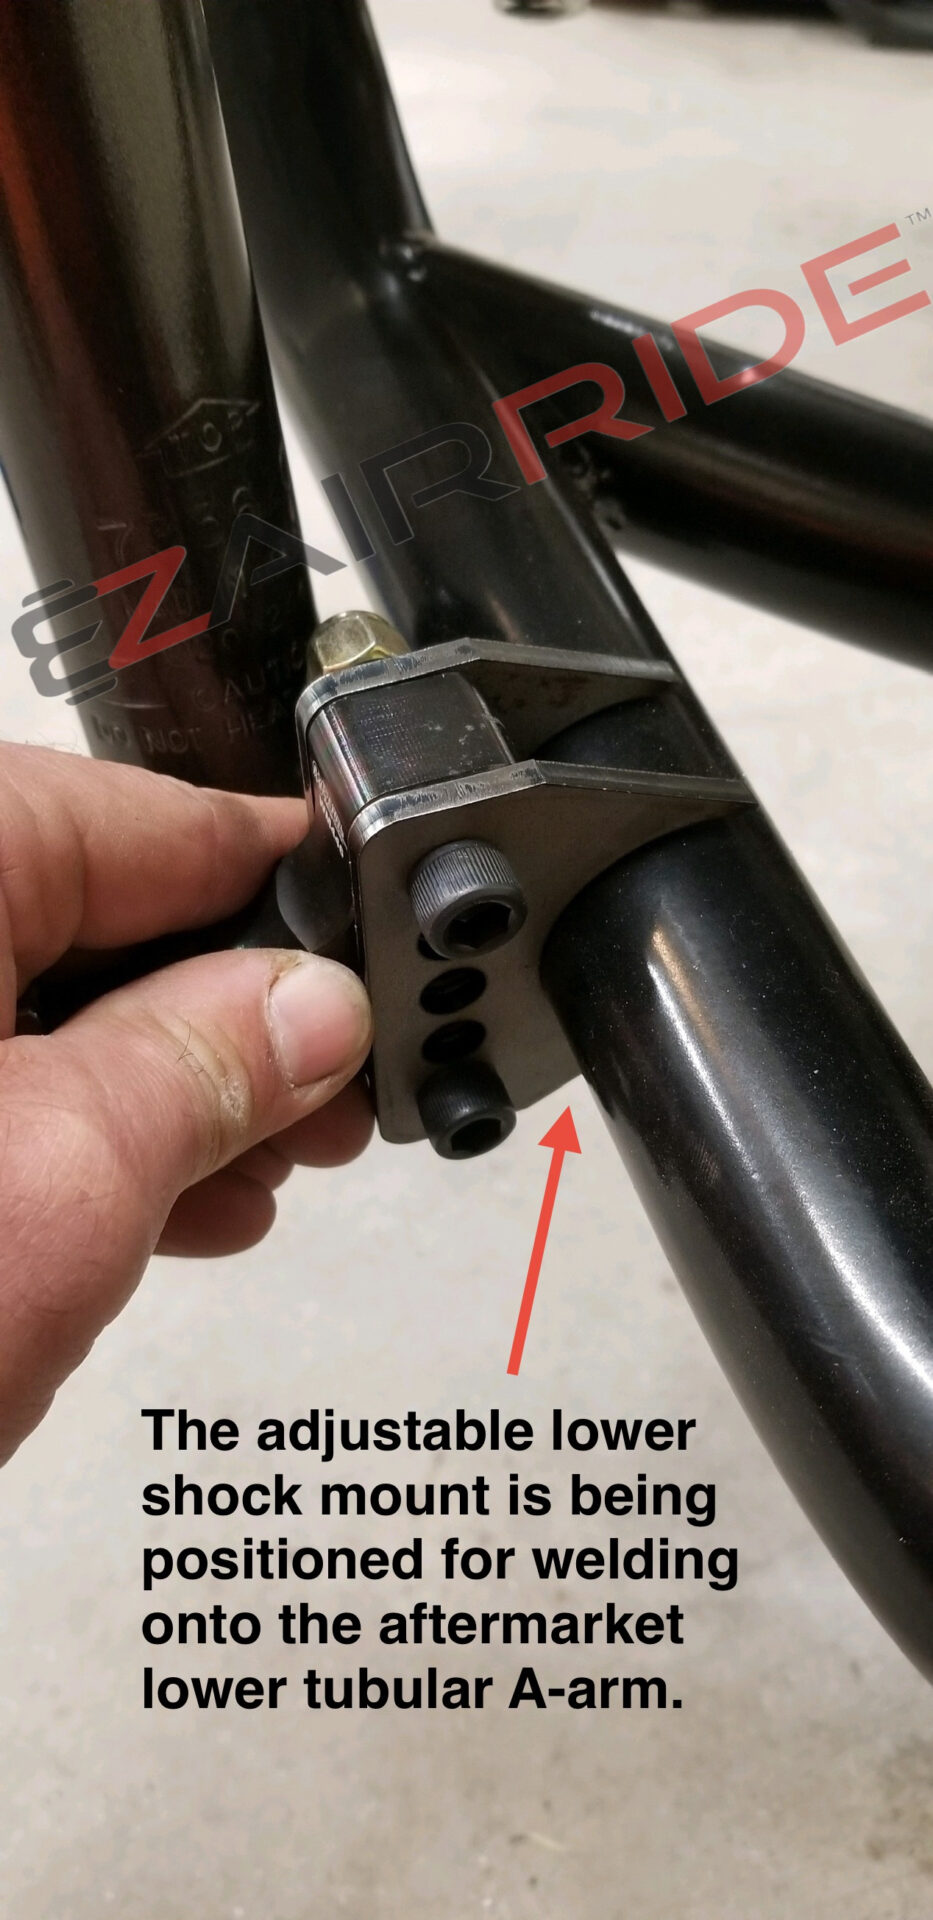
Furthermore, our shop experience has shown that most standard aftermarket tubular arms lack an integrated lower shock mounting tab in the necessary position. Because our complete air ride kit includes a front shock relocation pack, you must mount a heavy-duty lower shock stud to the arm.
- With Factory Stamped Arms: The factory arm features a flat, rigid steel vertical wall. You simply drill a clean hole, bolt the high-grade shock stud in, and the lower installation is complete.
- With Tubular Arms: Mechanically, drilling a straight bolt through a hollow, round tube can risk collapsing the tube walls under load. To install a shock stud safely on round tubing, a builder generally has to grind down the aftermarket finish, weld custom reinforcement tabs, or install an internal DOM steel sleeve inside the arm.
Our Recommendation: Save your money. There is absolutely nothing wrong with freshening up your factory arms with a fresh set of ball joints and a coat of paint—nobody sees them anyway, and they will not alter the premium ride quality of our system.
(Note: If you already purchased aftermarket tubular arms, just let us know in the order comments or call us before ordering. We can custom-build drop-in brackets to adapt to your specific arms at no extra charge).
The Physics of Drop Spindles (Catalog Specs vs. Real-World Clearances)
Order-takers love pitching drop spindles because they promise a quick, extra 2 to 3 inches of drop. But they are selling catalog part numbers, not vehicle geometry, and they don’t know your specific car. They don’t know your wheel diameter, your tire aspect ratio, or what’s actually hanging underneath your chassis.
Here is the reality of a classic cruiser: an airbag system drops the entire chassis toward the earth. If you install drop spindles and an air ride kit together right out of the gate, you aren’t just lowering the body—you are dropping your mechanical vitals dangerously closer to the concrete.
If your car features an oversized aftermarket oil pan, low-hanging exhaust headers, or custom exhaust pipes that sit 3 to 4 inches below the factory frame rail, those vital components will smash into the pavement long before your frame rails ever layout.
Our Recommendation: Build in stages. Install our air ride kit first on your factory spindles. For 95% of builders, our 8 inches of usable bag stroke will have your cruiser safely kissing the concrete and sitting exactly how you want.
Once the kit is installed, air the car all the way down, crawl underneath with a tape measure, and check your clearances. If your oil pan and exhaust pipes still have ample room to breathe and you want to go even lower, then buy the drop spindles. Don’t risk cracking a custom oil pan on day one just to clear a catalog spec.
How difficult is this kit to install, and do I need to take it to a professional shop?
The short answer: If you can change brakes, route automotive power wire, swap factory shocks, and use basic shop tools, you have the right foundation for this install. The air suspension system itself is bolt-on, but the front shock relocation kit requires welding.
The Mechanical Breakdown:
- The Rear: Completely bolt-on. Relieve factory spring pressure, slide them out, and bolt our vehicle-specific brackets right up. The rear shock stays in its stock position.
- The Front: The bag and bracket assembly is a direct bolt-on as well—once the factory coil springs are safely uncompressed and removed. Since many vintage front upper frame pocket tolerances vary, the installer must verify ample bag clearance through the full range of travel: aired-out, ride height, and fully lifted.
The Welding Required: Because the new airbags occupy the factory spring and shock pockets, you will discard the stock front shocks. You will install our proprietary shocks by welding our custom shock towers directly to the frame rail. This requires a solid level of experience with structural welding and fabrication. If you or a buddy have those skills, you can most likely knock out the fabrication and main installation in your garage over a solid 2 to 3 days.
The Plumbing & Electrical: The rest of the kit is just clean routing.
Manifold Mounting & Plumbing: Once the manifolds are attached to the tank and the tank is mounted in the trunk, run your 3/8″ air lines from the manifolds to the airbags, then run your 1/8″ digital gauge pressure sensors from the manifolds to your gauges.
Compressor Mounting: Securely mount your compressors in the trunk, connect the leader hose from each compressor to the tank, and run both power wires to the battery.
Relay & Power Wiring: Run the pressure switch lead trigger wire up to your fuse panel for a keyed ignition power source, then connect the 4-pin relays to each pump, pressure switch, power wires, and ground.
7-Button Switch Box Wiring: Plug the wire harnesses into each manifold, then wire the opposite ends of the harness into the 7-button switch box controller.
DIY vs. Professional Shop:
Shops typically charge anywhere from $1,500 to $2,500 in labor for a full air ride install. The reality of a commercial shop means operating on billable hours and lift turnover. Because plumbing and line routing are the most time-consuming parts of an air ride build—requiring patience to strategically route, tuck, and hide lines for a perfectly clean finish—critical details can easily get rushed under a tight schedule.
A fast-paced shop environment can mean missing the small things, like installing rubber protective grommets through frame holes, routing air lines completely clear of moving suspension components, or double-checking every single fitting. Furthermore, few commercial shops can afford to let a vehicle take up valuable lift space for a proper 24-hour overnight leak check or final clearance testing. By taking your time in your own garage, you ensure every line and wire run is strategically hidden and secure. More importantly, you gain peace of mind that comes from knowing exactly how your system was installed, how every component was assembled, and that it was done right.
Item #5
Lorem ipsum dolor sit amet, consectetur adipiscing elit. Ut elit tellus, luctus nec ullamcorper mattis, pulvinar dapibus leo.